Four Simple Tips for Better Composition
Have you ever wondered why you are instantly drawn to some photographs, but not to others? Or why some of your images lack that wow factor that you see in other’s. It may be related to how you compose your pictures. How a photograph is composed has a huge impact on how long we look at it. The longer our brain is allowed to wander through an image, the more likely we are to like it. Photographs that are not composed well do not have staying power, and are quickly discarded by our brain. In this article I want to discuss four very basic compositional tips. I won’t be talking about the “rule of thirds” or “leading lines”, but rather four pointers you should consider before you take a picture. These tips will save you a lot of post processing time, and will allow you to create much stronger images.
هل سبق لك أن تساءلت عن سبب انجذابك الفوري لبعض الصور الفوتوغرافية دون غيرها؟ أو لماذا تفتقر بعض صورك إلى عامل الإبهار الذي تراه في صور الآخرين. قد يكون الأمر مرتبطًا بكيفية تكوين صورك. إن كيفية تكوين الصورة لها تأثير كبير على المدة التي ننظر فيها إليها. كلما سمح لأدمغتنا بالتجول في الصورة لفترة أطول، زادت احتمالية إعجابنا بها. الصور التي لم يتم تركيبها بشكل جيد ليس لها قوة البقاء، ويتم التخلص منها بسرعة من قبل دماغنا. أريد في هذه المقالة مناقشة أربع نصائح تركيبية أساسية جدًا. لن أتحدث عن “قاعدة الأثلاث” أو “الخطوط البادئة”، بل عن أربع مؤشرات يجب عليك مراعاتها قبل التقاط الصورة. ستوفر لك هذه النصائح الكثير من وقت المعالجة اللاحقة، وستسمح لك بإنشاء صور أقوى بكثير.
Table of Contents
جدول المحتويات
الأفقي والرأسي 2) دورية الحدود، الكائنات المتقاطعة، التبسيط، الاستنتاج
Horizontals are a relatively simple thing to fix. It just takes practice and being aware of the horizon before you click your shutter. In most cameras you can turn on a grid display in the viewfinder. Try to make a conscious effort to level the horizon so that it is parallel with one of the gridlines. I have a tendency to drop my left elbow when I am holding my camera. I have to work hard to remember to lift it up so the Gulf of Mexico doesn’t drain off to the east!
This first shot of a windsurfer doesn’t look right because the horizon is tilted.
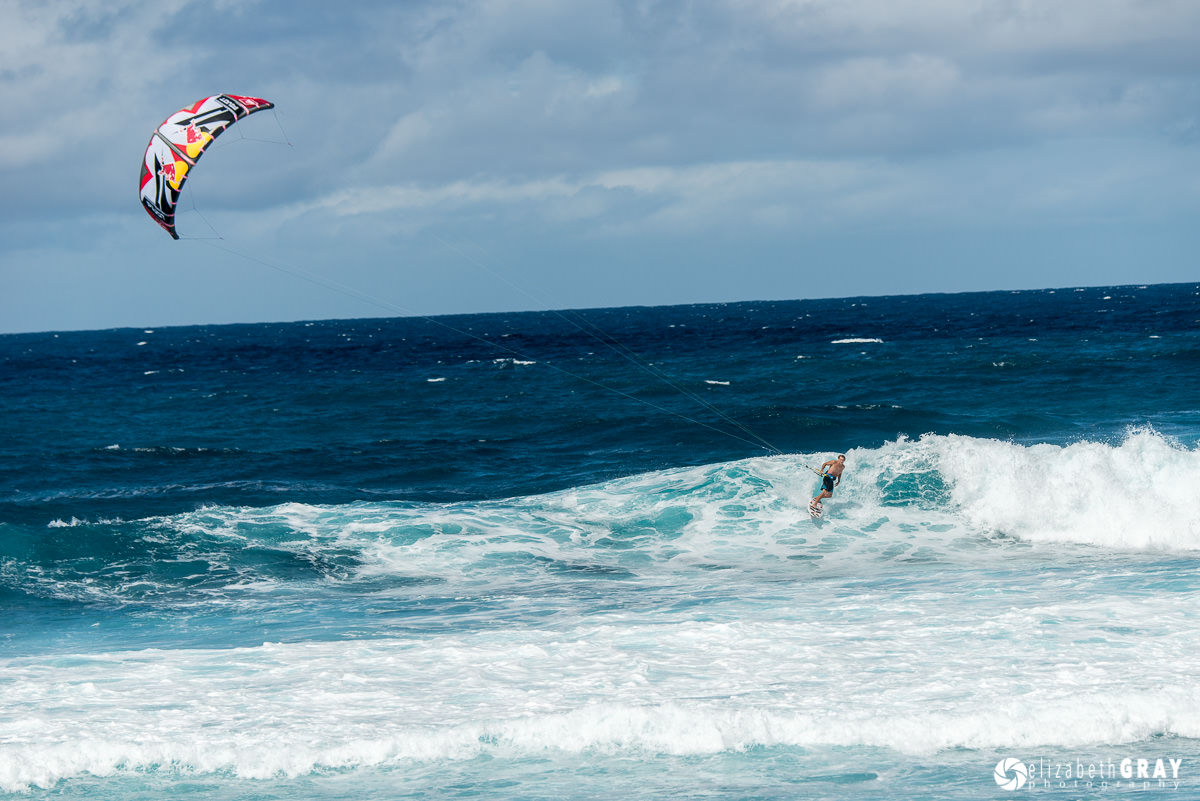 NIKON D800 + 80-400mm f/4.5-5.6 @ 195mm, ISO 200, 1/3200, f/6.3
Being more aware of the horizon led to a much better image here.
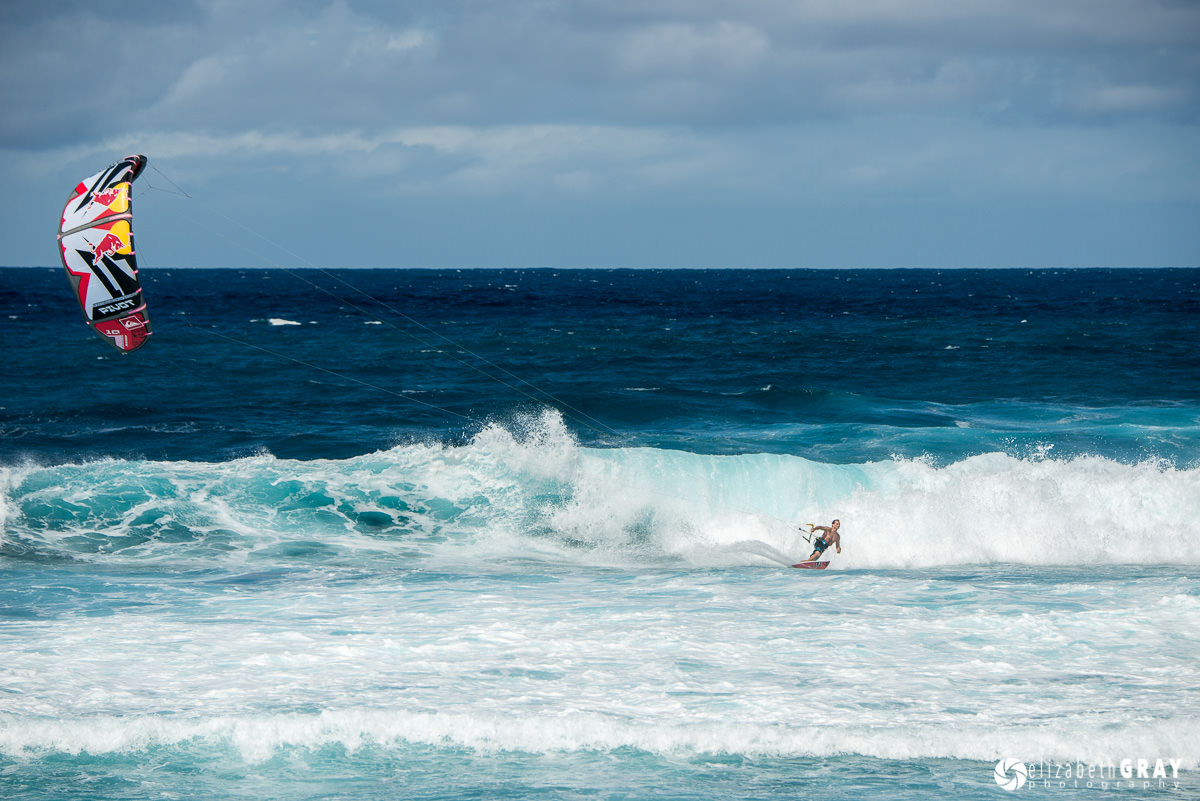 NIKON D800 + 80-400mm f/4.5-5.6 @ 195mm, ISO 200, 1/3200, f/6.3
1) الأفقي والعمودي
عندما يرى دماغنا شيئًا يعرف أنه يجب أن يكون أفقيًا، مثل الأفق البعيد، لكنه ليس كذلك، تنطلق أجراس التحذير. تخبرنا الغريزة أن هناك شيئًا خاطئًا. يُترجم هذا عادةً إلى “لا أحب هذه الصورة كثيرًا”. ويحدث نفس الشيء عندما لا تكون الأشياء التي يجب أن تكون عمودية، مثل المبنى، كذلك.
الأفقية هي شيء بسيط نسبيًا لإصلاحه. لا يتطلب الأمر سوى التدريب والإدراك للأفق قبل النقر على الغالق. في معظم الكاميرات، يمكنك تشغيل عرض الشبكة في عدسة الكاميرا. حاول أن تبذل مجهودًا واعيًا لتسوية الأفق بحيث يكون موازيًا لأحد خطوط الشبكة. أميل إلى إسقاط مرفقي الأيسر عندما أحمل الكاميرا. يجب أن أبذل قصارى جهدي لأتذكر رفعه حتى لا يتدفق خليج المكسيك إلى الشرق!
هذه اللقطة الأولى لراكب شراعي لا تبدو صحيحة لأن الأفق مائل.
كاميرا نيكون D800 + 80-400 مم f/4.5-5.6 @ 195 مم، ISO 200، 1/3200، f/6.3
أدى كونك أكثر وعيًا بالأفق إلى الحصول على صورة أفضل بكثير هنا.
كاميرا نيكون D800 + 80-400 مم f/4.5-5.6 @ 195 مم، ISO 200، 1/3200، f/6.3
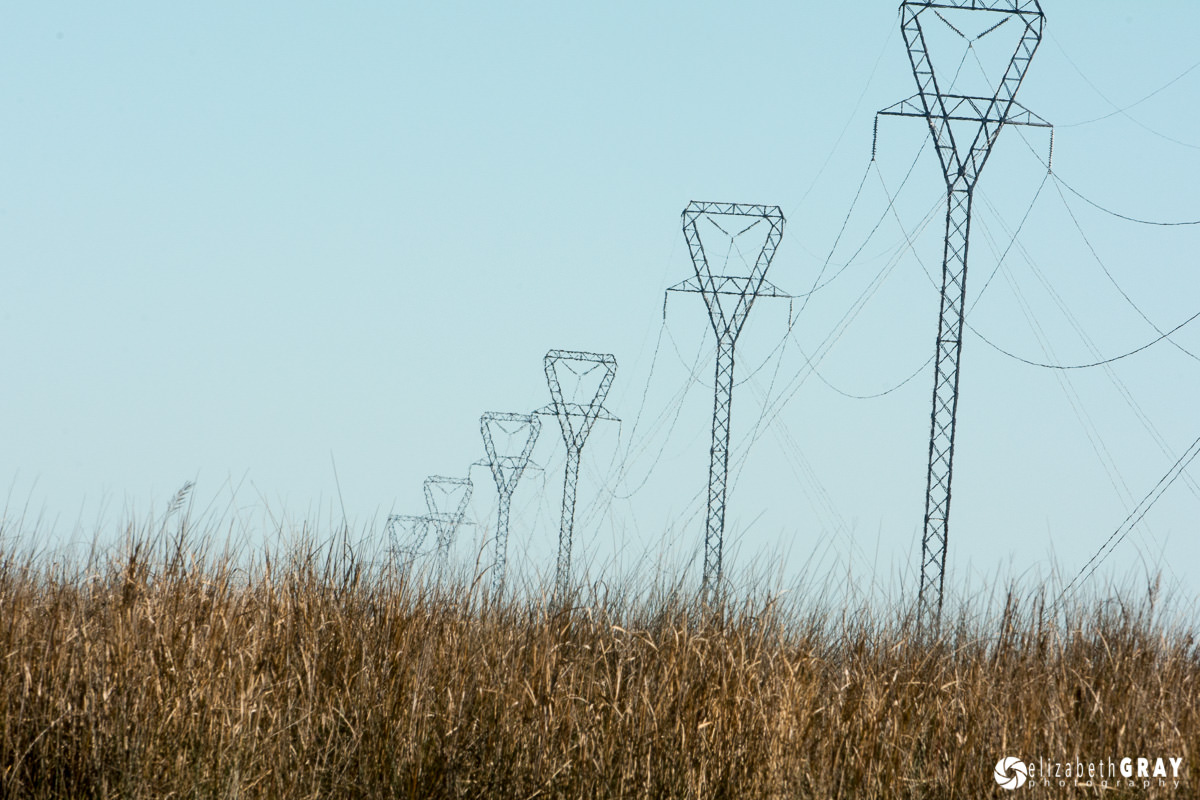 NIKON D7100 + 200-400mm f/4 @ 280mm, ISO 400, 1/320, f/18.0
In this situation, you need to turn your camera so that the poles are vertical. Use the layout grid in the viewfinder to help you do this, just like you did to level your horizon. For this shot, I was riding in a boat, so keeping my horizon level and verticals truly vertical took a bit more care. Here is a second image shot just a few seconds before this last one, and converted to black and white.
 NIKON D7100 + 200-400mm f/4 @ 280mm, ISO 400, 1/640, f/13.0
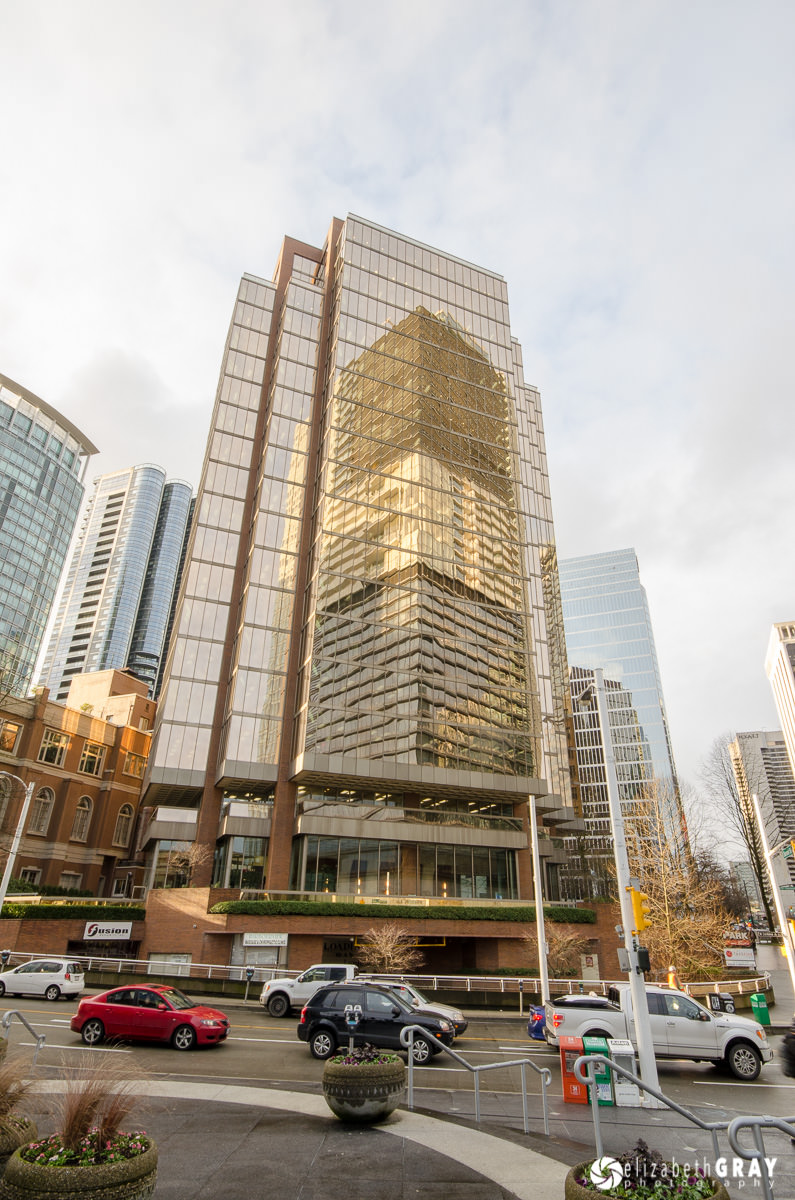
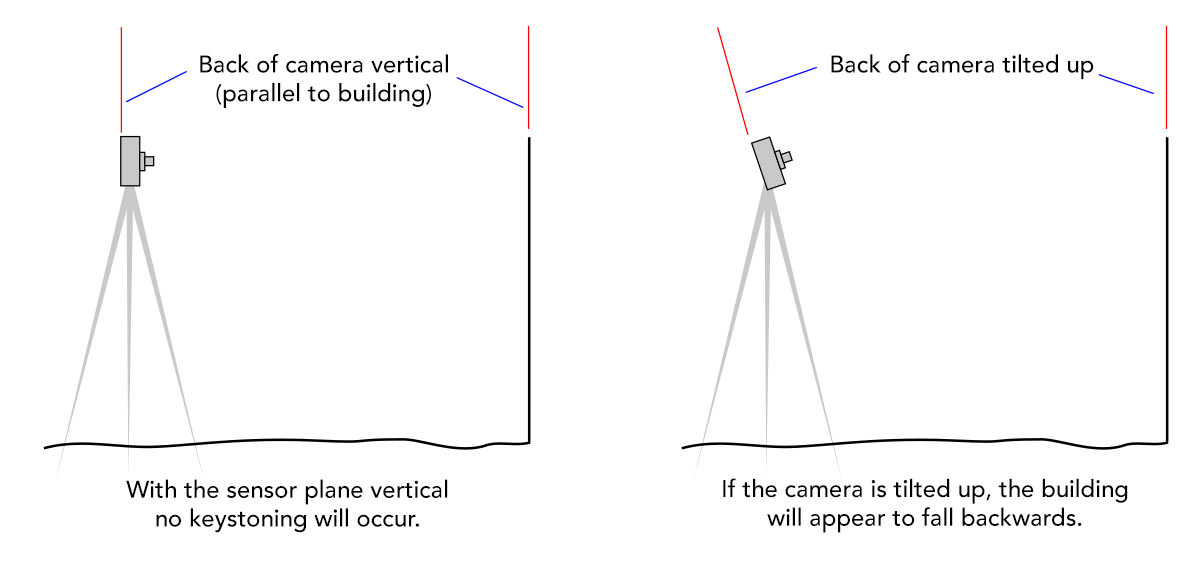
The second situation that can occur with vertical lines can be a bit more difficult to correct in-camera. I mention it in this article so you can be aware of it and correct it if possible. However, sometimes a cure can only be found using post-processing software or an expensive tilt-shift lens. In this photo, notice how the vertical building appears to be falling backwards. This is an effect called keystoning. Keystoning is defined as the converging of lines that are supposed to be parallel. It occurs when the sensor plane (aka the back of the camera) is not vertical.
 NIKON D7000 + 10-20mm f/4-5.6 @ 14mm, ISO 250, 1/15, f/16.0
يمكن أن تكون الأوضاع العمودية أكثر صعوبة بعض الشيء في الحفاظ على وضع مستقيم في عدسة الكاميرا. هناك مشكلتان مختلفتان يمكن أن تحدثا للخطوط العمودية. المشكلة الأولى تشبه الأفق المائل أعلاه. ويحدث ذلك عند تدوير الكاميرا، كما هو موضح في هذه الصورة التالية. لاحظ كيف أن أعمدة الكهرباء لا تقف في وضع مستقيم.كاميرا نيكون D7100 + 200-400 مم f/4 @ 280 مم، ISO 400، 1/320، f/18.0
في هذه الحالة، يتعين عليك إدارة الكاميرا بحيث تصبح الأعمدة رأسية. استخدم شبكة التخطيط في عدسة الكاميرا لمساعدتك في القيام بذلك، تمامًا كما فعلت لتسوية أفقك. في هذه اللقطة، كنت أركب قاربًا، لذا فإن الحفاظ على مستوى الأفق والعمودي بشكل عمودي حقًا يتطلب مزيدًا من الاهتمام. إليكم صورة ثانية تم التقاطها قبل ثوانٍ قليلة من الصورة الأخيرة، وتم تحويلها إلى الأسود والأبيض.
كاميرا نيكون D7100 + 200-400 مم f/4 @ 280 مم، ISO 400، 1/640، f/13.0
قد يكون تصحيح الموقف الثاني الذي يمكن أن يحدث مع الخطوط العمودية أكثر صعوبة داخل الكاميرا. أذكرها في هذا المقال حتى تكون على علم بها وتصحيحها إن أمكن. ومع ذلك، في بعض الأحيان لا يمكن العثور على علاج إلا باستخدام برامج ما بعد المعالجة أو عدسة قابلة للإمالة باهظة الثمن. في هذه الصورة، لاحظ كيف يبدو المبنى العمودي وكأنه يتساقط للخلف. وهذا هو التأثير الذي يسمى حجر الزاوية. يتم تعريف Keystoning على أنه تقارب الخطوط التي من المفترض أن تكون متوازية. ويحدث ذلك عندما لا يكون مستوى المستشعر (المعروف أيضًا باسم الجزء الخلفي من الكاميرا) عموديًا.
كاميرا نيكون D7000 + 10-20 مم f/4-5.6 @ 14 مم، ISO 250، 1/15، f/16.0
If at all possible, try to keep the back of the camera parallel to the face of the building so that the sensor plane remains vertical. In this sketch, the camera on the left will not cause any keystoning while the camera on the right will.
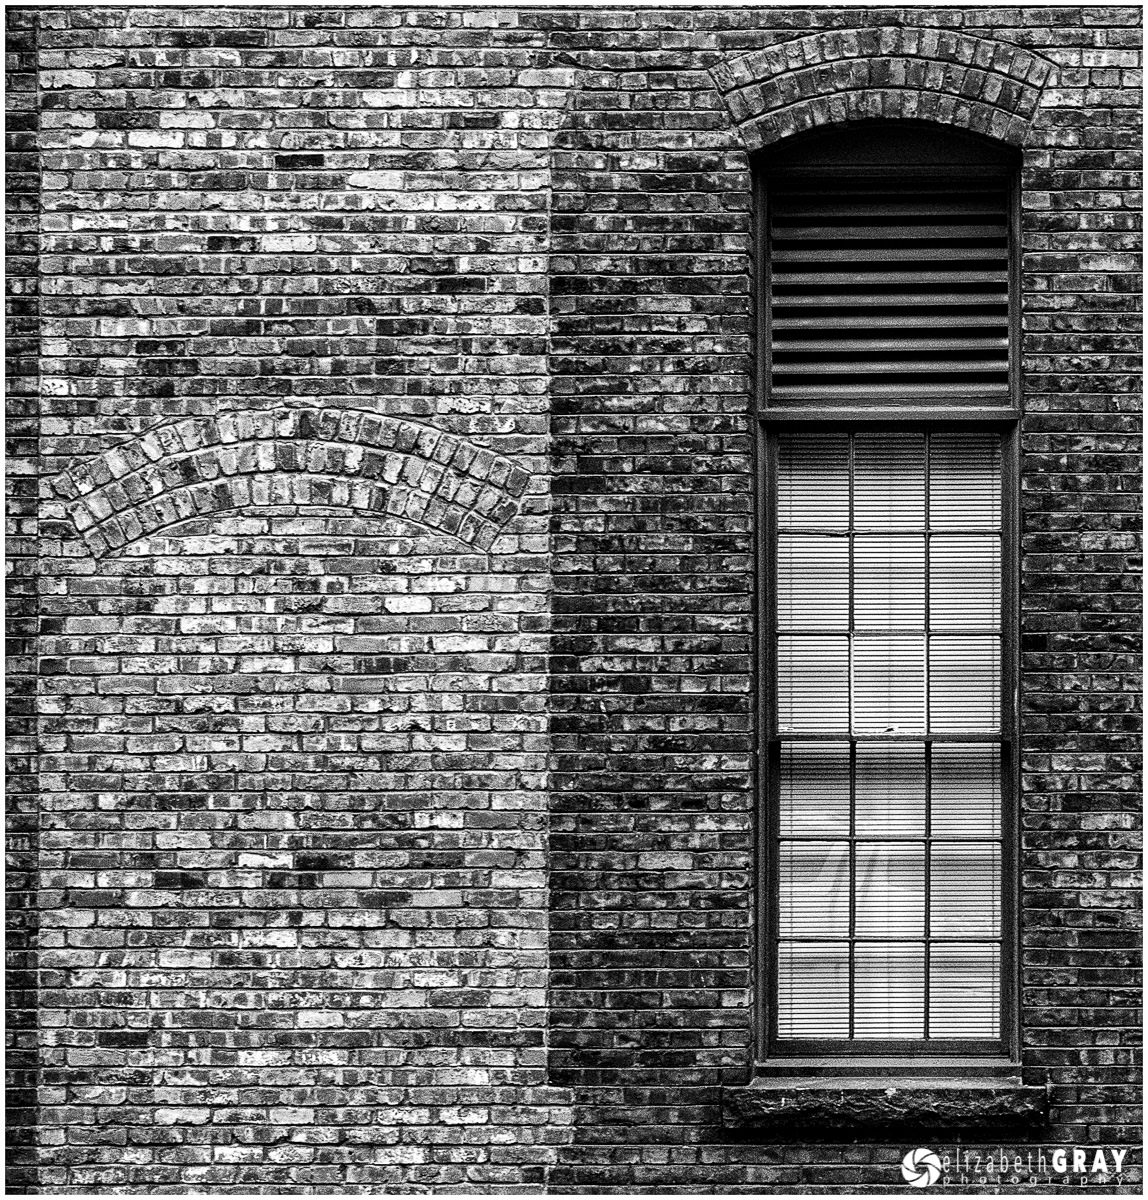
For this photo of an old window and brick wall, I had to stand across the street on a set of stairs so that I would be up high enough to look straight on at the wall. Had I stood at street level, I would have had to angle my camera upwards. The only way to stop keystoning in the field is to keep the back of the camera vertical.
 NIKON D7000 + 24-70mm f/2.8 @ 64mm, ISO 1250, 1/40, f/8.0
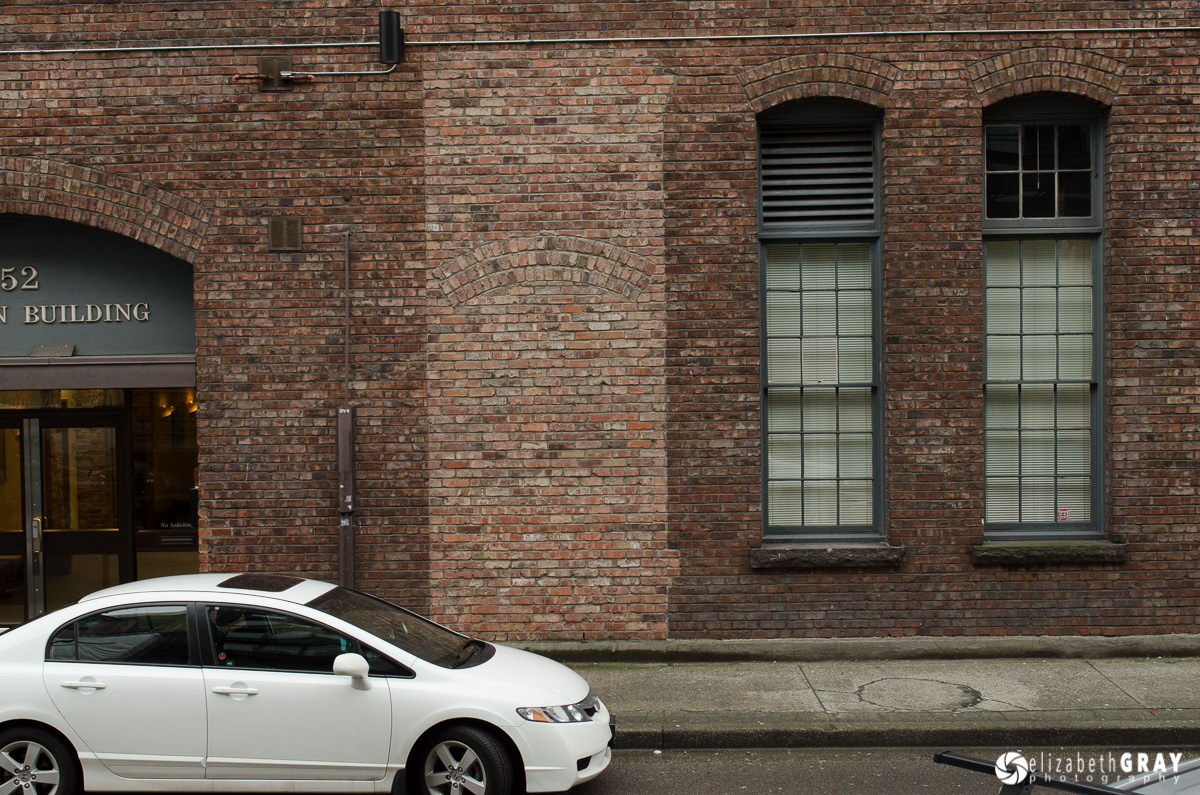
This photograph gives you an idea of where I was standing to keep the wall from tilting back.
 NIKON D7000 + 24-70mm f/2.8 @ 31mm, ISO 1250, 1/60, f/8.0
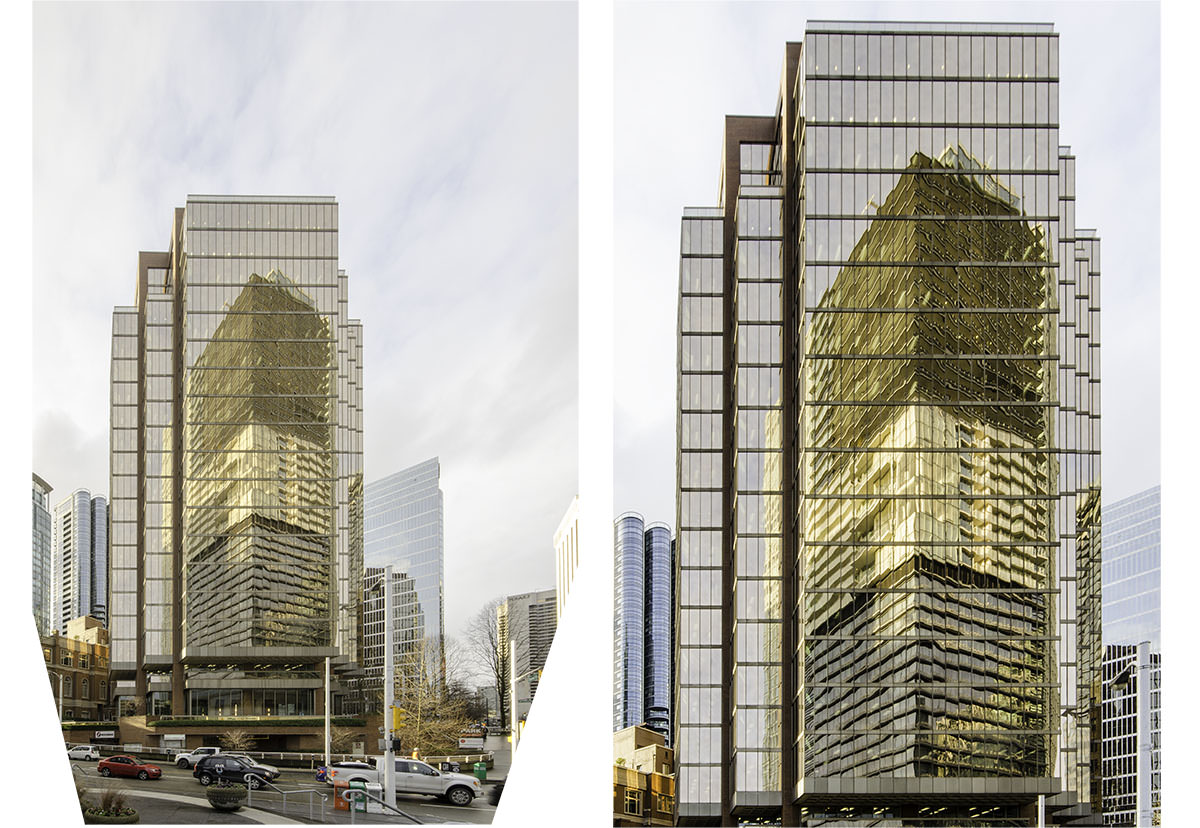
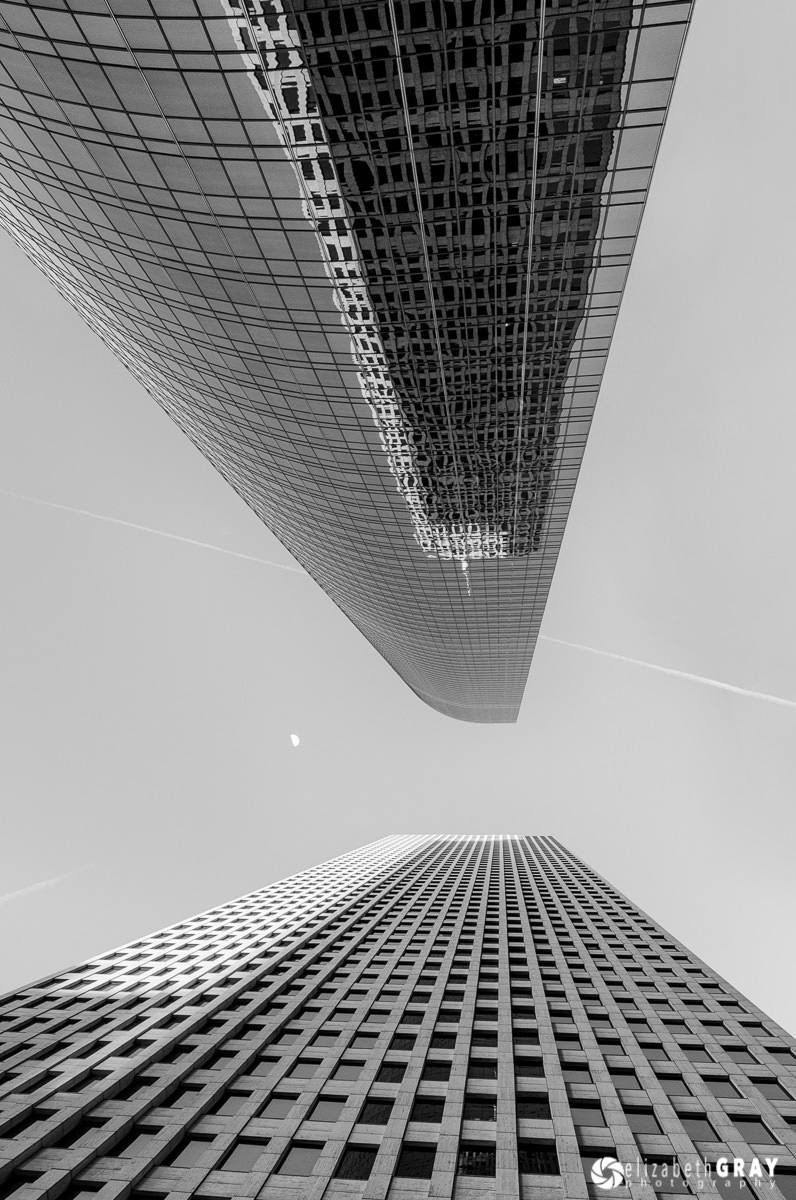
Sometimes it is impossible to shoot from a position that keeps the back of the camera vertical. For example, if you want to take a photo of a tall building, even with a very wide-angle lens you will have to angle the camera upwards. This occurred in the photo of the high-rise above. In situations like this you will have to correct the keystoning in post-processing. This is very easy to do in any program that offers perspective corrections, like Lightroom. In a future article I will discuss how to correct perspective in Lightroom. In the mean time however, if you can’t avoid tipping your camera upwards, give your subject lots of room. You will need to do some cropping after you correct the perspective in post. Here is the photo of the high-rise after I did a perspective correction in Lightroom. Notice how the final version had to be cropped quite substantially because I lost the bottom corners of the image when the perspective was corrected.
 NIKON D7000 + 10-20mm f/4-5.6 @ 14mm, ISO 250, 1/15, f/16.0
إذا كان ذلك ممكنًا، حاول إبقاء الجزء الخلفي من الكاميرا موازيًا لوجه المبنى بحيث يظل مستوى المستشعر في وضع عمودي. في هذا الرسم التخطيطي، لن تتسبب الكاميرا الموجودة على اليسار في أي تشويش بينما ستتسبب الكاميرا الموجودة على اليمين في ذلك.

بالنسبة إلى هذه الصورة لنافذة قديمة وجدار من الطوب، كان علي أن أقف في الجهة المقابلة من الشارع على مجموعة من السلالم حتى أكون مرتفعًا بدرجة كافية لأنظر مباشرة إلى الحائط. لو وقفت على مستوى الشارع، لاضطررت إلى رفع الكاميرا لأعلى. الطريقة الوحيدة لإيقاف الانحراف في الميدان هي إبقاء الجزء الخلفي من الكاميرا في وضع عمودي.
كاميرا نيكون D7000 + 24-70 مم f/2.8 @ 64 مم، ISO 1250، 1/40، f/8.0
تعطيك هذه الصورة فكرة عن المكان الذي كنت أقف فيه لمنع الجدار من الميل للخلف.
كاميرا نيكون D7000 + 24-70 مم f/2.8 @ 31 مم، ISO 1250، 1/60، f/8.0
في بعض الأحيان يكون من المستحيل التصوير من وضع يبقي الجزء الخلفي من الكاميرا في وضع عمودي. على سبيل المثال، إذا كنت تريد التقاط صورة لمبنى طويل، حتى باستخدام عدسة ذات زاوية واسعة جدًا، فسيتعين عليك توجيه الكاميرا لأعلى. حدث هذا في صورة الشاهقة أعلاه. في مثل هذه المواقف، سيتعين عليك تصحيح حجر المفاتيح في مرحلة ما بعد المعالجة. من السهل جدًا القيام بذلك في أي برنامج يقدم تصحيحات للمنظور، مثل Lightroom. في مقال مستقبلي سأناقش كيفية تصحيح المنظور في Lightroom. ومع ذلك، في هذه الأثناء، إذا لم تتمكن من تجنب رفع الكاميرا للأعلى، فامنح هدفك مساحة كبيرة. سوف تحتاج إلى القيام ببعض الاقتصاص بعد تصحيح المنظور في المنشور. إليكم صورة المبنى الشاهق بعد أن قمت بتصحيح المنظور في Lightroom. لاحظ كيف كان لا بد من اقتصاص النسخة النهائية إلى حد كبير لأنني فقدت الزوايا السفلية للصورة عندما تم تصحيح المنظور.
كاميرا نيكون D7000 + 10-20 مم f/4-5.6 @ 14 مم، ISO 250، 1/15، f/16.0
 NIKON D7000 + 14-24mm f/2.8 @ 24mm, ISO 400, 1/50, f/11.0
 NIKON D7000 + 10.5mm f/2.8 @ 10.5mm, ISO 200, 1/640, f/10.0
 NIKON D7000 + 24-70mm f/2.8 @ 70mm, ISO 200, 1/13, f/9.0على الجانب الآخر، يمكن التقاط بعض الصور المثيرة للاهتمام عن طريق الإمالة العمودية والأفقية عمدًا. إذا حاولت ذلك، افعل ذلك بحماسة! تريد التأكد من أن المشاهد يدرك أن اختيارك للتكوين كان مقصودًا.
NIKON D7000 + 14-24 مم f/2.8 @ 24 مم، ISO 400، 1/50، f/11.0 NIKON D7000 + 10.5 مم f/2.8 @ 10.5 مم، ISO 200، 1/640، f/10.0 NIKON D7000 + 24-70 ملم f/2.8 @ 70 ملم، ISO 200، 1/13، f/9.0
2) Border Patrol
One of the most common distractions I see when critiquing photos are bits and pieces protruding into the edges of the frame. These distractions cause your eye to wander away from the main subject. Yes, you can “fix” them in post-processing by cropping or cloning, but why not deal with them at the source? These edge distractions often take the form of branches, bright spots, or a small bit of something that just clearly doesn’t belong in the photo. When you are framing an image, before you take the shot, look around the borders of your frame. Are there any distracting elements? If there are, adjust your composition just a bit. Usually a simple step to one side, or a slight change in camera angle can fix the problem before it is a problem! When I take a photo, besides checking the histogram for exposure, I quickly glance around the edge of my frame to make sure that I haven’t got any of those nasty little distractions that try to take the spotlight away from my subject.
2) دورية الحدود
أحد أكثر عوامل التشتيت شيوعًا التي أراها عند انتقاد الصور هي الأجزاء والأجزاء البارزة في حواف الإطار. تتسبب هذه الانحرافات في ابتعاد عينك عن الموضوع الرئيسي. نعم، يمكنك “إصلاحها” في مرحلة ما بعد المعالجة عن طريق الاقتصاص أو الاستنساخ، ولكن لماذا لا تتعامل معها من المصدر؟ غالبًا ما تأخذ عوامل التشتيت هذه شكل فروع أو نقاط مضيئة أو جزء صغير من شيء من الواضح أنه لا ينتمي إلى الصورة. عندما تقوم بتأطير صورة، قبل التقاط اللقطة، انظر حول حدود الإطار. هل هناك أي عناصر تشتيت الانتباه؟ إذا كان هناك، قم بتعديل التكوين الخاص بك قليلاً. عادة، خطوة بسيطة إلى جانب واحد، أو تغيير طفيف في زاوية الكاميرا يمكن أن يحل المشكلة قبل أن تصبح مشكلة! عندما ألتقط صورة، إلى جانب التحقق من الرسم البياني للتعريض الضوئي، ألقي نظرة سريعة حول حافة إطاري للتأكد من عدم وجود أي من تلك الانحرافات الصغيرة السيئة التي تحاول إبعاد الضوء عن هدفي.
 NIKON D7000 + 24-70mm f/2.8 @ 42mm, ISO 400, 1/4, f/11.0
 NIKON D7000 + 24-70mm f/2.8 @ 34mm, ISO 400, 1/5, f/11.0
عندما التقطت هذه الصورة لاحظت وجود فرع مشتت للانتباه في الحافة اليمنى العليا. إذا حاولت قص هذا المنشور، لكنت قد فقدت بعضًا من الشجرة الحمراء في الخلفية. ومن خلال التحول إلى اليسار، تمكنت من إزالة الفرع المشتت للانتباه. وكمكافأة إضافية، تمكنت الآن من الحصول على المجموعة الكاملة من الأشجار الحمراء في الخلفية.NIKON D7000 + 24-70 مم f/2.8 @ 42 مم، ISO 400، 1/4، f/11.0 NIKON D7000 + 24-70 مم f/2.8 @ 34 مم، ISO 400، 1/5، f/11.0
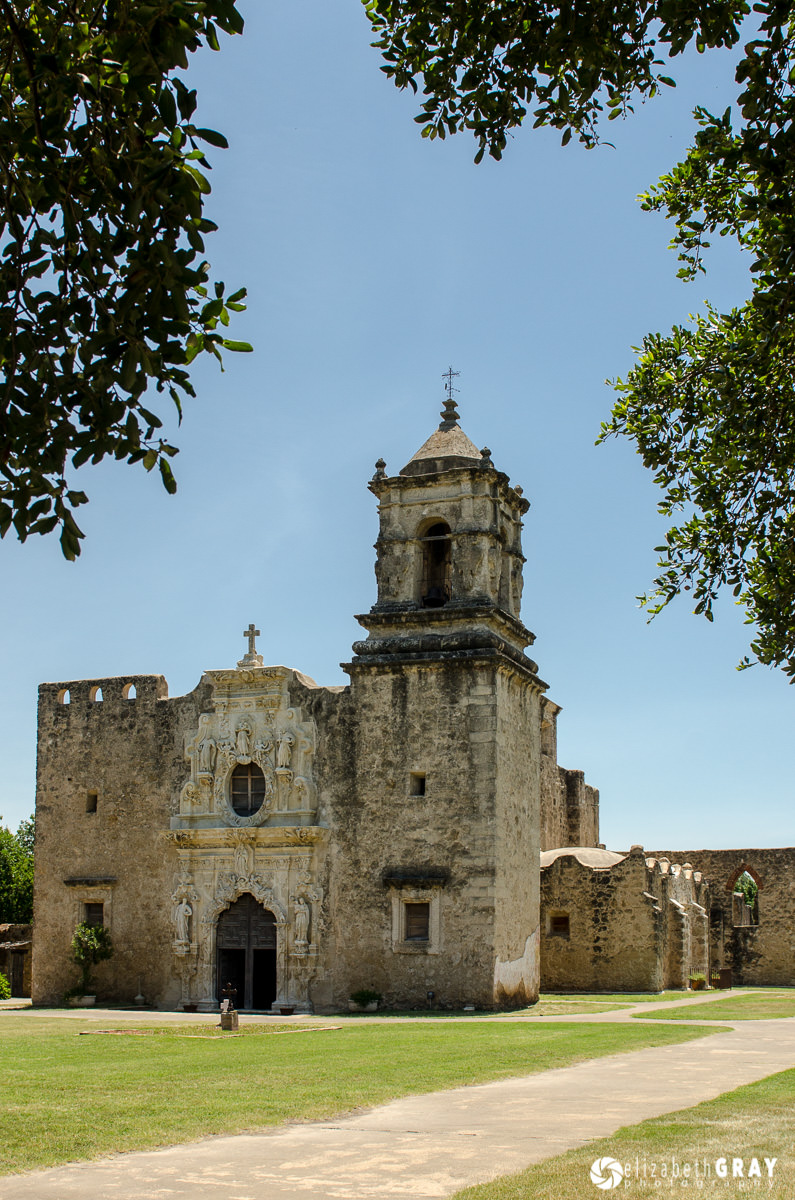
 NIKON D7000 + 24-70mm f/2.8 @ 38mm, ISO 200, 1/1000, f/6.3
Here is the final composition. The trees around the edge of the frame are intentional and help to frame the mission. My vantage point also eliminated the shadow on the ground. As a side note, the mission does display some slight keystoning, but this could be corrected in post.
 NIKON D7000 + 24-70mm f/2.8 @ 26mm, ISO 200, 1/1000, f/6.3في هذه الصور أدناه، قمت بتجربة عدة وجهات نظر مختلفة. هناك فرع واحد مزعج في الصورة الأولى. وفي الثانية، حاولت دون جدوى تأطير الكنيسة باستخدام الشجرة. ومع ذلك، أصبح لدي الآن ظل مشتت للانتباه بالإضافة إلى اثنين من المتسللين على طول الحافة اليمنى. لا تزال المحاولة الثالثة تحتوي على تشتيت حدودي بسيط. ونعم، أعرف كيفية استخدام أداة الاستنساخ وفرشاة معالجة البقع في Photoshop! ومع ذلك، إذا تمكنت من القيام بذلك بشكل صحيح داخل الكاميرا، فسيوفر لي الكثير من وقت المعالجة اللاحقة. هذه كلها صور غير مقصوصة.
كاميرا نيكون D7000 + 24-70 مم f/2.8 @ 38 مم، ISO 200، 1/1000، f/6.3
وهنا التركيبة النهائية . الأشجار الموجودة حول حافة الإطار مقصودة وتساعد في تأطير المهمة. وجهة نظري أيضًا قضت على الظل الموجود على الأرض. كملاحظة جانبية، تعرض المهمة بعض التشويش الطفيف، ولكن يمكن تصحيح هذا لاحقًا.
كاميرا نيكون D7000 + 24-70 مم f/2.8 @ 26 مم، ISO 200، 1/1000، f/6.3
3) Intersecting Objects
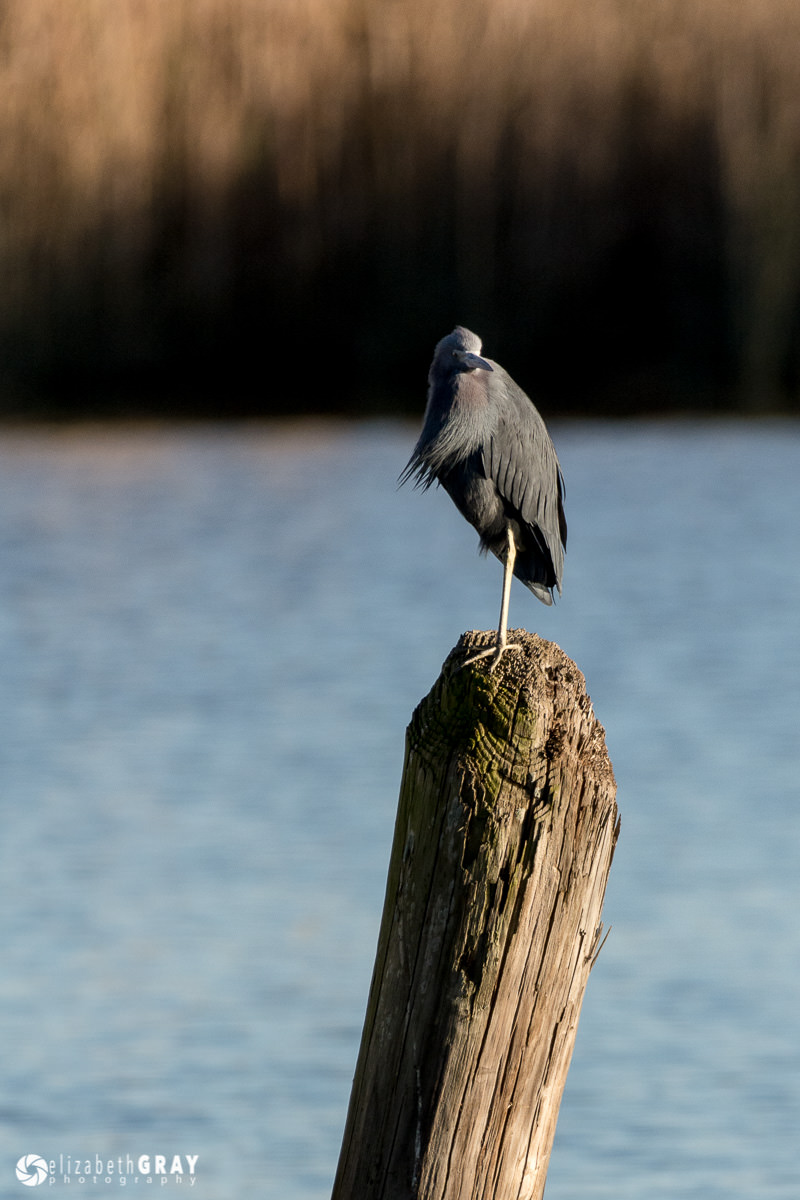
When two unrelated visual elements touch or overlap, they often draw unintended attention to their intersection. In this series of photos I was trying to capture a little blue heron on a piling. In the first picture you can see that his head is merging with the dark grasses across the bayou. By taking a few steps to the left and climbing a small incline, I was able to get a much better image.
 NIKON D7100 + 200-500mm f/5.6 @ 500mm, ISO 400, 1/1250, f/6.3
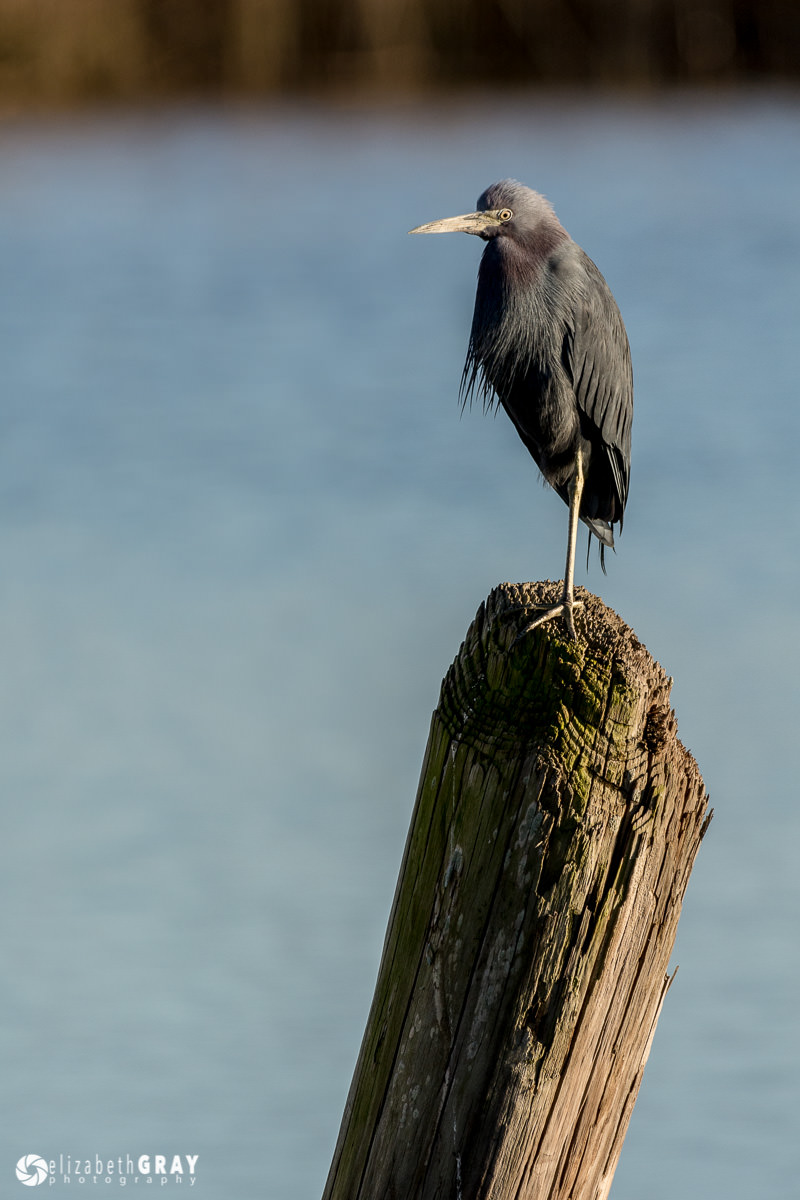 NIKON D7100 + 200-500mm f/5.6 @ 500mm, ISO 400, 1/1000, f/7.1
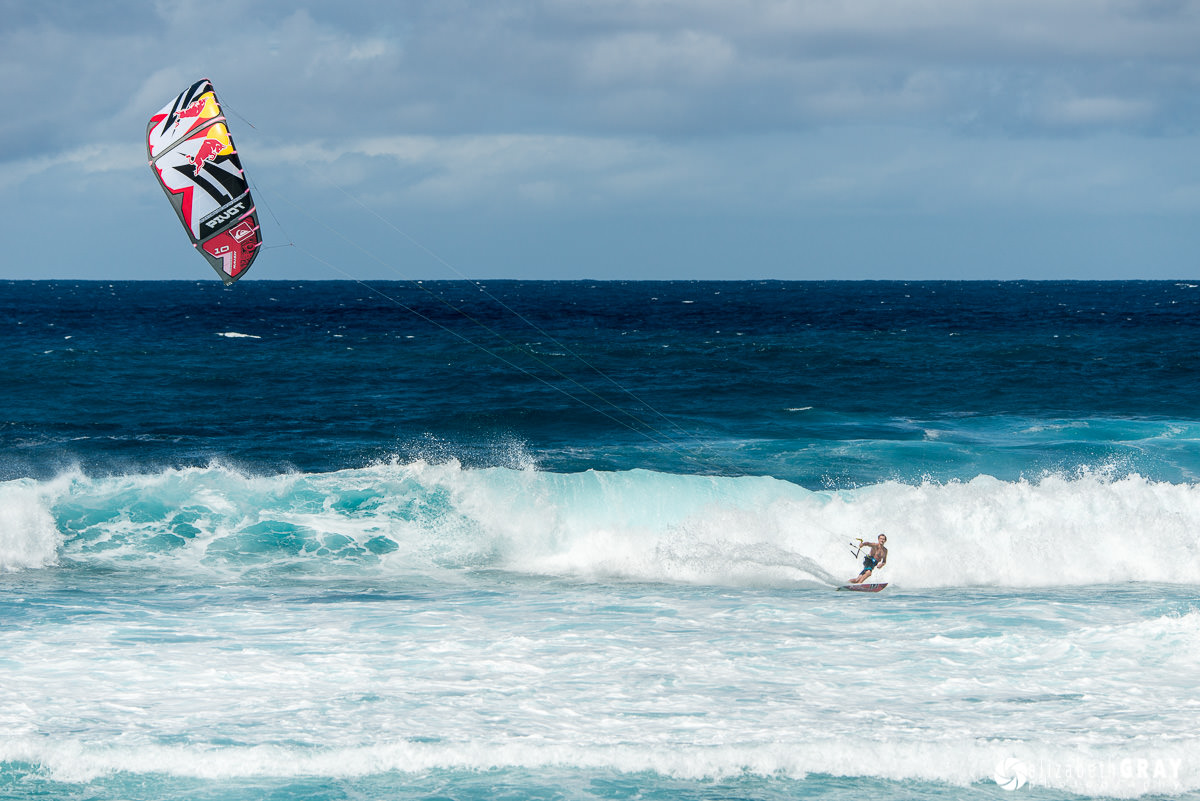
Here is another frame from the windsurfer series. Here the kite and the horizon brush up against each other. I don’t feel this is as strong an image as the one at the top of this post where the kite cuts the horizon closer to its center. In that image, although two important elements of the frame intersect, they do so in a commanding way, and not half-hardidly.
 NIKON D800 + 80-400mm f/4.5-5.6 @ 195mm, ISO 200, 1/3200, f/6.3
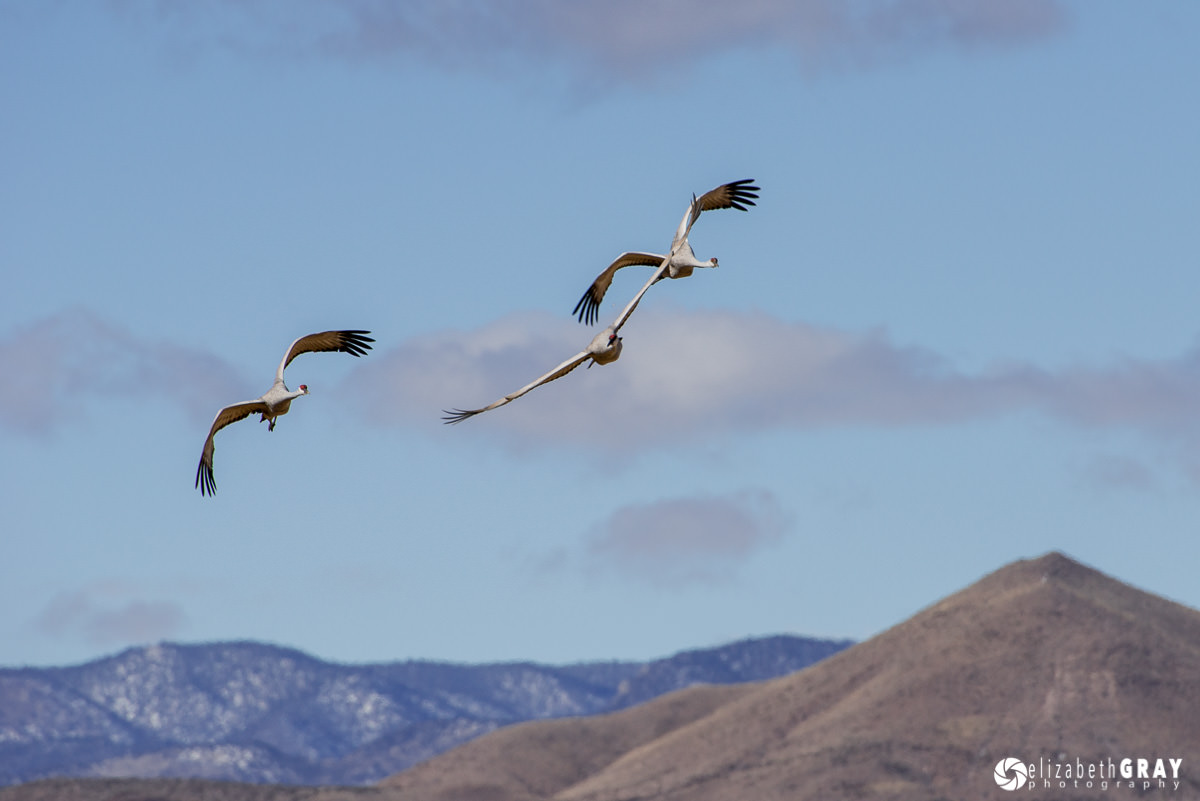
Sometimes it is not possible to change your vantage point. However, patience often pays off. Notice in this first image of several sandhill cranes in flight, that two of the birds’ wings are overlapping. Waiting just a few seconds, and keeping my fingers crossed, I captured an image where I can clearly see all the birds individually.
 NIKON D800 + 200-400mm f/4 @ 550mm, ISO 400, 1/1600, f/8.0
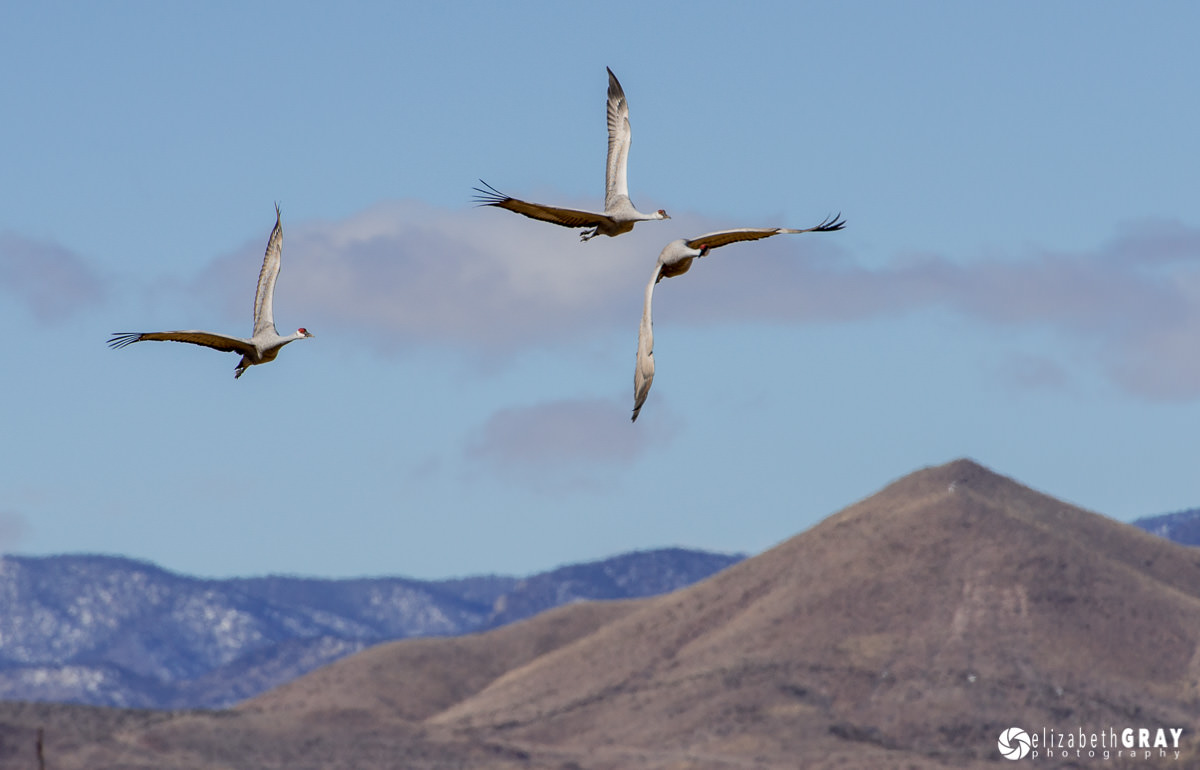 NIKON D800 + 200-400mm f/4 @ 550mm, ISO 400, 1/1600, f/8.0
3) الأجسام المتقاطعة
عندما يتلامس عنصران مرئيان غير مرتبطين أو يتداخلان، فإنهما غالبًا ما يلفتان الانتباه غير المقصود إلى تقاطعهما. في هذه السلسلة من الصور كنت أحاول التقاط مالك الحزين الأزرق الصغير على كومة. في الصورة الأولى يمكنك أن ترى أن رأسه يندمج مع الأعشاب الداكنة عبر الخليج. ومن خلال اتخاذ بضع خطوات إلى اليسار وتسلق منحدر صغير، تمكنت من الحصول على صورة أفضل بكثير.
NIKON D7100 + 200-500 مم f/5.6 @ 500 مم، ISO 400، 1/1250، f/6.3 NIKON D7100 + 200-500 مم f/5.6 @ 500 مم، ISO 400، 1/1000، f/7.1
هنا إطار آخر من سلسلة ركوب الأمواج. هنا تصطدم الطائرة الورقية والأفق ببعضهما البعض. لا أشعر أن هذه الصورة قوية مثل تلك الموجودة في الجزء العلوي من هذا المنشور حيث تقطع الطائرة الورقية الأفق بالقرب من مركزها. في تلك الصورة، على الرغم من تقاطع عنصرين مهمين في الإطار، إلا أنهما يفعلان ذلك بطريقة مسيطرة، وليس بنصف صلابة.
كاميرا نيكون D800 + 80-400 مم f/4.5-5.6 @ 195 مم، ISO 200، 1/3200، f/6.3
في بعض الأحيان ليس من الممكن تغيير وجهة نظرك. ومع ذلك، الصبر غالبا ما يؤتي ثماره. لاحظ في هذه الصورة الأولى للعديد من طيور الكركي الرملية أثناء الطيران، أن جناحي الطائر متداخلان. انتظرت بضع ثوانٍ فقط، وأبقيت أصابعي متقاطعة، والتقطت صورة يمكنني من خلالها رؤية جميع الطيور بشكل فردي بوضوح.
NIKON D800 + 200-400 مم f/4 @ 550 مم، ISO 400، 1/1600، f/8.0 NIKON D800 + 200-400 مم f/4 @ 550 مم، ISO 400، 1/1600، f/8.0
4) Simplifying
It is easy to have your subject become lost in a busy or cluttered image. Whenever possible, try composing so nothing competes with the subject. This can be done a couple of ways.
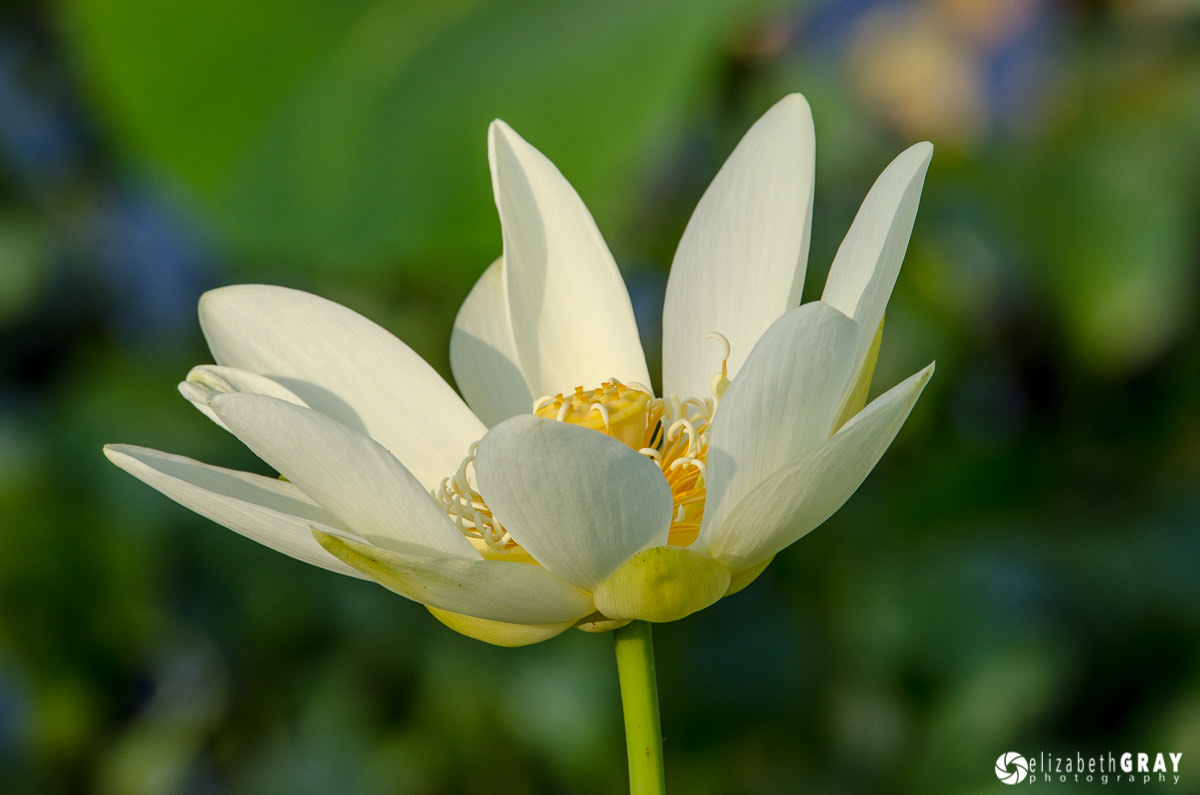
Try shooting the subject from different angles. Sometimes changing your perspective, even slightly can be the difference between a good photo and a great one. Here are two images of the same yellow lotus flower taken a few seconds apart. Although the background is nicely blurred in this shot, it is very busy. There are several highlights at the top right that distract the viewer from the bloom.
 NIKON D7000 + 200-400mm f/4 @ 450mm, ISO 200, 1/200, f/11
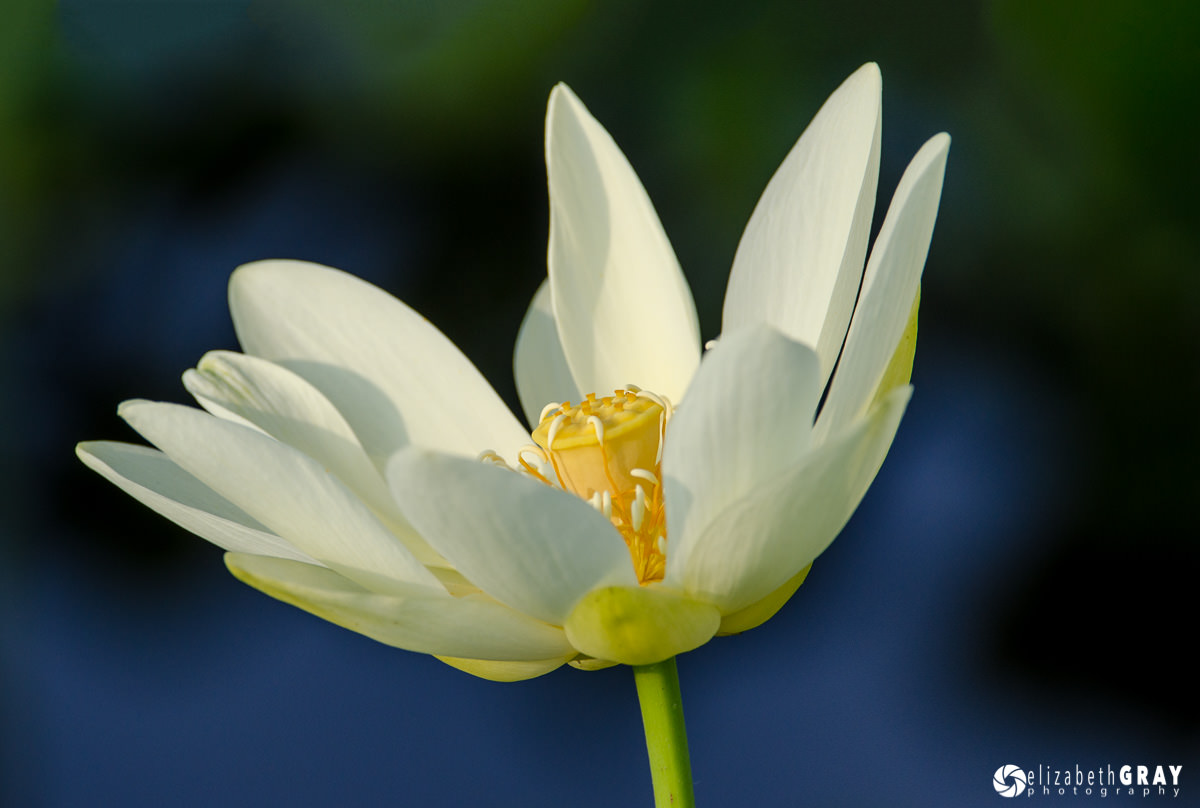
For this photo, I positioned myself further to the right of the plant. This put the bloom in front of the water and not as much of the vegetation. The result was an image with all the focus on the flower and none on the background.
 NIKON D7000 + 200-400mm f/4 @ 400mm, ISO 200, 1/640, f/5.6
4) التبسيط
من السهل أن يضيع هدفك في صورة مزدحمة أو مزدحمة. حاول التأليف كلما أمكن ذلك حتى لا يتنافس أي شيء مع الموضوع. يمكن إجراء ذلك بطريقتين.
حاول تصوير الهدف من زوايا مختلفة. في بعض الأحيان، قد يؤدي تغيير وجهة نظرك، ولو بشكل بسيط، إلى إحداث فرق بين صورة جيدة وصورة رائعة. إليك صورتان لنفس زهرة اللوتس الصفراء تم التقاطهما بفارق بضع ثوانٍ. على الرغم من أن الخلفية غير واضحة بشكل جيد في هذه اللقطة، إلا أنها مزدحمة للغاية. هناك العديد من النقاط البارزة في أعلى اليمين والتي تصرف انتباه المشاهد عن الإزهار.
كاميرا نيكون D7000 + 200-400 مم f/4 @ 450 مم، ISO 200، 1/200، f/11
في هذه الصورة، وضعت نفسي على يمين النبات. يؤدي ذلك إلى وضع الزهرة أمام الماء وليس أمام قدر كبير من النباتات. وكانت النتيجة صورة مع كل التركيز على الزهرة وليس على الخلفية.
كاميرا نيكون D7000 + 200-400 مم f/4 @ 400 مم، ISO 200، 1/640، f/5.6
Here is another example of how changing perspective can improve a picture. The top left corner of this first shot completely takes away from the branch and its beautiful fall foliage. There is even a telephone pole visible in the background. Near the top right corner is a bright white spot that also detracts from the subject.
 NIKON D7000 + 200-400mm f/4 @ 220mm, ISO 800, 1/80, f/10.0
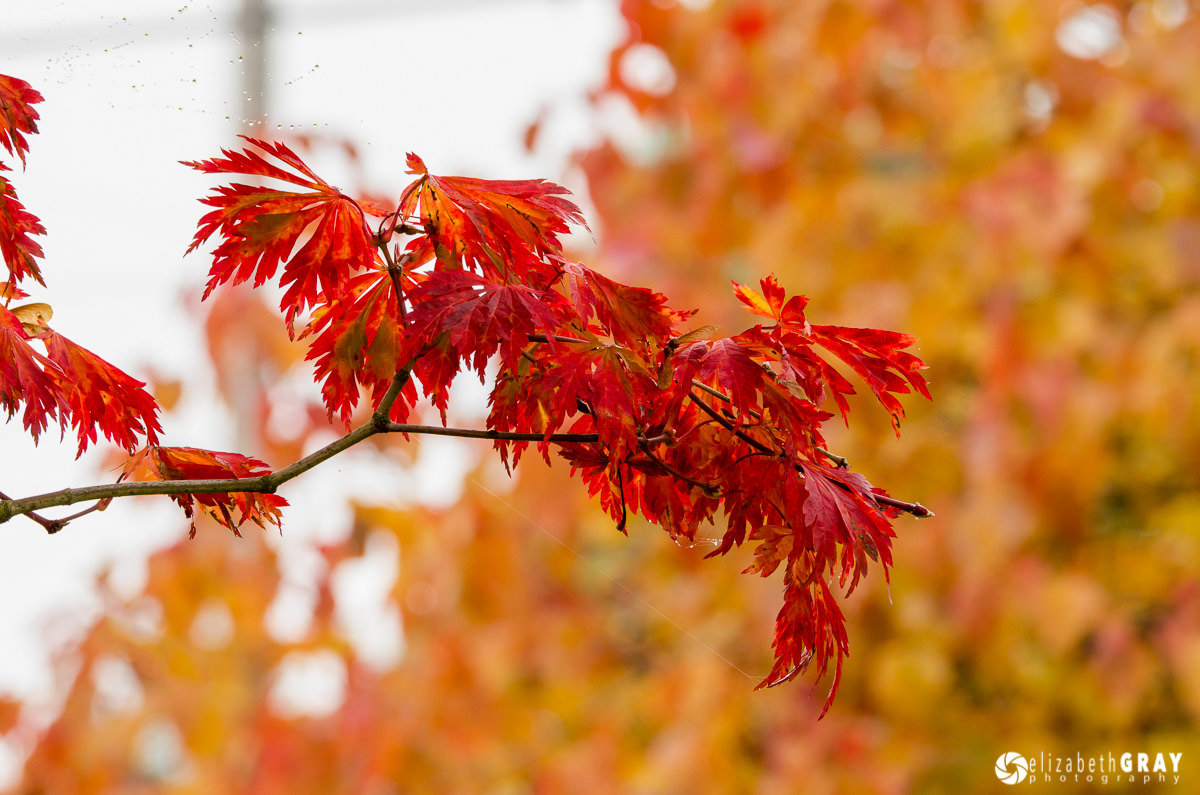
Moving to the left, and stepping a bit closer has created a much better image.
 NIKON D7000 + 200-400mm f/4 @ 220mm, ISO 800, 1/50, f/10.0
فيما يلي مثال آخر لكيفية تأثير تغيير المنظور على تحسين الصورة. الزاوية العلوية اليسرى من هذه اللقطة الأولى تزيل تمامًا الفرع وأوراق الشجر الجميلة المتساقطة. يوجد أيضًا عمود هاتف مرئي في الخلفية. بالقرب من الزاوية اليمنى العليا توجد نقطة بيضاء ساطعة تنتقص أيضًا من الموضوع.
كاميرا نيكون D7000 + 200-400 مم f/4 @ 220 مم، ISO 800، 1/80، f/10.0
أدى الانتقال إلى اليسار والاقتراب قليلاً إلى إنشاء صورة أفضل بكثير.
كاميرا نيكون D7000 + 200-400 مم f/4 @ 220 مم، ISO 800، 1/50، f/10.0
Another way to simplify your composition is to clean up the scene before you take the picture. Pick up any litter. If there is a distracting object, temporarily move it! Just make sure that you put back everything before you leave, except the litter! That goes in the trashcan! I have a short length of string in my camera bag and some cloths pegs. I use them to gently pull back branches when I’m taking flower shots and macro images. If I’m in my own garden, I often do some “pruning” if I notice a wayward branch. Don’t try this at a public garden or park though, the string and cloths pegs will work great here.
In this shot, notice the piece of tape in the corner and my shadow. I know I could have fixed both of these using Photoshop. But I can guarantee you that it would take a hundred times longer than it did for me to bend down, pick up the trash, move so that my shadow was not in the frame and take a second image.
 NIKON D7000 + 24-70mm f/2.8 @ 58mm, ISO 160, 1/125, f/11.0
Raw Image
This second image is much “cleaner” to look at!
 NIKON D7000 + 24-70mm f/2.8 @ 58mm, ISO 160, 1/250, f/8.0
Processed in Lightroom
هناك طريقة أخرى لتبسيط التركيب وهي تنظيف المشهد قبل التقاط الصورة. التقط أي فضلات. إذا كان هناك جسم مشتت للانتباه، حركه مؤقتًا! فقط تأكد من إعادة كل شيء قبل المغادرة، باستثناء القمامة! سيتم إرسال ذلك إلى سلة المهملات! لدي خيط قصير في حقيبة الكاميرا وبعض أوتاد الملابس. أستخدمها لسحب الفروع للخلف برفق عندما أقوم بالتقاط صور للزهور وصور ماكرو. إذا كنت في حديقتي الخاصة، فغالبًا ما أقوم ببعض “التقليم” إذا لاحظت فرعًا ضالًا. لا تجرب ذلك في حديقة عامة أو حديقة عامة، فستعمل الخيوط وأوتاد الملابس بشكل رائع هنا.
في هذه اللقطة، لاحظ قطعة الشريط في الزاوية وظلي. أعلم أنه كان بإمكاني إصلاح كلا الأمرين باستخدام Photoshop. لكن يمكنني أن أؤكد لك أن الأمر سيستغرق وقتًا أطول بمائة مرة من الوقت الذي كنت أستغرقه للانحناء والتقاط سلة المهملات والتحرك حتى لا يكون ظلي في الإطار والتقاط صورة ثانية.
كاميرا نيكون D7000 + 24-70 مم f/2.8 @ 58 مم، ISO 160، 1/125، f/11.0
صورة خام
هذه الصورة الثانية هي “أنظف” بكثير للنظر إليها!
كاميرا نيكون D7000 + 24-70 مم f/2.8 @ 58 مم، ISO 160، 1/250، f/8.0
تمت معالجتها في لايت روم
5) Conclusion
In the digital age of photography the majority of photographers press the shutter release quickly and frequently. After all, a digital image is free (minus the cost of the camera, lens, post processing software … well you know what I mean). However, what most photographers neglect to consider is the cost of their time. Going through hundreds or worse, thousands of images can be very time consuming. You will save yourself countless hours reviewing photos and correcting them in your favourite post-processing program if you slow down and think about your composition first. This doesn’t mean that you have to get it right with the first shot. But review your images after you take them. Ask yourself these questions before moving on to a new subject. Are my horizontals and verticals actually horizontal and vertical? Do I have any distracting bits and pieces poking into the borders of the frame? Do any of the main elements overlap or touch? And finally, is there anything I can do to clean up the composition? With these four questions addressed before you shoot at 10 frames a second, you will not only save valuable time, but you will end up with images that you are much happier with. This will give your brain time to linger and enjoy your artwork!
5. الخلاصة
في العصر الرقمي للتصوير الفوتوغرافي، يقوم غالبية المصورين بالضغط على زر الغالق بسرعة وبشكل متكرر. ففي نهاية المطاف، الصورة الرقمية مجانية (مطروحًا منها تكلفة الكاميرا والعدسة وبرامج المعالجة اللاحقة… حسنًا، أنت تعرف ما أعنيه). ومع ذلك، فإن ما يهمل معظم المصورين أخذه في الاعتبار هو تكلفة وقتهم. من خلال المئات أو ما هو أسوأ، يمكن أن تستغرق آلاف الصور وقتًا طويلاً. ستوفر على نفسك ساعات لا حصر لها من مراجعة الصور وتصحيحها في برنامج ما بعد المعالجة المفضل لديك إذا أبطأت وفكرت في تكوينك أولاً. هذا لا يعني أنه عليك القيام بذلك بشكل صحيح من اللقطة الأولى. لكن قم بمراجعة صورك بعد التقاطها. اسأل نفسك هذه الأسئلة قبل الانتقال إلى موضوع جديد. هل خطوطي الأفقية والرأسية هي في الواقع أفقية ورأسية؟ هل هناك أي أجزاء وأجزاء مشتتة للانتباه تظهر في حدود الإطار؟ هل يتداخل أو يتلامس أي من العناصر الرئيسية؟ وأخيرا، هل هناك أي شيء يمكنني القيام به لتنظيف التكوين؟ من خلال الإجابة على هذه الأسئلة الأربعة قبل التصوير بمعدل 10 إطارات في الثانية، لن توفر وقتًا ثمينًا فحسب، بل سينتهي بك الأمر بالحصول على صور ستسعدك كثيرًا. سيمنح هذا عقلك وقتًا للاسترخاء والاستمتاع بأعمالك الفنية!