إعدادات نيكون D600 / D610 الموصى بها
طلب مني أحد قرائنا مؤخرًا تقديم الإعدادات الخاصة بي من كاميرات Nikon D600 / D610 التي أستخدمها لتلبية احتياجات التصوير الفوتوغرافي الخاصة بي. بينما اعتقدت في البداية أنه طلب غريب، فقد جعلني أفكر في أن العديد من المصورين ربما يضيعون أثناء محاولتهم البحث في خيارات القائمة العديدة. وبما أنني كنت أقوم بالتصوير باستخدام Nikon لعدد من السنوات حتى الآن، فمن السهل جدًا بالنسبة لي أن أفهم هذه الإعدادات وأقوم بتطبيقها مرارًا وتكرارًا على كل كاميرا أعمل بها. في هذه المقالة، أريد تقديم بعض المعلومات حول الإعدادات التي أستخدمها وشرح باختصار ما تفعله بعض الإعدادات المهمة. يرجى أن تضع في اعتبارك أنه على الرغم من أن هذه الأمور تناسبني، إلا أن هذا لا يعني أنه يجب على الجميع التصوير بنفس الإعدادات تمامًا. يتم توفير المعلومات أدناه كدليل لأولئك الذين يعانون ويريدون فقط البدء بفهم أساسي لإعدادات القائمة.One of our readers recently asked me to provide my settings from the Nikon D600 / D610 cameras that I use for my photography needs. While at first I thought that it was an odd request, it got me into thinking that many photographers probably get lost trying to dig through the many menu options. Since I have been shooting with Nikon for a number of years now, those settings are very easy for me to understand and I apply them over and over again for each camera that I work with. In this article, I want to provide some information on what settings I use and shortly explain what some of the important settings do. Please do keep in mind that while these work for me, it does not mean that everyone else should be shooting with exactly the same settings. The below information is provided as a guide for those that struggle and just want to get started with a basic understanding of menu settings.
قبل الدخول إلى قائمة الكاميرا، فلنبدأ أولاً في عناصر التحكم الخارجية. تحتوي كاميرا D600 / D610 على الكثير من خيارات القائمة، ولكن هناك بعض الأشياء التي لا يمكنك التحكم فيها إلا باستخدام عناصر التحكم الخارجية.
Before going into the camera menu, let’s first get started on the exterior controls. The D600 / D610 have a lot of menu options, but there are some things that you can only control with the external controls.
أوضاع التركيز التلقائي، والتصحيح، والفلاش
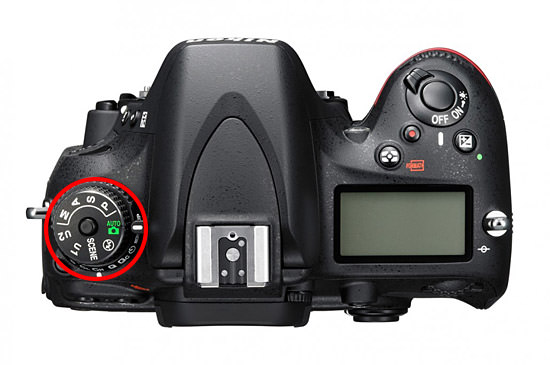
في الجزء الأمامي الأيسر من الكاميرا، ستجد رافعة تنتقل من AF إلى M، مع وجود زر في المنتصف (دائرة حمراء كبيرة في الصورة أدناه). تأكد من إبقاء هذا الرافعة على وضع “AF”، وإلا فلن تقوم العدسة بالتركيز التلقائي. إذا توقفت عدستك عن التركيز لسبب ما، فهذا هو ما يجب عليك التحقق منه أولاً. يتيح لك الضغط على الزر الموجود في منتصف الذراع الاختيار بين أوضاع التركيز المختلفة.

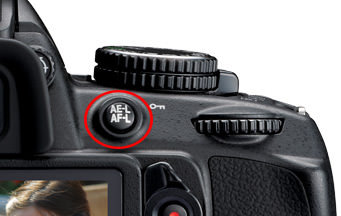
لتنشيط هذا التغيير، تحتاج إلى الضغط مع الاستمرار على الزر، ثم تدوير القرص الخلفي بإبهامك. أثناء قيامك بذلك، انظر إلى شاشة LCD العلوية وستقوم الكاميرا بالتبديل بين AF-A وAF-S وAF-C. لن أخوض في الكثير من التفاصيل حول كل وضع من أوضاع التركيز، حيث تم شرح كل ذلك بالتفصيل في هذه المقالة التي كتبتها منذ فترة. هنا خلاصة سريعة:
AF-S – يُسمى هذا الوضع “Single-servo AF” ويستخدم فقط للأهداف الثابتة التي لا تتحرك. عندما تضغط نصف زر على زر الغالق، يتم قفل التركيز البؤري التلقائي على الهدف وإذا تحرك الهدف، فلن يتغير التركيز، مما يؤدي إلى صورة ضبابية. استخدم هذا الوضع فقط لتصوير الأهداف الثابتة (المناظر الطبيعية، والهندسة المعمارية، وما إلى ذلك). AF-C – المعروف باسم “التركيز البؤري التلقائي المستمر” في لغة نيكون، يُستخدم هذا الإعداد لتصوير الأهداف المتحركة. عندما تضغط نصف زر على زر الغالق ويتحرك هدفك، ستعيد الكاميرا التركيز. أحتفظ عادةً بالكاميرا في وضع التركيز البؤري التلقائي AF-C عند تصوير الأشخاص، وخاصة أطفالي وهم يركضون. AF-A – هذا الوضع موجود فقط في الكاميرات المنخفضة الجودة لتسهيل الأمر على المبتدئين. في الأساس، إنه مزيج من الوضعين المذكورين أعلاه في إعداد واحد. تقوم الكاميرا بتقييم الموضوع/المشهد والتبديل تلقائيًا بين الوضعين المذكورين أعلاه اعتمادًا على ما تقوم بتصويره.
إذا كنت لا تعرف من أين تبدأ، فاحتفظ بالإعداد على AF-A، مما سيتيح للكاميرا أن تقرر كيفية التركيز في المواقف المختلفة.
Autofocus Modes, Bracketing and Flash
On the front left of the camera, you will find a lever that goes from AF to M, with a button in the middle (big red circle in the image below). Make sure to keep that lever on “AF”, or your lens will not autofocus. If for some reason your lens stops focusing, this is what need to check first. Pressing the button in the middle of the lever allows to choose between different focus modes.
To activate this change, you need to press and hold the button, then rotate the rear dial with your thumb. As you do this, look at the top LCD and the camera will switch between AF-A, AF-S and AF-C. I won’t go into too much detail about each focus mode, since it is all explained in detail in this article that I wrote a while ago. Here is a quick recap:
- AF-S – this mode is called “Single-servo AF” and it is used only for stationary subjects that do not move. When you half-press the shutter button, autofocus lock on the subject and if the subject moves, the focus will not change, resulting in a blurry picture. Only use this mode for photographing stationary subjects (landscapes, architecture, etc).
- AF-C – known as “Continuous-servo AF” in Nikon’s lingo, this setting is used for photographing moving subjects. When you half-press the shutter button and your subject moves, the camera will re-acquire focus. I usually keep my camera in AF-C autofocus mode when photographing people, especially my kids running around.
- AF-A – this mode is only present on lower-end cameras to make it easier for beginners. Basically, it is a combination of the above two modes in one setting. The camera evaluates the subject/scene and automatically switches between the above two modes depending on what you are photographing.
If you don’t know where to start, keep the setting on AF-A, which will let the camera decide on how to focus in different situations.
إذا كنت لا تعرف من أين تبدأ، فاحتفظ بالإعداد على AF-A، مما سيتيح للكاميرا أن تقرر كيفية التركيز في المواقف المختلفة.الآن إذا قمت بتدوير القرص الأمامي بإصبع السبابة أثناء الضغط على نفس الزر، فستحصل على العديد من الخيارات المختلفة مثل “S” و”D 9″ و”D 21″ و”D 39″ و”3D” و”Auto” . توجد هذه الإعدادات للتحكم في نقاط التركيز التي تراها داخل عدسة الكاميرا. مرة أخرى، تم بالفعل شرح معظم هذه الأمور بالتفصيل في المقالة الموضحة لأوضاع التركيز التلقائي، لذلك لن أخوض في الكثير من التفاصيل هنا. إذا كنت لا تعرف من أين تبدأ، فاحتفظ به على “S” (مفرد)، والذي يتيح لك اختيار نقطة تركيز واحدة ستستخدمها الكاميرا للتركيز. دعنا ننتقل إلى الضوابط الخارجية الأخرى.
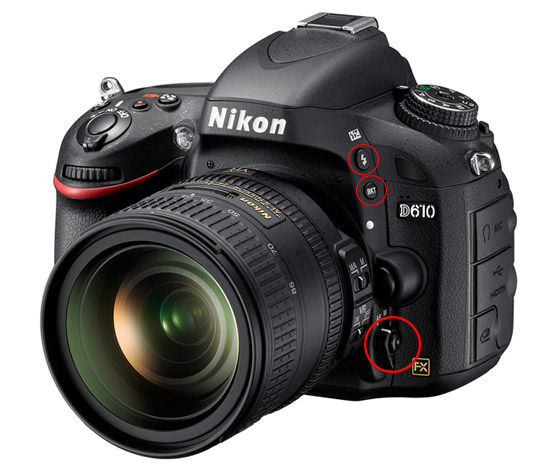
مباشرة فوق ذراع AF / M، ستجد زرين: “BKT” (تقوس) وفلاش. يجب استخدامها فقط في بعض المواقف مثل عند تصوير صور HDR أو العمل باستخدام الفلاش. فقط تأكد من أنه عند الضغط على زر BKT فإنه يظهر “0F” على الجانب الأيسر من شاشة LCD العلوية – وهذا يعني أنه تم إيقاف تشغيل التصحيح (ويجب أن يكون افتراضيًا). إعدادات الفلاش ليست مهمة حقًا، ولكن في الوقت الحالي فقط تأكد من إيقاف تشغيل كل شيء وإظهار “0.0” عند الضغط عليه مع الاستمرار.
If you don’t know where to start, keep the setting on AF-A, which will let the camera decide on how to focus in different situations.
Now if you rotate the front dial with your index finger while holding the same button, you will get many different options like “S”, “D 9”, “D 21”, “D 39”, “3D” and “Auto”. These settings are there for controlling the focus points that you see inside the viewfinder. Once again, most of these are already explained in detail in my autofocus modes explained article, so I won’t go into too much detail here. If you don’t know where to start, keep it on “S” (Single), which lets you choose one single focus point that the camera will use for focusing. Let’s move on to other external controls.
Right above the AF / M lever, you will find two buttons: “BKT” (Bracketing) and Flash. These should only be used in some situations such as when shooting HDR images or working with flash. Just make sure that when you press the BKT button it shows “0F” on the left side of the top LCD – this means that bracketing is turned off (and it should be by default). The flash settings don’t really matter, but for now just make sure that everything is turned off and shows “0.0” when you press and hold it.