10 Underwater Photography Tips For Beginners
Underwater photography is a whole new world, where infinite photographic opportunities present themselves. It is also where even experienced photographers struggle at the beginning. Every aspect of photography becomes more complicated underwater. In this article, I will share some of my favorite tips to help you understand the basics of underwater photography and skip the initial struggle.
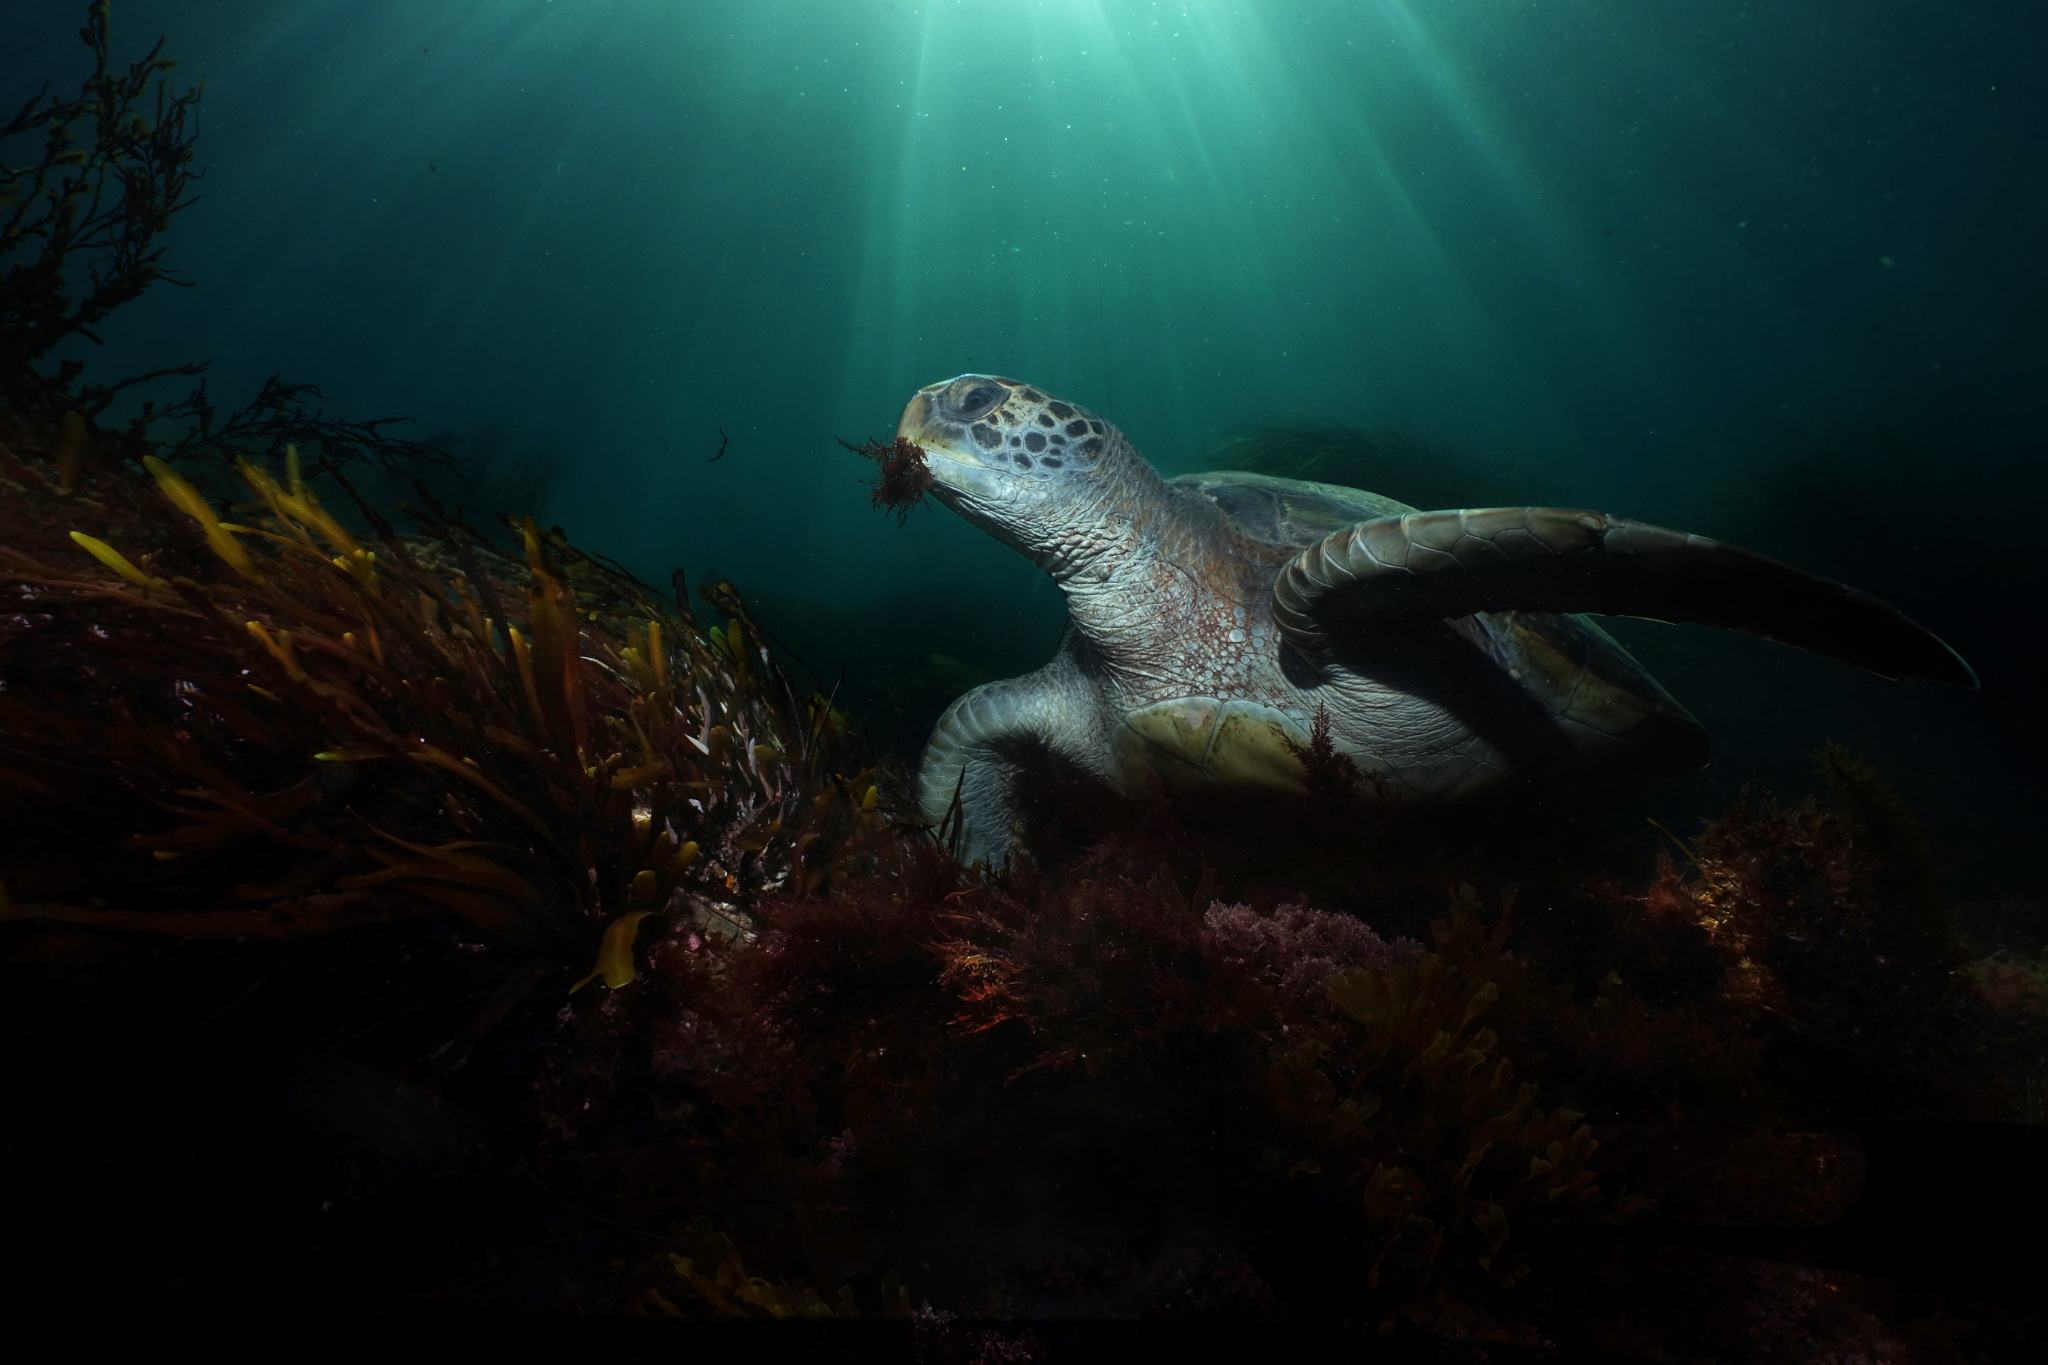
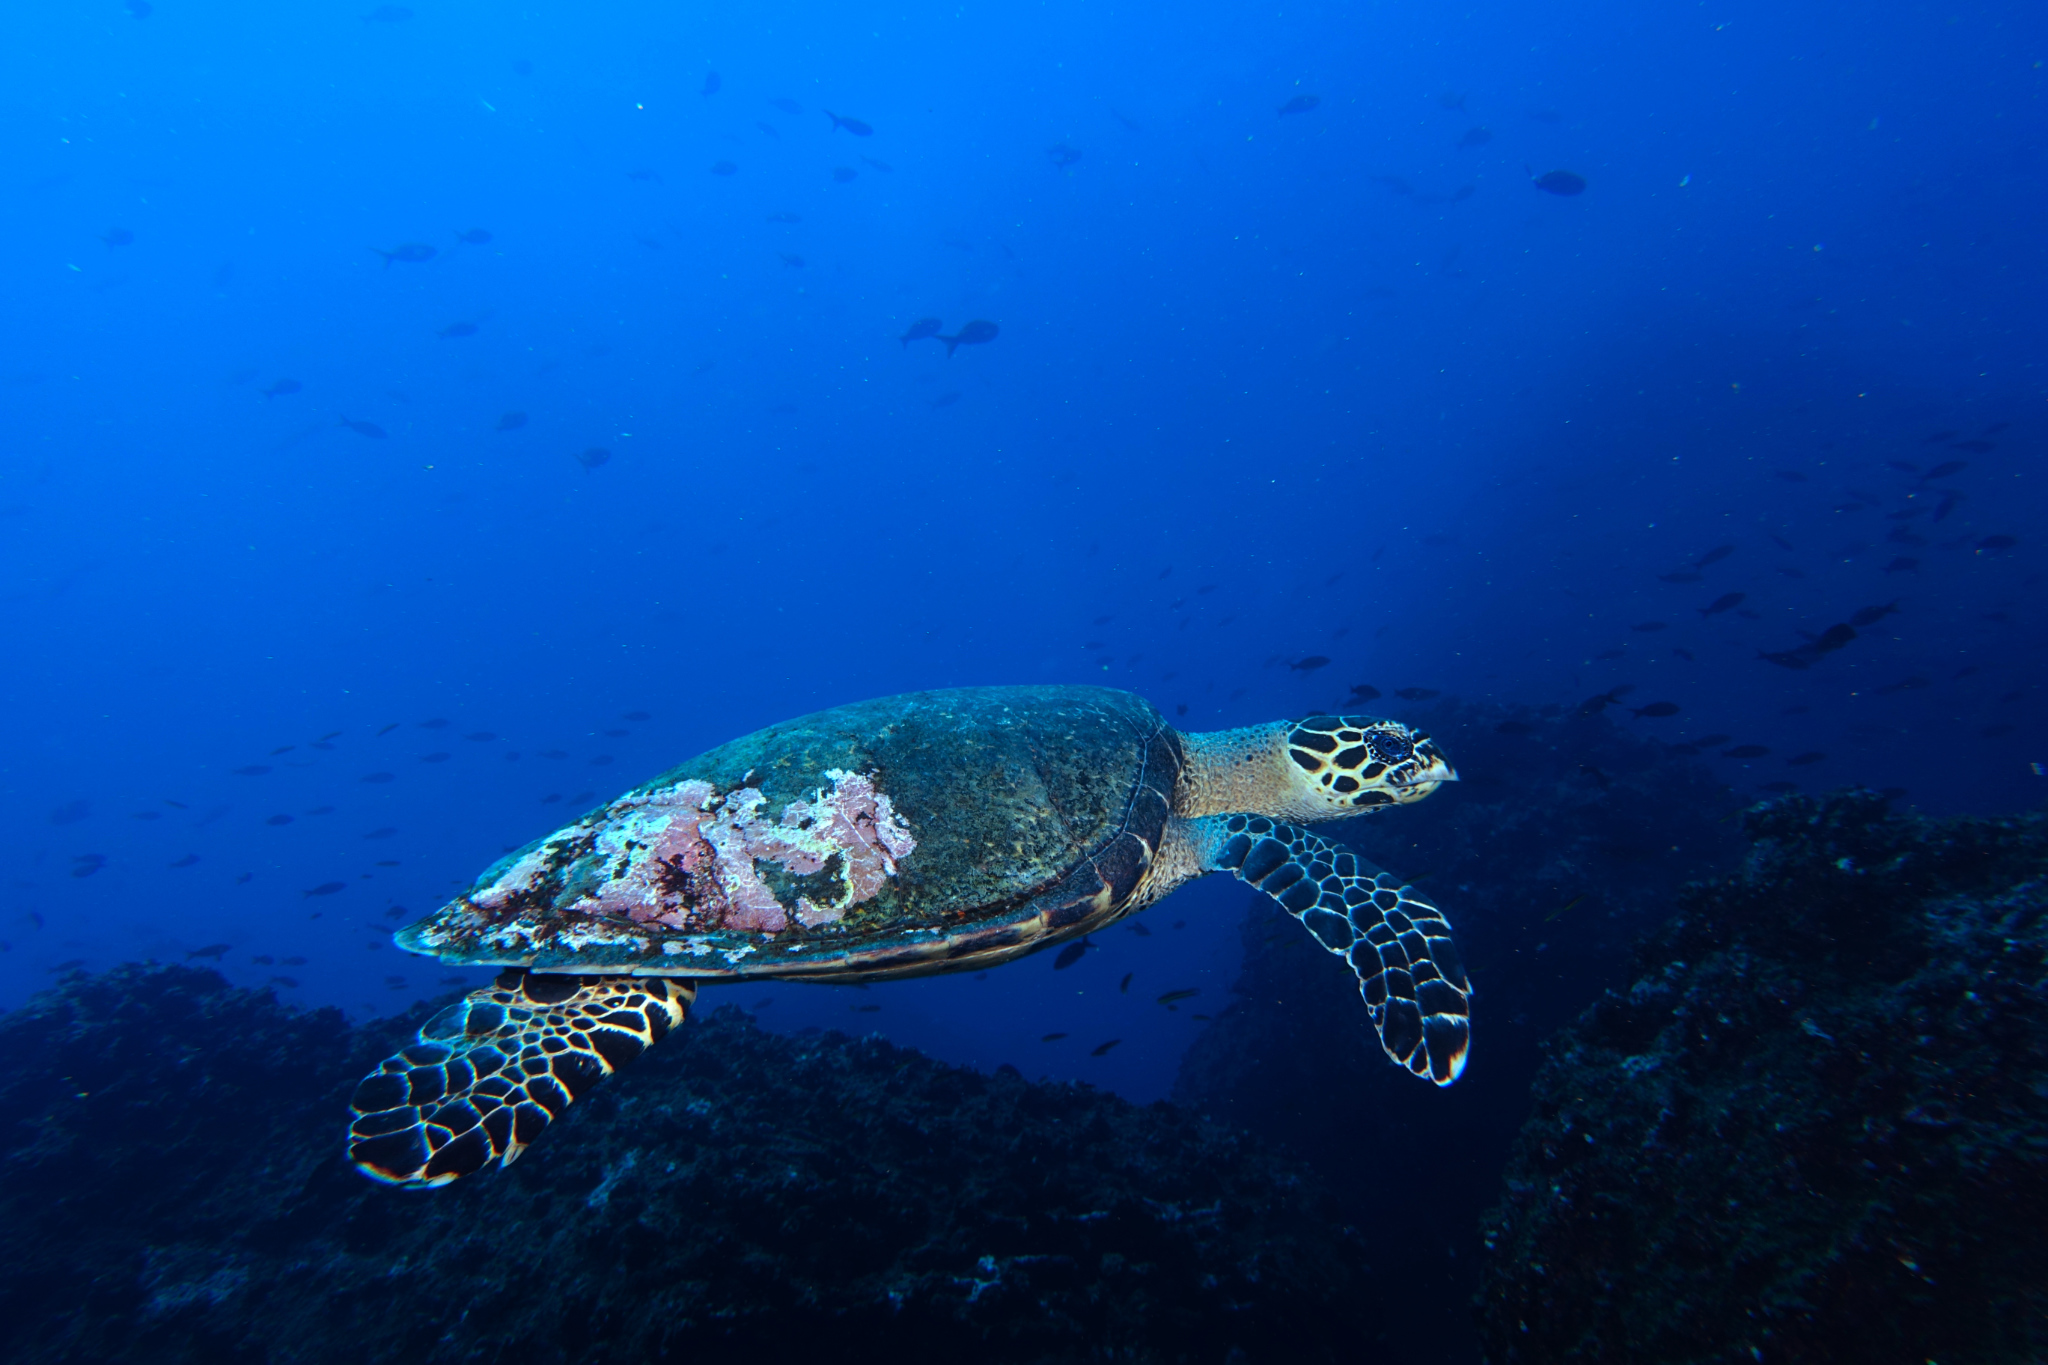
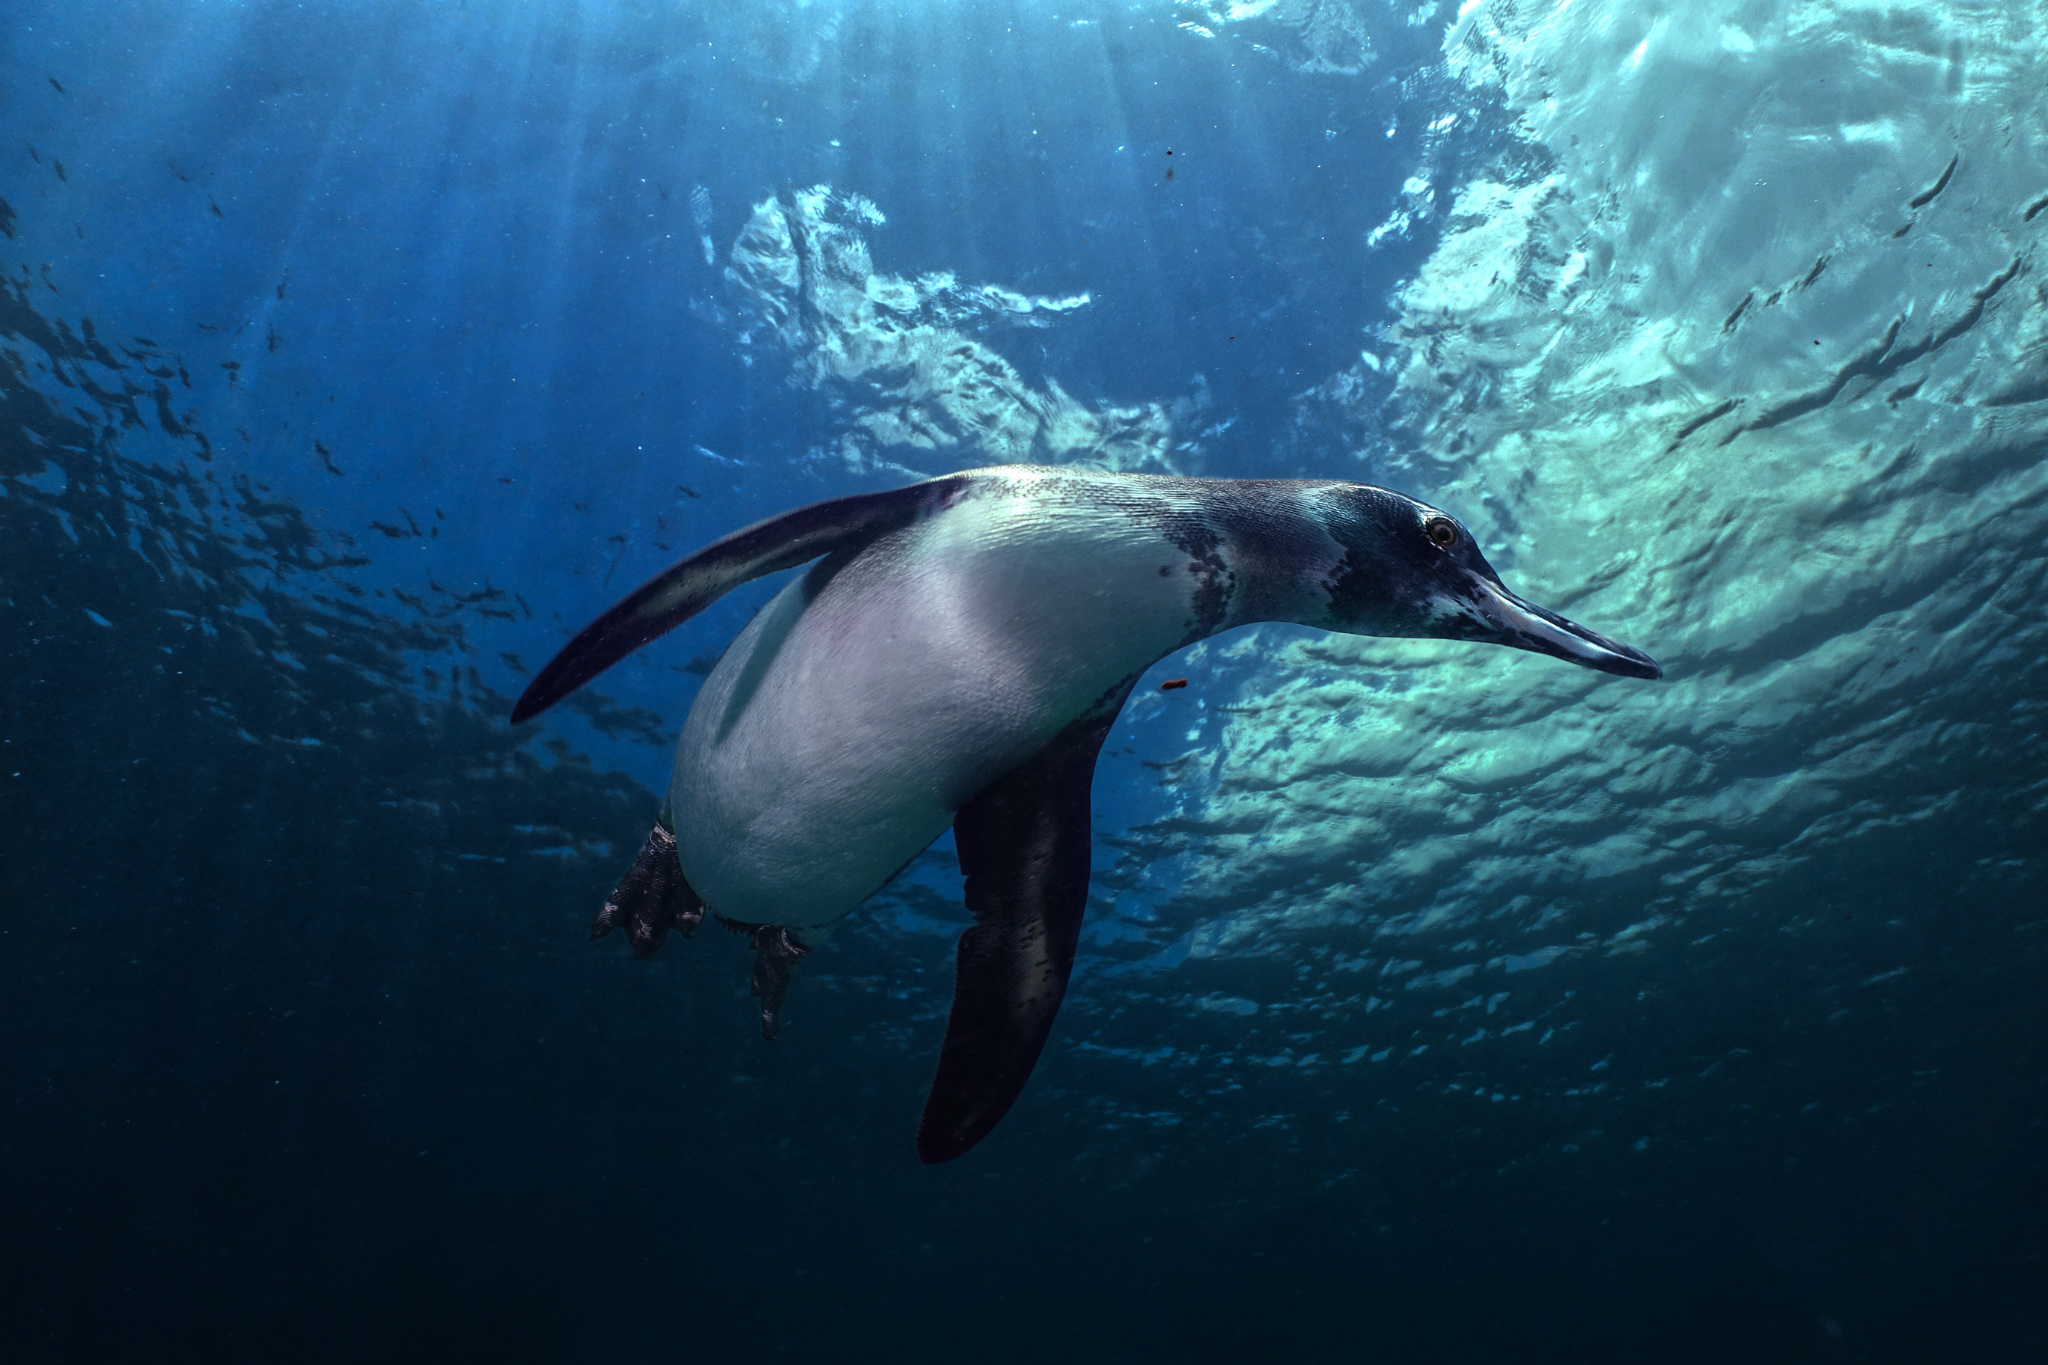 DSC-RX100M4 @ 8.8mm, ISO 320, 1/320, f/9.0
10 نصائح للتصوير تحت الماء للمبتدئين
التصوير تحت الماء هو عالم جديد تمامًا، حيث تتاح فرص لا حصر لها للتصوير الفوتوغرافي. إنه أيضًا المكان الذي يعاني فيه المصورون ذوو الخبرة في البداية. يصبح كل جانب من جوانب التصوير الفوتوغرافي أكثر تعقيدًا تحت الماء. في هذه المقالة، سأشارك بعض نصائحي المفضلة لمساعدتك على فهم أساسيات التصوير الفوتوغرافي تحت الماء وتخطي الصراع الأولي.
Table of Contents
- Understand How Light Behaves Underwater
- Change Camera Settings As You Change Directions
- Know the Direction of the Sun
- Make the Most of Underwater Flash
- Get Under and Up-Close
- Don’t Scare Your Subject
- Check the Water Conditions Beforehand
- Edit Your Underwater Images
- Prevent Flooding
- Prevent Fogging
- Conclusion
جدول المحتويات
فهم كيف يتصرف الضوء تحت الماء
قم بتغيير إعدادات الكاميرا أثناء تغيير الاتجاهات
تعرف على اتجاه الشمس
حقق أقصى استفادة من الوميض تحت الماء
اقترب من الأسفل ولا تخيف هدفك تحقق من ظروف المياه مسبقًا
قم بتحرير صورك تحت الماء
امنع الفيضانات،
منع الضباب
الخاتمة
1. Understand How Light Behaves Underwater
Light behaves in fundamentally different ways when it travels through water instead of air. This has major implications for underwater photographers.
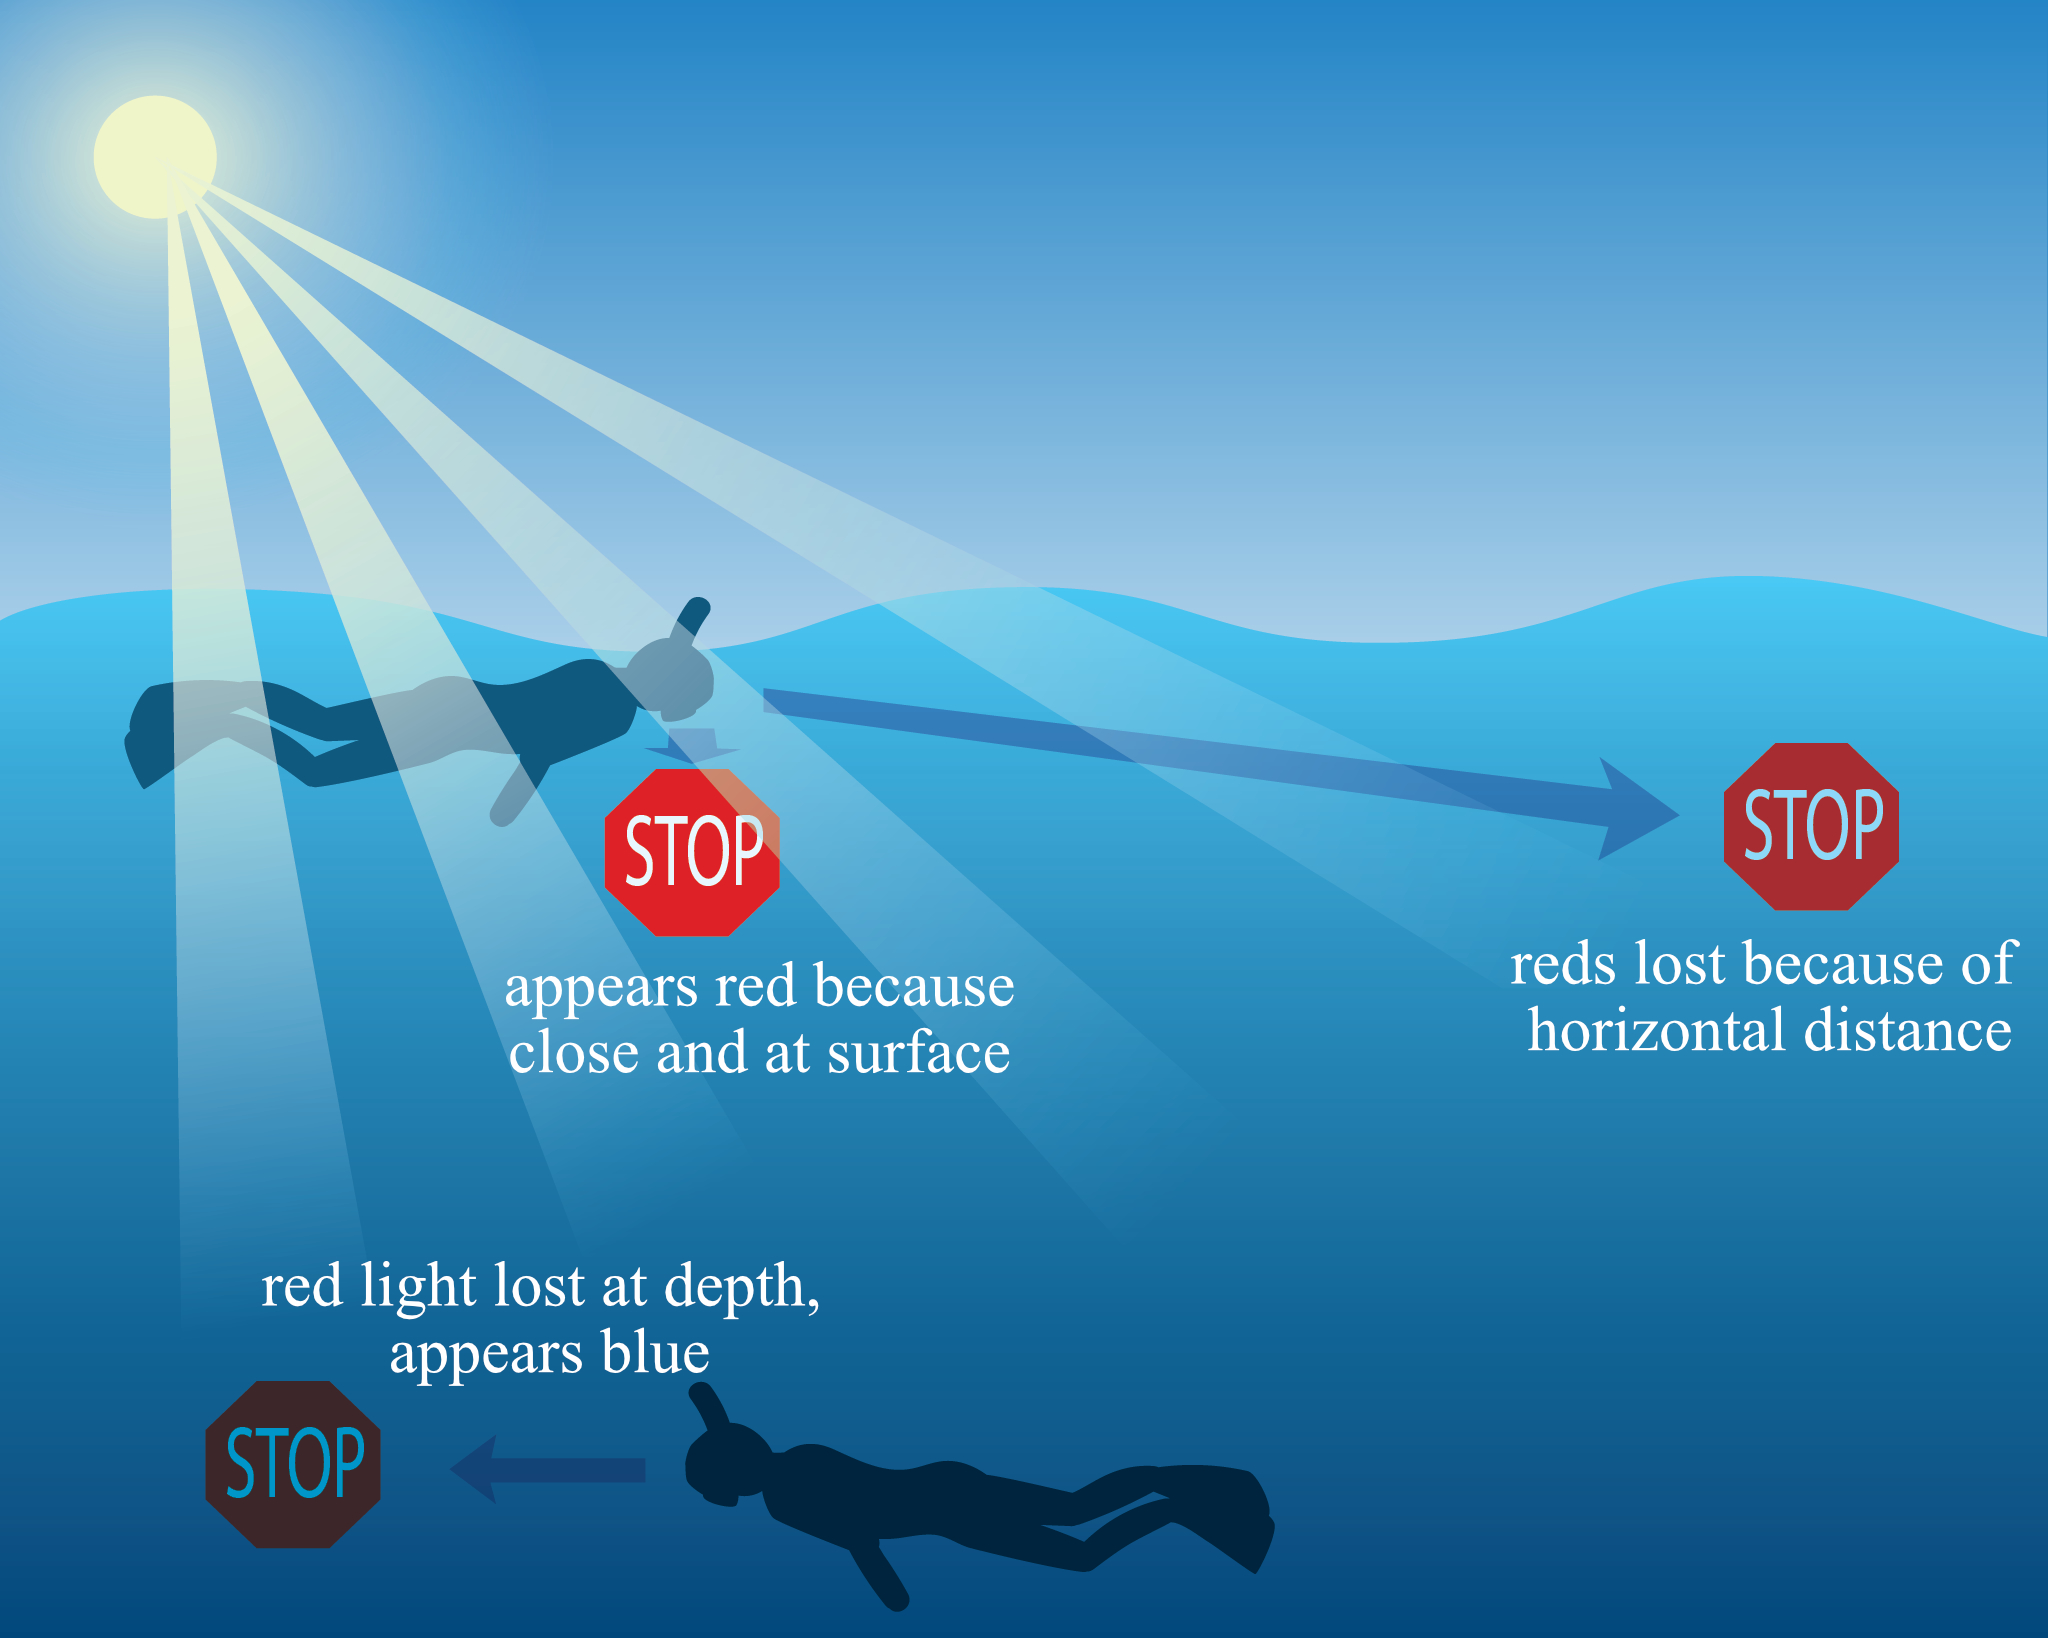
The most apparent difference underwater is that everything is blue! As an object gets further away, it will appear more and more blue. Likewise, as you dive deeper underwater, blue begins to replace all the other colors.
The color red is especially susceptible to this change. Objects that are red at the surface will look very dark and desaturated at moderate depths, even if you hold them directly in front of your eye. They will also look darker at the surface if they’re far away from you.
Consider the graphic below:
1. افهم كيف يتصرف الضوء تحت الماء
يتصرف الضوء بطرق مختلفة بشكل أساسي عندما ينتقل عبر الماء بدلاً من الهواء. وهذا له آثار كبيرة على المصورين تحت الماء.
الفرق الأكثر وضوحًا تحت الماء هو أن كل شيء باللون الأزرق! كلما ابتعد الجسم أكثر، سيظهر باللون الأزرق أكثر فأكثر. وبالمثل، عندما تغوص بشكل أعمق تحت الماء، يبدأ اللون الأزرق في استبدال جميع الألوان الأخرى.
اللون الأحمر عرضة بشكل خاص لهذا التغيير. ستبدو الأجسام ذات اللون الأحمر على السطح داكنة جدًا وغير مشبعة على أعماق معتدلة، حتى لو حملتها مباشرة أمام عينك. كما أنها ستبدو أكثر قتامة على السطح إذا كانت بعيدة عنك.
النظر في الرسم أدناه:
Although this is most obvious with the color red, the entire spectrum of sunlight is absorbed by water molecules. The first wavelengths to be absorbed are reds, and the last are blues, but eventually the blue light is also absorbed, and everything becomes black.
This takes us to our next concept: Light is lost underwater.
As you dive lower, everything gets darker. This happens faster than you would expect; our eyes account for this difference, so it can be hard to notice. On a sunny day about 30 feet / 9 meters below the surface – a typical depth for recreational scuba diving – you may need to start pushing the limits of your camera settings to get a properly exposed shot.
All of this means that a lot of underwater photos look blue, dark, and low in contrast. Many of the next tips below talk about ways to solve these issues.
وعلى الرغم من أن هذا يكون أكثر وضوحًا مع اللون الأحمر، إلا أن جزيئات الماء تمتص كامل نطاق ضوء الشمس. أول الأطوال الموجية التي سيتم امتصاصها هي الأحمر، والأخيرة هي الأطوال الموجية الزرقاء، ولكن في النهاية يتم امتصاص الضوء الأزرق أيضًا، ويصبح كل شيء أسود.
وهذا يأخذنا إلى مفهومنا التالي: الضوء يُفقد تحت الماء.
عندما تغوص للأسفل، يصبح كل شيء أكثر قتامة. يحدث هذا بشكل أسرع مما تتوقع؛ أعيننا مسؤولة عن هذا الاختلاف، لذلك قد يكون من الصعب ملاحظته. في يوم مشمس على عمق حوالي 30 قدمًا / 9 أمتار تحت السطح – وهو عمق نموذجي للغوص الترفيهي – قد تحتاج إلى البدء في تجاوز حدود إعدادات الكاميرا للحصول على لقطة مكشوفة بشكل صحيح.
كل هذا يعني أن الكثير من الصور تحت الماء تبدو زرقاء ومظلمة ومنخفضة التباين. تتحدث العديد من النصائح التالية أدناه عن طرق حل هذه المشكلات.
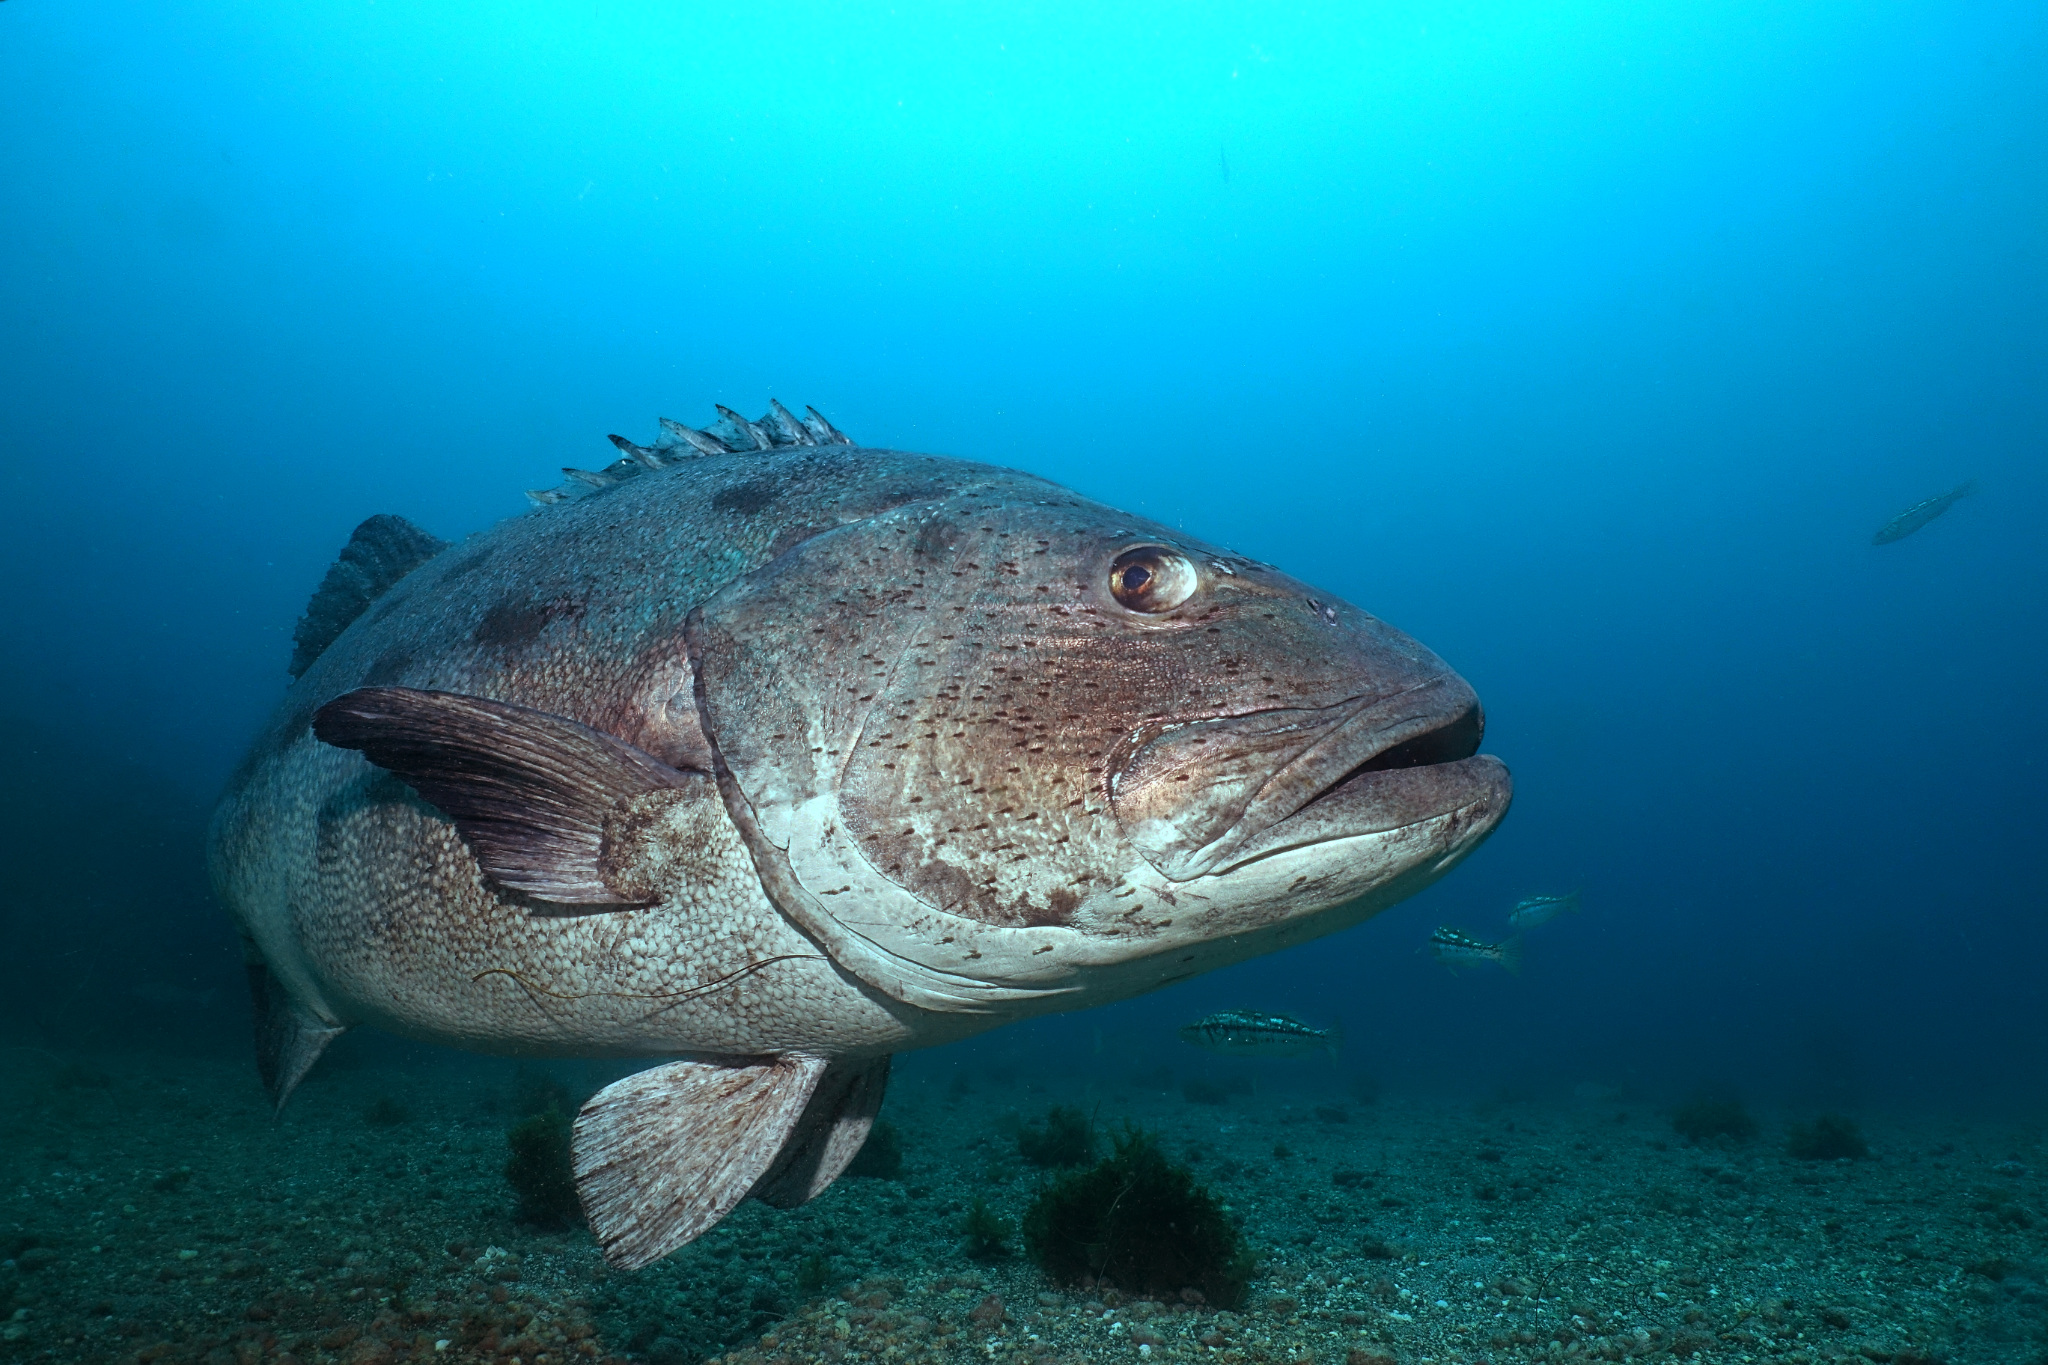
2. Change Camera Settings As You Change Directions
One challenge about exposing images underwater is that shooting downwards is totally different than shooting horizontally or upwards, in terms of your exposure.
At the same settings, shooting downwards may be extremely underexposed, while shooting upwards is too bright. So, when you’re doing natural light photography, I suggest shooting in aperture priority mode so the camera accounts for these differences on the fly.
You can also take advantage of Auto ISO menu settings to set a minimum acceptable shutter speed, like 1/200 second, and allow the camera to raise or lower ISO as needed. Aperture priority mode + Auto ISO is a good combination that still gives you full control over both your aperture and your minimum shutter speed.
 DSC-RX100M4 @ 8.8mm, ISO 250, 1/200
2. قم بتغيير إعدادات الكاميرا أثناء تغيير الاتجاهات
أحد التحديات المتعلقة بتعريض الصور تحت الماء هو أن التصوير لأسفل يختلف تمامًا عن التصوير أفقيًا أو لأعلى، من حيث التعريض الضوئي.
في نفس الإعدادات، قد يكون التصوير لأسفل منخفضًا للغاية، في حين أن التصوير لأعلى يكون ساطعًا للغاية. لذا، عندما تقوم بالتصوير الفوتوغرافي في الضوء الطبيعي، أقترح التصوير في وضع أولوية فتحة العدسة حتى تراعي الكاميرا هذه الاختلافات بسرعة.
يمكنك أيضًا الاستفادة من إعدادات قائمة ISO التلقائي لتعيين الحد الأدنى المقبول لسرعة الغالق، مثل 1/200 ثانية، والسماح للكاميرا برفع أو خفض ISO حسب الحاجة. يعد وضع أولوية فتحة العدسة + Auto ISO مزيجًا جيدًا يمنحك التحكم الكامل في كل من فتحة العدسة والحد الأدنى لسرعة الغالق
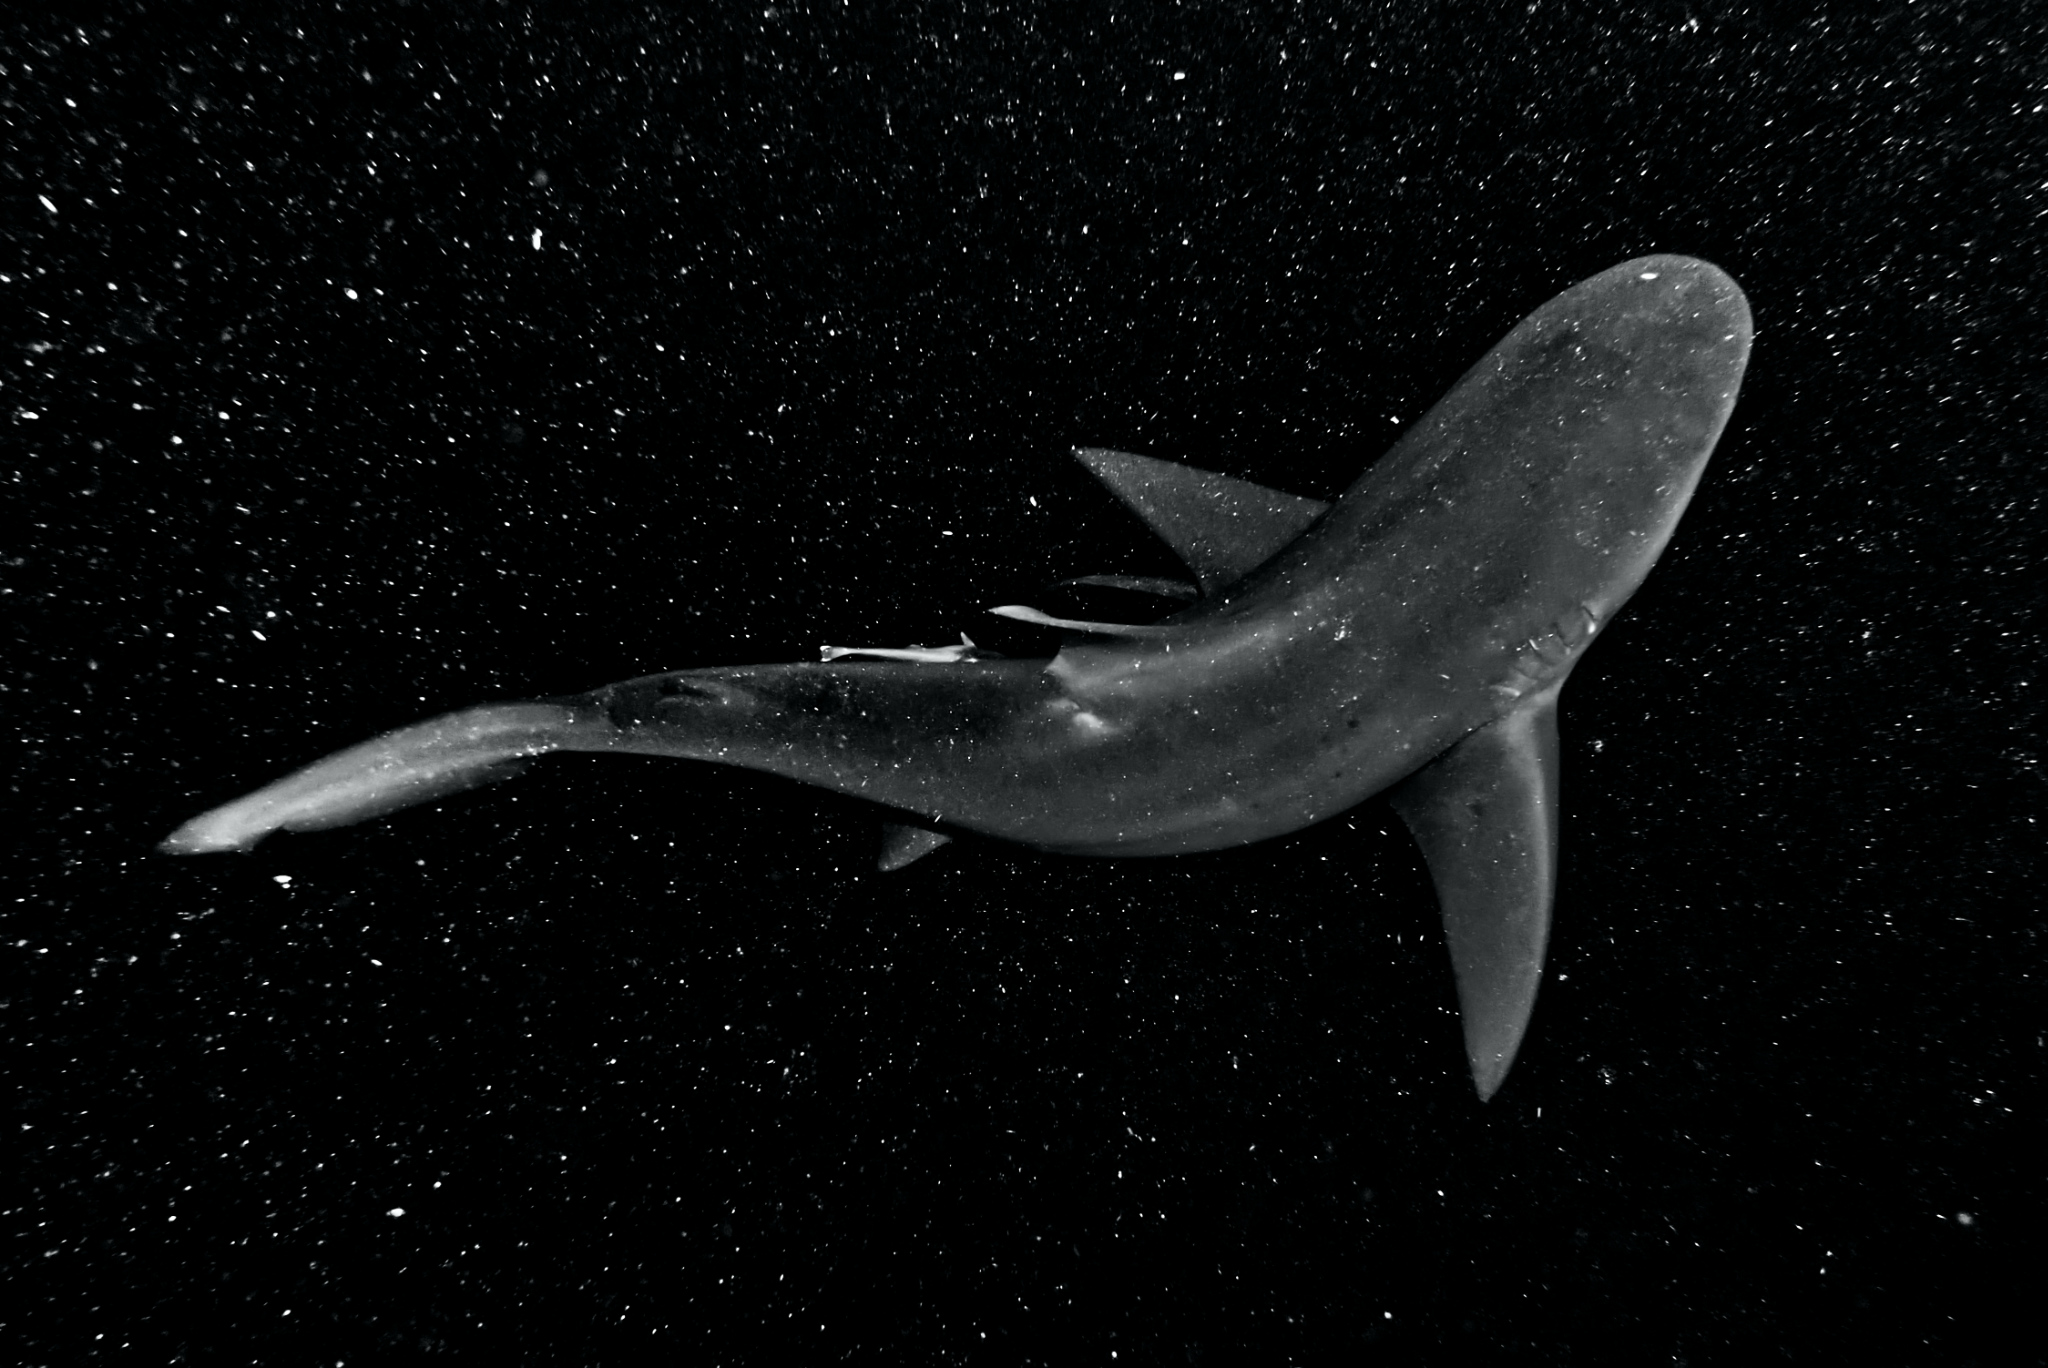
3. Know the Direction of the Sun
Underwater, it’s not always immediately obvious which direction the light is coming from. However, the angle of the sun is just as important underwater as on land, because it affects the appearance of light and shadow on your subject.
Beyond that, if you’re shooting toward the direction of the sun, you’ll get substantial backscatter due to particles in the water, lowering contrast. Even when you shoot horizontally and the sun seems to be directly overhead, shooting toward the slight angle of the sun can lead to the same problem. For this reason, I try to shoot with the sun to my back for natural-light photography underwater.
That said, the silhouettes and backscatter from shooting toward the sun can sometimes be a desirable look, thanks to the moody atmosphere it creates. Like most things in photography, there are exceptions – but even then, you can’t exploit these exceptions unless you’re aware of the direction of the sun.
 DSC-RX100M4 + Sony 24-70mm F1.8-2.8 @ 8.8mm, ISO 500, 1/640, f/7.1
3. معرفة اتجاه الشمس
تحت الماء، ليس من الواضح دائمًا على الفور الاتجاه الذي يأتي منه الضوء. ومع ذلك، فإن زاوية الشمس لا تقل أهمية تحت الماء عن الأرض، لأنها تؤثر على مظهر الضوء والظل على موضوعك.
علاوة على ذلك، إذا كنت تقوم بالتصوير في اتجاه الشمس، فسوف تحصل على تشتت خلفي كبير بسبب الجزيئات الموجودة في الماء، مما يقلل التباين. حتى عندما تقوم بالتصوير أفقيًا وتبدو الشمس في سماء المنطقة مباشرة، فإن التصوير باتجاه زاوية طفيفة من الشمس يمكن أن يؤدي إلى نفس المشكلة. لهذا السبب، أحاول التصوير مع وضع الشمس على ظهري للتصوير الفوتوغرافي تحت الماء بالضوء الطبيعي.
ومع ذلك، فإن الصور الظلية والتشتت الخلفي الناتج عن التصوير باتجاه الشمس يمكن أن يكون مظهرًا مرغوبًا في بعض الأحيان، وذلك بفضل الجو المزاجي الذي يخلقه. مثل معظم الأشياء في التصوير الفوتوغرافي، هناك استثناءات – ولكن حتى في هذه الحالة، لا يمكنك استغلال هذه الاستثناءات إلا إذا كنت على دراية باتجاه الشمس.
4. Make the Most of Underwater Flash
Using a flash underwater is a double-edged sword. It can bring light – and the color red – back from the depths. But it can also reflect particles, creating bright spots and backscatter. The more particles, the worse the backscatter.
The best way to avoid backscatter is by increasing the distance between the light source and the camera (note – the camera, not necessarily the subject). This prevents the particles from reflecting light directly back to the camera, making them less apparent. Unfortunately, this is only feasible with an underwater strobe with separate arms coming off the camera. It’s best to avoid using the on-camera flash unless everything in the photo is extremely close to your lens.
Strobes attach to the camera by mounting your underwater housing to a tray table, onto which you connect a flexible arm, which attaches the strobe. Next, the strobe is triggered by a fiber optics cable attached to the housing in front of the flash.
4. حقق أقصى استفادة من الفلاش تحت الماء
إن استخدام الفلاش تحت الماء هو سيف ذو حدين. يمكنها أن تعيد الضوء – واللون الأحمر – من الأعماق. ولكنها يمكن أن تعكس أيضًا الجسيمات، مما يؤدي إلى ظهور نقاط مضيئة وتشتت خلفي. كلما زاد عدد الجزيئات، كان التشتت الخلفي أسوأ.
أفضل طريقة لتجنب التشتت الخلفي هي زيادة المسافة بين مصدر الضوء والكاميرا (ملاحظة – الكاميرا، وليس بالضرورة الهدف). وهذا يمنع الجزيئات من عكس الضوء مباشرة إلى الكاميرا، مما يجعلها أقل وضوحًا. لسوء الحظ، هذا ممكن فقط مع وجود وميض تحت الماء بأذرع منفصلة تخرج من الكاميرا. من الأفضل تجنب استخدام فلاش الكاميرا إلا إذا كان كل شيء في الصورة قريبًا جدًا من العدسة.
يتم توصيل الومضات بالكاميرا عن طريق تثبيت المبيت تحت الماء على طاولة صينية، حيث يتم توصيل ذراع مرن بها، والذي يعلق الومض. بعد ذلك، يتم تشغيل الومض بواسطة كابل ألياف بصرية متصل بالجسم الموجود أمام الفلاش.
Strobes can illuminate shadows which allows you to shoot sunrays while still exposing your subject. This technique requires fine tuning strobe strength, position, and settings so that the sun rays are not over-exposed and the subject is properly lit. To avoid backscatter, it is recommended not to let the strobe flash brightly.
Buying a strobe, arm, tray table, and fiber optics cable is not a cheap investment. However, it makes a huge difference shooting underwater – especially when at depth or if color is important. I should also note here that advanced underwater photographers typically shoot with two strobes! It nearly doubles the price but gives better light and fills in shadows.
 DSC-RX100M4 @ 8.8mm, ISO 320, 1/400, f/9.0
يمكن أن تضيء الومضات الظلال مما يسمح لك بالتقاط أشعة الشمس مع الاستمرار في تعريض هدفك. تتطلب هذه التقنية ضبطًا دقيقًا لقوة الوميض وموضعه وإعداداته بحيث لا يتم تعريض أشعة الشمس بشكل مفرط ويتم إضاءة الهدف بشكل صحيح. لتجنب التشتت الخلفي، يوصى بعدم السماح للومضة القوية بالوميض بشكل ساطع.
إن شراء كابل قوي وذراع وطاولة صينية وكابل ألياف بصرية ليس استثمارًا رخيصًا. ومع ذلك، فإن التصوير تحت الماء يحدث فرقًا كبيرًا – خاصة عندما تكون في العمق أو إذا كان اللون مهمًا. يجب أن أشير هنا أيضًا إلى أن المصورين المتقدمين تحت الماء عادة ما يصورون بومضتين! إنه يضاعف السعر تقريبًا ولكنه يوفر إضاءة أفضل ويملأ الظلال.
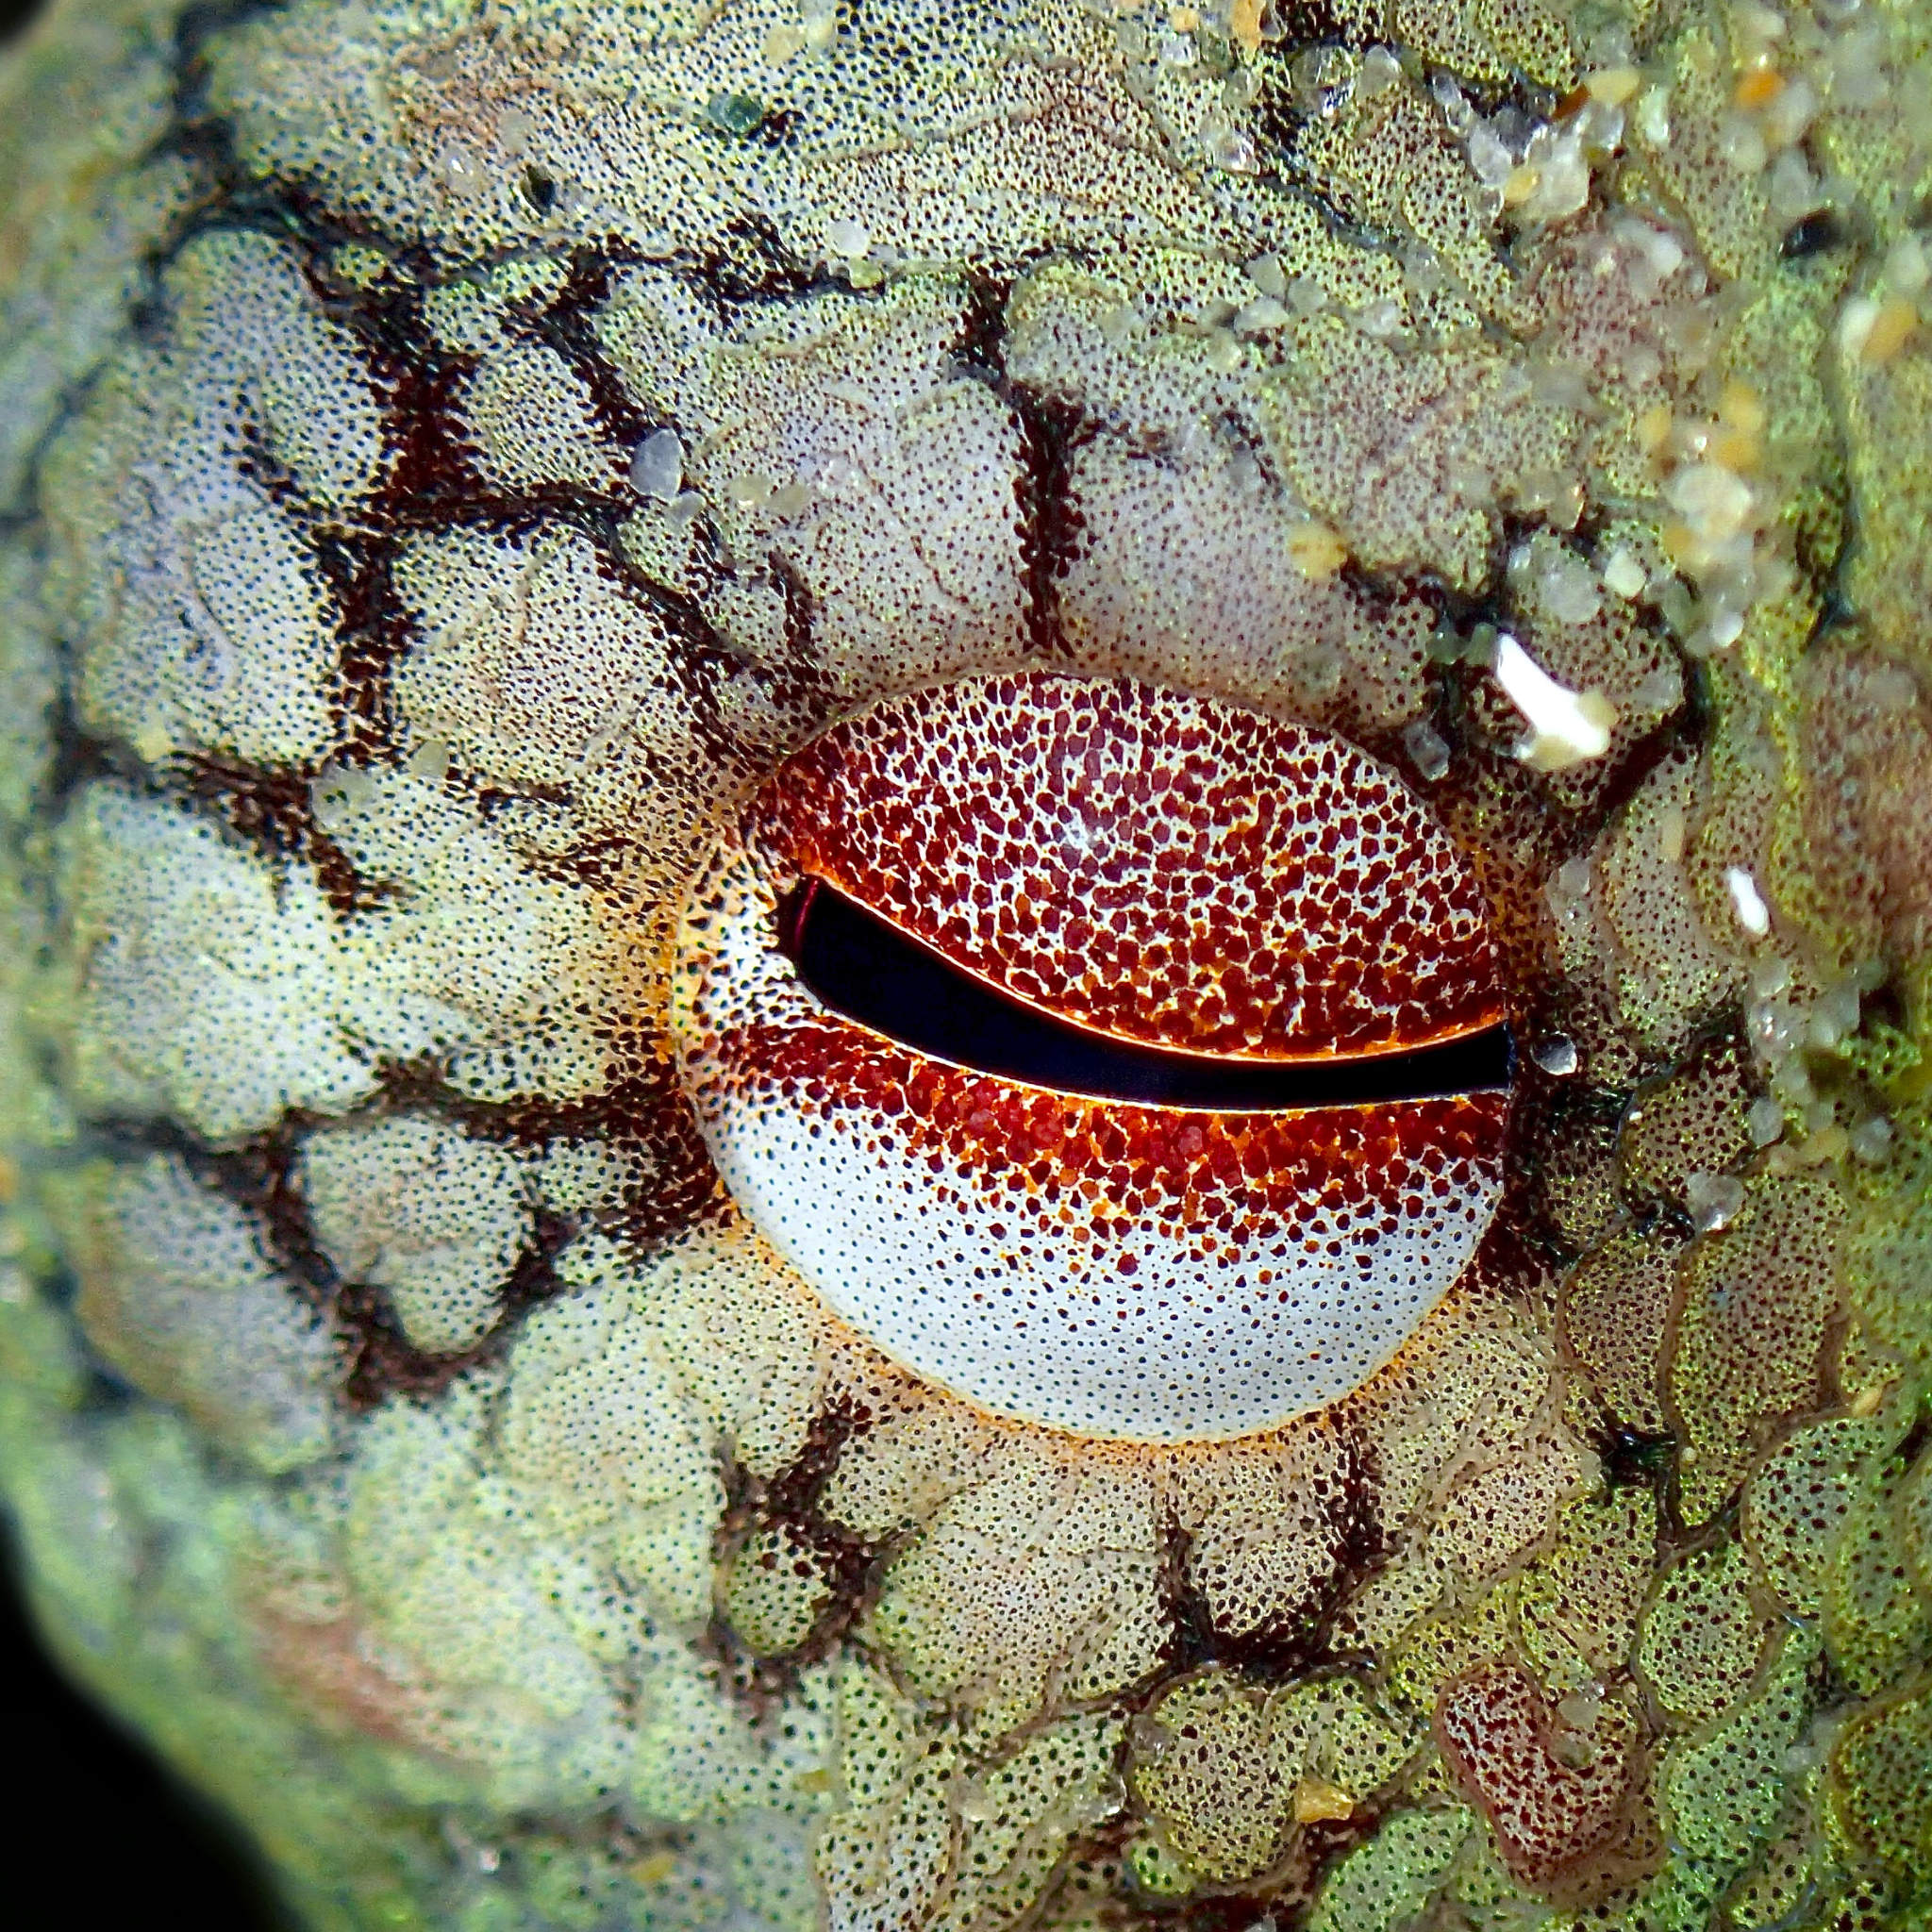
5. Get Under and Up-Close
The amazing thing about being underwater is that you can basically fly! Use that to your advantage when shooting underwater. Shooting from the surface is the best way to take boring underwater photographs. There is much less contrast when shooting downwards, and it’s unlikely to be the most attractive angle for your subject. Even in just a few feet of water, diving down means you can shoot horizontally, which will capture more contrast and more of the background.
Often, you’ll want to get as close to your subject as possible. This goes back to the first effect of shooting underwater, which is that distance harms your contrast and colors. This is why most underwater photographers shoot with ultra-wide lenses, even fisheyes: to get as close to their subject as possible.
 TG-4 @ 18mm, ISO 100, 1/100, f/14.0
5. انزل للأسفل وأغلق
إن الشيء المذهل في التواجد تحت الماء هو أنه يمكنك الطيران بشكل أساسي! استخدم ذلك لصالحك عند التصوير تحت الماء. يعد التصوير من السطح أفضل طريقة لالتقاط صور مملة تحت الماء. يوجد تباين أقل بكثير عند التصوير لأسفل، ومن غير المرجح أن تكون الزاوية الأكثر جاذبية لموضوعك. حتى على بعد بضعة أقدام من الماء، يعني الغوص للأسفل أنه يمكنك التصوير أفقيًا، مما سيؤدي إلى التقاط المزيد من التباين والمزيد من الخلفية.
في كثير من الأحيان، سوف ترغب في الاقتراب من موضوعك قدر الإمكان. يعود هذا إلى التأثير الأول للتصوير تحت الماء، وهو أن المسافة تضر بالتباين والألوان. وهذا هو السبب وراء قيام معظم المصورين الفوتوغرافيين تحت الماء بالتصوير باستخدام عدسات فائقة الاتساع، وحتى عيون السمكة: للاقتراب من هدفهم قدر الإمكان.
6. Don’t Scare Your Subject
The last thing you want to do when photographing an animal underwater is to chase it. That’s the best way to get no more cool photos, and ensure the only photo you get is of its tail or butt.
It’s better to stay as calm as possible and keep movements to a minimum. This will make any animal more accepting of your presence. Usually, animals hang out in a certain area for a reason and will not want to leave. Animals might even swim toward you out of curiosity if you just hold tight.
If you’re snorkeling, I recommend getting the hang of diving down while holding your breath to make the most of these encounters. You should also stay as still as possible to keep your body from spending precious oxygen. Practice in a pool if you need to.
6. لا تخيف موضوعك
آخر شيء تريد القيام به عند تصوير حيوان تحت الماء هو مطاردته. هذه هي أفضل طريقة لعدم الحصول على المزيد من الصور الرائعة، والتأكد من أن الصورة الوحيدة التي تحصل عليها هي لذيلها أو مؤخرتها.
من الأفضل أن تظل هادئًا قدر الإمكان وتحافظ على الحد الأدنى من الحركات. وهذا سيجعل أي حيوان أكثر قبولا لوجودك. عادةً ما تتسكع الحيوانات في منطقة معينة لسبب ما ولا ترغب في المغادرة. قد تسبح الحيوانات باتجاهك بدافع الفضول إذا تمسكت بها بقوة.
إذا كنت تمارس الغطس، فإنني أنصحك بالتدرب على الغوص مع حبس أنفاسك لتحقيق أقصى استفادة من هذه اللقاءات. يجب عليك أيضًا أن تظل ثابتًا قدر الإمكان لمنع جسمك من استهلاك الأكسجين الثمين. تدرب في حمام السباحة إذا كنت بحاجة لذلك.
You can also dive much more comfortably (both snorkel and scuba) if you equalize the pressure in your ears every three feet / one meter or so, to counter the water pressure. You can do this by pinching your nose and gently exhaling through your nose. You should hear a pop and feel the pressure release.
If you do that, you can dive more comfortably and enjoy the encounter without flailing around and scaring away the best subjects.
 DSC-RX100M4 @ 8.8mm, ISO 800, 1/640, f/5.6
يمكنك أيضًا الغوص براحة أكبر (سواء الغطس أو الغطس) إذا قمت بمساواة الضغط في أذنيك كل ثلاثة أقدام / متر واحد أو نحو ذلك، لمواجهة ضغط الماء. يمكنك القيام بذلك عن طريق الضغط على أنفك والزفير بلطف من خلال أنفك. يجب أن تسمع فرقعة وتشعر بتحرر الضغط.
إذا قمت بذلك، يمكنك الغوص براحة أكبر والاستمتاع باللقاء دون التخبط وإخافة أفضل الأهداف.
7. Check the Water Conditions Beforehand
Especially in the ocean, successful underwater photography requires favorable water conditions. Visibility is the measure of how far you can see underwater. Visibility can be really good most of the year in some areas like the tropics, or very poor for most of the year except a few times a year like on the west coast of the United States. It all depends on the amount of particles in the water, typically sediment or plankton.
If going with a dive operator, be sure to ask how conditions have been lately while keeping in mind they may be exaggerating visibility because they want your business. Ask lots of direct questions; you don’t want to pay big bucks for a trip just to be met with murky water with zero photographic opportunity.
Especially in temperate (cooler water) zones, plankton blooms occur seasonally, which can turn the water almost completely murky and green. Every area has different seasons with the best and worst conditions for plankton. Before planning a trip, research when the preferable time of year for diving is.
7. تحقق من ظروف المياه مسبقًا
يتطلب التصوير الناجح تحت الماء، خاصة في المحيط، ظروفًا مائية مواتية. الرؤية هي مقياس المدى الذي يمكنك رؤيته تحت الماء. يمكن أن تكون الرؤية جيدة حقًا معظم أيام العام في بعض المناطق مثل المناطق الاستوائية، أو سيئة للغاية معظم أيام العام باستثناء بضع مرات في السنة كما هو الحال على الساحل الغربي للولايات المتحدة. كل هذا يتوقف على كمية الجزيئات الموجودة في الماء، عادة الرواسب أو العوالق.
إذا كنت ستذهب مع أحد مشغلي الغوص، فتأكد من السؤال عن الظروف التي كانت عليها مؤخرًا مع الأخذ في الاعتبار أنهم قد يبالغون في الرؤية لأنهم يريدون عملك. اطرح الكثير من الأسئلة المباشرة؛ أنت لا تريد أن تدفع أموالاً طائلة مقابل رحلة لمجرد أن تقابل بالمياه العكرة دون أي فرصة للتصوير الفوتوغرافي.
تزدهر العوالق بشكل موسمي، خاصة في المناطق المعتدلة (المياه الباردة)، مما قد يحول المياه إلى اللون الأخضر والعكر تمامًا تقريبًا. تتميز كل منطقة بمواسم مختلفة مع أفضل وأسوأ الظروف للعوالق. قبل التخطيط لرحلة، ابحث عن الوقت المفضل للغوص في العام.
A less predictable aspect of the water conditions is how much sediment is churned up by waves. If entering the ocean without a professional, be sure to check the surf forecast to see if large waves may hitting the area you plan to do underwater photography. Because waves often travel a long distance before hitting shore, surf forecasts can be pretty accurate several days in advance. You want to go in the ocean when the waves are smallest (preferably under 2 ft). Using a surf forecast can help you schedule a dive trip on the ideal day.
And I suppose now is the best time to say it: Never enter a body of water if there are unsafe conditions! Do plenty of research on the location and current conditions where you are planning to enter the water.
 DSC-RX100M4 @ 8.8mm, ISO 640, 1/200, f/7.1
أحد الجوانب الأقل قابلية للتنبؤ بظروف المياه هو مقدار الرواسب التي تحركها الأمواج. إذا دخلت المحيط بدون محترف، فتأكد من التحقق من توقعات الأمواج لمعرفة ما إذا كانت الأمواج الكبيرة قد تضرب المنطقة التي تخطط للقيام بالتصوير الفوتوغرافي تحت الماء. ونظرًا لأن الأمواج غالبًا ما تنتقل لمسافة طويلة قبل أن تصل إلى الشاطئ، فإن توقعات الأمواج يمكن أن تكون دقيقة جدًا قبل عدة أيام. تريد الذهاب إلى المحيط عندما تكون الأمواج أصغر (ويفضل أن تكون أقل من قدمين). يمكن أن يساعدك استخدام توقعات الأمواج في تحديد موعد لرحلة غوص في اليوم المثالي.
وأعتقد أن الآن هو أفضل وقت لقول ذلك: لا تدخل أبدًا إلى مسطح مائي إذا كانت هناك ظروف غير آمنة! قم بإجراء الكثير من الأبحاث حول الموقع والظروف الحالية التي تخطط لدخول المياه فيها.
8. Edit Your Underwater Images
Editing is a crucial part of underwater photography. Remember my first tip about reds and contrast being lost underwater? Underwater images require the right care to turn into good results. The curves adjustment in your editing software will be your best friend.
If you are planning to do a lot of underwater photography, it is definitely worth investing in editing software that allows you to process RAW files and that does a good job at color correction. A well-edited GoPro image will look much better than a poorly-edited shot from the best underwater setups.
The two most important steps in editing underwater photographs are correcting for the loss of reds and increasing contrast. Typically, a RAW or unedited JPEG is overly green/blue and flat.
Here are the steps I tend to follow:
- First removing the green by adjusting tint or the curves adjustment until the photo looks slightly too magenta.
- Next remove the blue using the white balance bar or curves adjustment (and this should correct for the extra magenta, too).
- Finally, use levels or curves to increase the reds, if needed. It is important to note that if the water removed all the red from the scene, adjusting the red levels will not have an effect.
- Do all other post-processing adjustments as usual.
Adjusting white balance, curves, and levels will increase contrast slightly as a side effect, but usually this is desirable as well. Pro tip: when a more dramatic contrast adjustment is needed, adjusting the white and black levels/curves can do a more effective job than a basic contrast slider.
Do be careful when editing, though! It is easy to go overboard with high contrast or overly saturated images.
 DSC-RX100M4 @ 8.8mm, ISO 200, 1/200, f/7.1
8. قم بتحرير صورك تحت الماء
يعد التحرير جزءًا مهمًا من التصوير الفوتوغرافي تحت الماء. هل تتذكر نصيحتي الأولى حول فقدان اللون الأحمر والتباين تحت الماء؟ تتطلب الصور تحت الماء الرعاية المناسبة لتتحول إلى نتائج جيدة. سيكون تعديل المنحنيات في برنامج التحرير هو أفضل صديق لك.
إذا كنت تخطط للقيام بالكثير من التصوير الفوتوغرافي تحت الماء، فمن المؤكد أنه من المفيد الاستثمار في برنامج التحرير الذي يسمح لك بمعالجة ملفات RAW والذي يقوم بعمل جيد في تصحيح الألوان. ستبدو صورة GoPro التي تم تحريرها جيدًا أفضل بكثير من اللقطة التي تم تحريرها بشكل سيئ من أفضل الإعدادات تحت الماء.
أهم خطوتين في تحرير الصور الفوتوغرافية تحت الماء هما تصحيح فقدان اللون الأحمر وزيادة التباين. عادةً ما يكون لون RAW أو JPEG غير المحرر أخضر/أزرق ومسطح بشكل مفرط.
فيما يلي الخطوات التي أميل إلى اتباعها:
قم أولاً بإزالة اللون الأخضر عن طريق ضبط الصبغة أو ضبط المنحنيات حتى تبدو الصورة أرجوانية قليلاً. بعد ذلك، قم بإزالة اللون الأزرق باستخدام شريط توازن اللون الأبيض أو تعديل المنحنيات (وهذا يجب أن يصحح اللون الأرجواني الزائد أيضًا). وأخيرًا، استخدم المستويات أو المنحنيات لزيادة الحمر إذا لزم الأمر. من المهم ملاحظة أنه إذا أزال الماء كل اللون الأحمر من المشهد، فلن يكون لضبط مستويات اللون الأحمر أي تأثير. قم بإجراء جميع التعديلات الأخرى بعد المعالجة كالمعتاد.
سيؤدي ضبط توازن اللون الأبيض والمنحنيات والمستويات إلى زيادة التباين قليلاً كأثر جانبي، ولكن عادةً ما يكون هذا أمرًا مرغوبًا فيه أيضًا. نصيحة احترافية: عندما تكون هناك حاجة إلى تعديل تباين أكثر دراماتيكية، فإن ضبط مستويات/منحنيات اللون الأبيض والأسود يمكن أن يؤدي مهمة أكثر فعالية من شريط تمرير التباين الأساسي.
كن حذرًا عند التحرير، رغم ذلك! من السهل المبالغة في استخدام الصور ذات التباين العالي أو الصور المشبعة بشكل مفرط.
9. Prevent Flooding
The word “flooding” – meaning that your underwater housing stops being water-tight – brings fear to the hearts of all underwater photographers. Most have had their experience with flooding in one way or another. It is as tragic as it is expensive. Luckily, there are a couple ways to reduce this risk.
First, always check your O-rings and seals. Before closing housing (or the battery compartment), be sure to examine the seals closely to make sure no sand, hairs, or damage is visible. It just takes a small disruption in the seal to allow water to gradually seep into the electronics. Do not take this step in a rush; do it calmly in a well lit area. Likewise, never open a seal or expose your O-ring on the beach or when your hands are wet.
Second, take care of your O-rings and seals. Neglect will lead to their degradation, which eventually ends up with a flooded camera. Maintain your O rings by applying O-ring grease after each use, and follow all maintenance directions by the manufacturer of the housing. Never bring your camera underwater if you have any suspicion your O-ring or seals are damaged.
Beware of the depth rating. Because water pressure increases with depth, you can only take your camera so deep. Be sure you know the depth rating and try not to push your luck while diving. A lot of GoPros and underwater cameras do not have a particularly deep depth rating without an extra housing.
Along those lines, get an extra housing even for GoPros and waterproof cameras. Although they do not require a housing to shoot underwater, a housing reduces the risk of flooding electronics to almost zero. You can also go deeper with an extra housing. It is well worth it, if just for the peace of mind.
 DSC-RX100M4 @ 9.6mm, ISO 160, 1/200, f/5.6
9. منع الفيضانات
كلمة “الفيضان” – والتي تعني أن مسكنك تحت الماء لن يكون محكمًا للماء – يجلب الخوف إلى قلوب جميع المصورين تحت الماء. معظمهم لديهم تجربتهم مع الفيضانات بطريقة أو بأخرى. إنها مأساوية بقدر ما هي باهظة الثمن. ولحسن الحظ، هناك طريقتان لتقليل هذا الخطر.
أولاً، تحقق دائمًا من الحلقات والأختام. قبل إغلاق الغطاء (أو حجرة البطارية)، تأكد من فحص السدادات عن كثب للتأكد من عدم ظهور رمل أو شعر أو تلف. لا يتطلب الأمر سوى حدوث اضطراب بسيط في الختم للسماح للماء بالتسرب تدريجيًا إلى الأجهزة الإلكترونية. لا تتخذ هذه الخطوة على عجل؛ افعل ذلك بهدوء في منطقة مضاءة جيدًا. وبالمثل، لا تفتح أبدًا أي ختم أو تعرض الحلقة الدائرية على الشاطئ أو عندما تكون يديك مبتلة.
ثانيًا، اعتني بالحلقات والأختام. سيؤدي الإهمال إلى تدهورها، والذي ينتهي في النهاية بكاميرا مغمورة بالمياه. حافظ على حلقات O الخاصة بك عن طريق وضع شحم الحلقة O بعد كل استخدام، واتبع جميع توجيهات الصيانة من قبل الشركة المصنعة للمبيت. لا تضع الكاميرا تحت الماء أبدًا إذا كان لديك أي شك في أن الحلقة الدائرية أو الأختام الخاصة بك تالفة.
احذر من تصنيف العمق. نظرًا لأن ضغط الماء يزداد مع العمق، فلا يمكنك حمل الكاميرا إلا إلى هذا العمق. تأكد من أنك تعرف تصنيف العمق وحاول ألا تضغط على حظك أثناء الغوص. لا تتمتع الكثير من كاميرات GoPros والكاميرات تحت الماء بتصنيف عمق عميق بشكل خاص بدون غطاء إضافي.
وعلى هذا المنوال، احصل على غطاء إضافي حتى لكاميرات GoPros والكاميرات المقاومة للماء. على الرغم من أنها لا تحتاج إلى مبيت للتصوير تحت الماء، إلا أن المبيت يقلل من خطر إغراق الإلكترونيات إلى الصفر تقريبًا. يمكنك أيضًا التعمق أكثر باستخدام مسكن إضافي. إنه يستحق ذلك، إذا كان فقط من أجل راحة البال.
10. Prevent Fogging
Fogging occurs when water condenses inside the glass of your underwater housing or camera lens, ruining photos. The worst part is, once it occurs, there is nothing you can do but wait.
Fogging is most likely to happen when humidity gets trapped within the seal. A large temperature difference between the air and water makes things worse. This is a common problem I see all the time in beginners with GoPros and waterproof cameras. Luckily, it is pretty easy to prevent this issue.
If you use an underwater housing, you can slip in a desiccant pack, which pretty effectively prevents fogging. Be sure to use a new or dehydrated desiccant, because they can become saturated and stop working. These can be found online – or, if you’re traveling and in a pinch, stuffing tampon fluff in the housing works too. Beware no fibers or packs get caught in the O-ring!
10. منع الضباب
يحدث الضباب عندما يتكثف الماء داخل زجاج الغطاء الموجود تحت الماء أو عدسة الكاميرا، مما يؤدي إلى إتلاف الصور. أسوأ ما في الأمر هو أنه بمجرد حدوث ذلك، لا يوجد شيء يمكنك فعله سوى الانتظار.
من المرجح أن يحدث الضباب عندما تحبس الرطوبة داخل الختم. الفرق الكبير في درجات الحرارة بين الهواء والماء يجعل الأمور أسوأ. هذه مشكلة شائعة أراها دائمًا لدى المبتدئين الذين يستخدمون كاميرات GoPros والكاميرات المقاومة للماء. ولحسن الحظ، من السهل جدًا منع هذه المشكلة.
إذا كنت تستخدم مبيتًا تحت الماء، فيمكنك وضعه في عبوة مجففة، مما يمنع تكون الضباب بشكل فعال. تأكد من استخدام مجفف جديد أو مجفف، لأنه يمكن أن يتشبع ويتوقف عن العمل. يمكن العثور عليها عبر الإنترنت – أو إذا كنت مسافرة وفي حالة حاجتك إلى ذلك، فإن حشو السدادة القطنية في المبيت يعمل أيضًا. احذر من أن تعلق أي ألياف أو عبوات في الحلقة O!
There is no space to insert a desiccant pack in GoPros or waterproof cameras unless you purchase an extra housing. One more argument to do so!
Still, there are ways to reduce the risk of fogging for naked GoPros and waterproof cameras. If possible, close housing (including battery/charging ports) in a dry, air-conditioned space. However, if you must change batteries where there is no AC, make sure your hands are completely dry, and no droplets fall within the seal. This limits the humidity in the camera. Do not leave the camera in the sun or allow it to heat up, as this increases the chance of fogging.
 DSC-RX100M4 + Sony 24-70mm F1.8-2.8 @ 8.8mm, ISO 800, 1/250, f/5.6
لا توجد مساحة لإدخال حزمة المجففة في كاميرات GoPros أو الكاميرات المقاومة للماء إلا إذا قمت بشراء غطاء إضافي. حجة أخرى للقيام بذلك!
ومع ذلك، هناك طرق لتقليل مخاطر الضباب على كاميرات GoPro العارية والكاميرات المقاومة للماء. إذا أمكن، قم بإغلاق المبيت (بما في ذلك منافذ البطارية/الشحن) في مكان جاف ومكيف. ومع ذلك، إذا كان عليك تغيير البطاريات في حالة عدم وجود مكيف هواء، فتأكد من جفاف يديك تمامًا، وعدم سقوط أي قطرات داخل الختم. هذا يحد من الرطوبة في الكاميرا. لا تترك الكاميرا تحت أشعة الشمس أو تتركها تسخن، لأن ذلك يزيد من احتمالية تكون الضباب.
Conclusion
I hope these tips make diving into underwater photography a smoother process for you than it was for me! Learning the quirks of underwater photography is an extremely rewarding process. If you’ve struggled with underwater photography in a way I forgot to mention, leave a comment below, and I’ll do my best to give you some tips to make your next venture go more smoothly.
 DSC-RX100M4 @ 8.8mm, ISO 320, 1/320, f/9.0
خاتمة
آمل أن تجعل هذه النصائح عملية الغوص في التصوير الفوتوغرافي تحت الماء عملية أكثر سلاسة بالنسبة لك مما كانت عليه بالنسبة لي! يعد تعلم مراوغات التصوير الفوتوغرافي تحت الماء عملية مجزية للغاية. إذا كنت تواجه صعوبة في التصوير الفوتوغرافي تحت الماء بطريقة نسيت أن أذكرها، فاترك تعليقًا أدناه، وسأبذل قصارى جهدي لإعطائك بعض النصائح لجعل مغامرتك التالية تسير بسلاسة أكبر.