How Was This Picture Made #02?
This is our second iteration of the “How was this picture taken?” series of articles and this time we have a fun picture to dissect – the Total Lunar Eclipse, a.k.a. the “Blood Moon”, which took place on the 27th of September. I had the chance to photograph the Blood Moon along with a few other Colorado Fall Color workshop participants last week, so after I put together the image below, I thought it would be fun to ask our readers about this one to see if they can figure out exactly how the below image was captured

Here are the questions to answer this time:
- What equipment was used to capture the Moon phases and did it matter?
- What was the focal length?
- Specifically how was the Blood Moon captured and at what camera settings?
- How was the foreground captured and when?
- Is this a composite image or is it possible to capture the moon in a single shot like above?
- What post-processing steps were used to yield the above result?
I am sure those who have tried photographing the moon will most likely be able to answer most of the above questions, but let’s see if anyone can figure it all out!
كيف تم صنع هذه الصورة رقم 02؟
هذا هو التكرار الثاني لسؤال “كيف تم التقاط هذه الصورة؟” سلسلة من المقالات وهذه المرة لدينا صورة ممتعة لتشريحها – خسوف القمر الكلي، المعروف أيضًا باسم “القمر الدموي”، والذي حدث في 27 سبتمبر. لقد أتيحت لي الفرصة لتصوير القمر الدموي مع عدد قليل من المشاركين الآخرين في ورشة عمل ألوان خريف كولورادو في الأسبوع الماضي، لذلك بعد أن قمت بتجميع الصورة أدناه، اعتقدت أنه سيكون من الممتع أن نسأل القراء عن هذه الصورة لمعرفة ما إذا كان بإمكانهم معرفة ذلك بالضبط كيف تم التقاط الصورة أدناه
فيما يلي الأسئلة التي يجب الإجابة عليها هذه المرة: ما هي المعدات التي تم استخدامها لالتقاط مراحل القمر وهل لها أهمية؟ ما هو البعد البؤري؟ وكيف تم التقاط القمر الدموي على وجه التحديد وبأي إعدادات الكاميرا؟ كيف تم التقاط المقدمة ومتى؟ هل هذه صورة مركبة أم أنه من الممكن التقاط القمر في لقطة واحدة كما هو مذكور أعلاه؟ ما هي خطوات ما بعد المعالجة التي تم استخدامها للحصول على النتيجة المذكورة أعلاه؟
أنا متأكد من أن أولئك الذين حاولوا تصوير القمر سيكونون على الأرجح قادرين على الإجابة على معظم الأسئلة المذكورة أعلاه، ولكن دعونا نرى ما إذا كان أي شخص يمكنه اكتشاف ذلك كله!
How Was This Picture Made #02: The Answer
The second “How was this picture taken?” series article turned out to be a bit controversial, because some people either did not like the photo, or did not like some things about it. Some complained about the moon appearing unrealistic, with its darker side being darker than the sky (and they were right, as pointed out below), others did not like how the moon arced in the way I made it appear in the image. One of the readers even said “this shot is to astrophotography what a stuffed owl on a branch would be to wildlife photography”. I totally understand and sympathize with such views, because we want to see a realistic world in images. However, when it comes to moon photography, things can get quite difficult when trying to be realistic. First of all, unless you photograph just the moon by itself without any foreground elements, it is quite difficult to yield a good-looking and realistic image. The moon by itself is a small object when viewed from our planet, which means that if one wants to photograph the moon up close and include foreground elements so that they both appear realistic in terms of sizes and proportions, the only option is to use a telephoto lens above 200mm. And in such cases, one would have to time the shot and take pictures at moonrise, while the moon is still very close to the horizon.
كيف تم صنع هذه الصورة #02: الجواب
والثاني “كيف تم التقاط هذه الصورة؟” تبين أن مقالة المسلسل مثيرة للجدل بعض الشيء، لأن بعض الأشخاص إما لم تعجبهم الصورة، أو لم يعجبهم بعض الأشياء المتعلقة بها. اشتكى البعض من ظهور القمر بشكل غير واقعي، حيث أن جانبه المظلم أغمق من السماء (وكانوا على حق، كما هو موضح أدناه)، ولم يعجب البعض الآخر كيف قوس القمر بالطريقة التي جعلته يظهر بها في الصورة. حتى أن أحد القراء قال “هذه اللقطة هي للتصوير الفلكي مثل البومة المحشوة على فرع لتصوير الحياة البرية”. إنني أتفهم تماما مثل هذه الآراء وأتعاطف معها، لأننا نريد أن نرى عالما واقعيا في الصور. ومع ذلك، عندما يتعلق الأمر بالتصوير الفوتوغرافي للقمر، يمكن أن تصبح الأمور صعبة للغاية عند محاولة أن تكون واقعيًا. أولاً، ما لم تقم بتصوير القمر بمفرده دون أي عناصر أمامية، فمن الصعب جدًا الحصول على صورة واقعية وحسنة المظهر. يعد القمر في حد ذاته جسمًا صغيرًا عند رؤيته من كوكبنا، مما يعني أنه إذا أراد المرء تصوير القمر عن قرب وتضمين العناصر الأمامية بحيث يبدو كلاهما واقعيًا من حيث الأحجام والنسب، فإن الخيار الوحيد هو استخدام عدسة تليفوتوغرافي فوق 200 ملم. وفي مثل هذه الحالات، يتعين على المرء ضبط وقت اللقطة والتقاط الصور عند شروق القمر، بينما لا يزال القمر قريبًا جدًا من الأفق.
Sounds relatively easy, except it is really not. Unless the moon happens to rise at the horizon during the day, while sun rays are still illuminating the foreground, you run into a rather big problem – differences in exposure between the moon and the foreground. The darker the foreground, the more the moon will overexpose. If you expose for the moon, the foreground will be dark. That could be a good option for a silhouette shot, but what if you want to show the foreground? While one can certainly attempt to capture a well-lit foreground (cityscape or a brightly lit object) with the rising moon, planning for such events requires quite a bit of preparation and even then, it might be difficult to get both the moon and the foreground looking good in a single image. The easier solution usually involves taking two shots, with one exposing for the foreground and one exposing for the moon. Then the two can be blended together, provided that the conditions are right and the sky is completely clear. If haze or a light layer of clouds are present, the moon will create a pretty nasty “glow” around it and it will be quite difficult to blend the two images together.
Take a look at the below images, which were capturing using this particular technique:
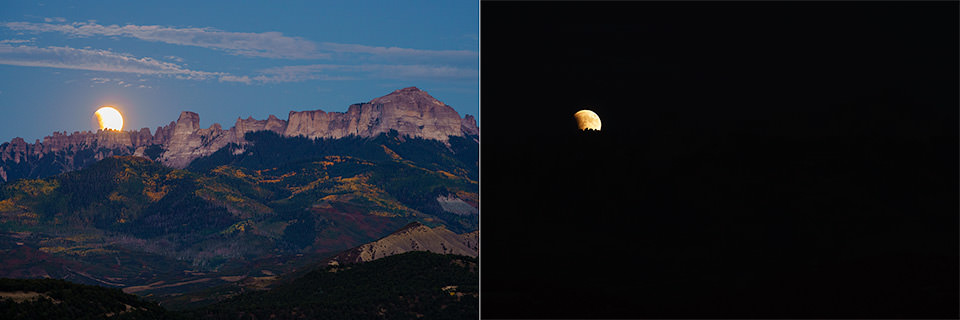
As you can see, there is a pretty drastic difference between the foreground and the moon in terms of exposure. Looking at EXIF data, I can see that the foreground was exposed at 0.6 seconds, while the moon was exposed at 1/60th of a second! That’s a five stop difference between the two shots. And what’s worse, at a mere 200mm of focal length, the moon moves so fast that before I adjusted my exposure and fired the second shot, it had already moved quite a bit. The longer the focal length, the faster the moon will move relative to the foreground elements. So blending such shots in Photoshop can be tricky.
يبدو الأمر سهلاً نسبيًا، إلا أنه في الواقع ليس كذلك. ما لم يصادف أن يرتفع القمر في الأفق أثناء النهار، بينما لا تزال أشعة الشمس تضيء المقدمة، فإنك ستواجه مشكلة كبيرة إلى حد ما – الاختلافات في التعرض بين القمر والمقدمة. كلما كانت المقدمة أكثر قتامة، كلما زاد تعريض القمر للضوء. إذا قمت بالتعريض للقمر، فستكون المقدمة مظلمة. يمكن أن يكون هذا خيارًا جيدًا للقطة ظلية، ولكن ماذا لو كنت تريد إظهار المقدمة؟ في حين يمكن للمرء بالتأكيد محاولة التقاط مقدمة مضاءة جيدًا (منظر المدينة أو جسم مضاء بشكل ساطع) مع ظهور القمر، فإن التخطيط لمثل هذه الأحداث يتطلب قدرًا كبيرًا من التحضير، وحتى في ذلك الوقت، قد يكون من الصعب الحصول على القمر والصورة معًا. المقدمة تبدو جيدة في صورة واحدة. عادةً ما يتضمن الحل الأسهل التقاط لقطتين، إحداهما تعرض للمقدمة والأخرى للقمر. ومن ثم يمكن مزج الاثنين معًا بشرط أن تكون الظروف مناسبة والسماء صافية تمامًا. في حالة وجود ضباب أو طبقة خفيفة من السحب، سيخلق القمر “توهجًا” سيئًا للغاية حوله وسيكون من الصعب جدًا مزج الصورتين معًا.
ألقِ نظرة على الصور أدناه، والتي تم التقاطها باستخدام هذه التقنية المحددة:

كما ترون، هناك فرق كبير جدًا بين المقدمة والقمر من حيث التعريض. بالنظر إلى بيانات EXIF، أستطيع أن أرى أن المقدمة تم تعريضها في 0.6 ثانية، بينما تم تعريض القمر في 1/60 من الثانية! وهذا فرق خمس نقاط بين اللقطتين. والأسوأ من ذلك، عند طول بؤري يبلغ 200 مم فقط، يتحرك القمر بسرعة كبيرة لدرجة أنه قبل أن أضبط التعريض الضوئي وأطلق اللقطة الثانية، كان قد تحرك بالفعل قليلاً. كلما زاد البعد البؤري، زادت سرعة تحرك القمر بالنسبة إلى العناصر الأمامية. لذا فإن مزج مثل هذه اللقطات في Photoshop قد يكون أمرًا صعبًا.
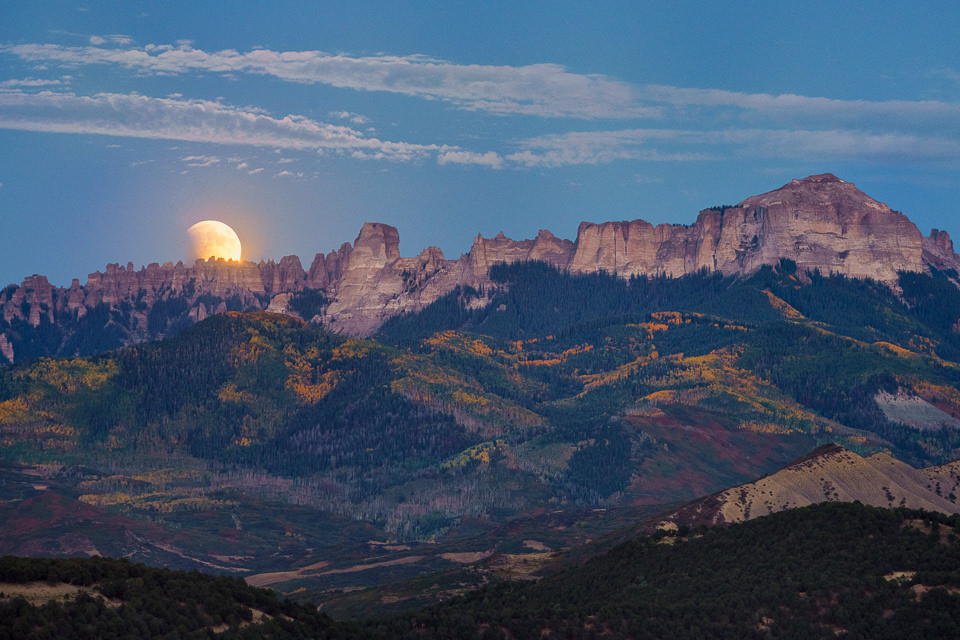
Here is my attempt to quickly blend the two to demonstrate this:
 ILCE-7RM2 + FE 70-200mm F4 G OSS @ 200mm, ISO 800, 6/10, f/8.0
I brightened up the image a little, but you can clearly see what I am talking about – the glow from the moon is there and it would take quite a bit of time to clean up in post. For cleaner and quicker result, it would have been easier to capture the foreground way before the moon shows up, then capture the moon separately and copy-paste it into the scene… wait, did I say “copy-paste”?
That’s right! That’s what most of us photographers end up doing anyway. The moon is so hard to capture in a single shot with the foreground, that it is always easier to expose for the moon separately, and then copy-paste it into a separate scene. But the big question remains – how do we make the foreground objects appear realistic relative to the size of the moon? If you capture the moon at say 400mm, the foreground would have to be shot at a similar focal length as well, or at least have the “feel” that it was photographed from far away. That means any wide-angle shot would be pretty much out of question, as the size of the moon would appear unrealistically huge!
But that’s what you see in most images of the moon anyway…that’s right – most images you see of the moon with all the crater details and a beautiful foreground scene are actually fake, with the moon pasted into the scene. The fact is, it is not like we have a lot of interesting foregrounds that we can photograph at 200mm and longer focal lengths, which will remain relevant while the moon moves up from the horizon. It all happens too fast and planning for such shots is extremely difficult, since you have to know exactly where the moon will show up. Once the moon moves a bit above the horizon, it gets even more difficult to photograph, because you will be losing most of the foreground. At long telephoto focal lengths, the angle of view is too narrow and too limiting to incorporate grand vistas. Unless you are willing to shoot a sequence of shots to later stitch them to a panorama…
إليكم محاولتي لمزج الاثنين بسرعة لإثبات ذلك:
ILCE-7RM2 + FE 70-200 مم F4 G OSS @ 200 مم، ISO 800، 6/10، f/8.0
لقد قمت بإضفاء السطوع على الصورة قليلاً، ولكن يمكنك أن ترى بوضوح ما أتحدث عنه – وهج القمر موجود وسيستغرق الأمر وقتًا طويلاً للتنظيف بعد ذلك. للحصول على نتيجة أوضح وأسرع، كان من الأسهل التقاط طريقة المقدمة قبل ظهور القمر، ثم التقاط القمر بشكل منفصل ونسخه ولصقه في المشهد… انتظر، هل قلت “نسخ ولصق”؟
صحيح! هذا ما يفعله معظم المصورين في نهاية المطاف على أي حال. من الصعب جدًا التقاط القمر في لقطة واحدة بالمقدمة، بحيث يكون من الأسهل دائمًا تعريضه للقمر بشكل منفصل، ثم نسخه ولصقه في مشهد منفصل. لكن يبقى السؤال الكبير: كيف نجعل الأجسام الأمامية تبدو واقعية بالنسبة لحجم القمر؟ إذا قمت بالتقاط القمر على بعد 400 ملم على سبيل المثال، فيجب تصوير المقدمة بطول بؤري مماثل أيضًا، أو على الأقل “الإحساس” بأنه تم تصويره من مسافة بعيدة. وهذا يعني أن أي لقطة بزاوية واسعة ستكون غير واردة إلى حد كبير، لأن حجم القمر سيبدو ضخمًا بشكل غير واقعي!
ولكن هذا ما تراه في معظم صور القمر على أي حال… هذا صحيح – معظم الصور التي تراها للقمر بكل تفاصيل الحفرة ومشهد المقدمة الجميل هي في الواقع مزيفة، حيث تم لصق القمر في المشهد. الحقيقة هي أنه ليس لدينا الكثير من المقدمات المثيرة للاهتمام التي يمكننا تصويرها بأطوال بؤرية 200 ملم وأطول، والتي ستظل ذات صلة بينما يتحرك القمر للأعلى من الأفق. يحدث كل ذلك بسرعة كبيرة والتخطيط لمثل هذه اللقطات أمر صعب للغاية، حيث يتعين عليك أن تعرف بالضبط أين سيظهر القمر. بمجرد أن يتحرك القمر قليلاً فوق الأفق، يصبح التصوير أكثر صعوبة، لأنك ستفقد معظم المقدمة. في الأطوال البؤرية المقربة الطويلة، تكون زاوية الرؤية ضيقة جدًا ومحدودة للغاية بحيث لا يمكنها دمج الآفاق الكبرى. إلا إذا كنت على استعداد لتصوير سلسلة من اللقطات لدمجها لاحقًا في صورة بانورامية…
Table of Contents
جدول المحتويات
الصورة المركبة لخسوف القمر الكلي، قوس القمر، مشكلات المزج، صورة 4K – المجال العام
Total Lunar Eclipse Composite Image
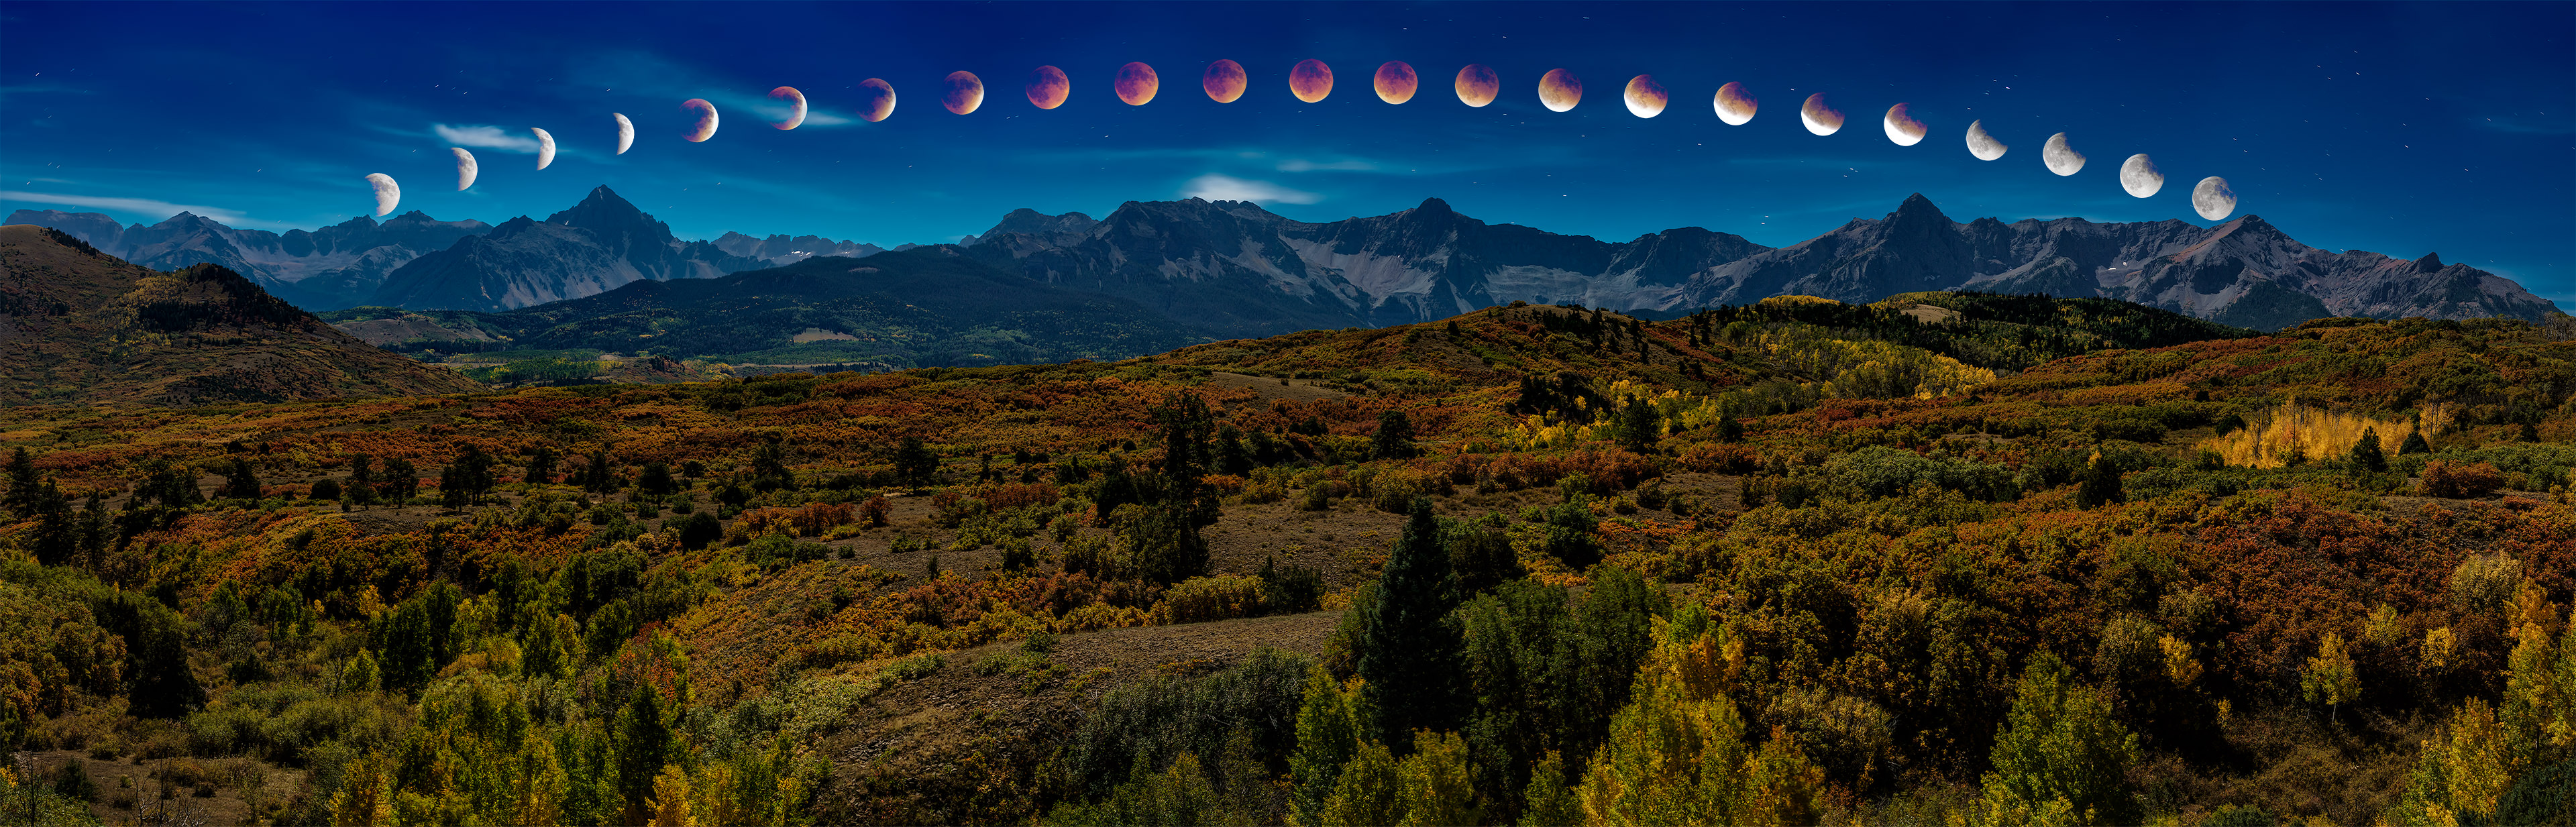
You can see that I have been leading you to the image in question, the below composite of the moon phases that I captured during the total lunar eclipse of 2015:
Anyone who has done moon photography before, would know that the shot is a composite, with the moon copy-pasted into the scene. As I have pointed out above, capturing such a scene at night with both the moon and the foreground captured at the same focal length would be quite difficult. So the only way to make such an image is by photographing the moon separately, then photographing the foreground and blending the two together. And that’s exactly what I did here. I photographed the moon phases at 200mm with the Sony FE 70-200mm f/4 lens on the Sony A7R II. Determining when to switch from the bright side to the dark side and vice-versa was surely a challenge. Initially, just to be safe, I hopped back and forth. As stated in my article on how to photograph a lunar eclipse, the difference in exposure between the bright and the dark side can be up to 8 full stops, which is insane! You will surely be pushing the limits of your camera system at such exposures. During the period of totality, I was pushing ISO 3200 just to be able to keep my shutter speed fast enough not to introduce motion blur. And if I shot with a longer lens, it would have been even more challenging.
After the show was over, I went to a completely different spot to photograph the foreground. Since the moon was full, photographing the moonlit foreground was quite easy. Remember, the moon is just a reflection of the sun, so you get the same reflected sunrays hitting the scene – even the white balance is the same! Once I got my focusing figured out (which wasn’t easy, since it was pretty dark), I set the focal length to 70mm on the same lens, switched to vertical orientation and then took 10 shots from left to right with some overlap between each shot, as described in my panoramic photography guide. The resulting exposure was 30 seconds at f/5.6, ISO 800. It took a while to take all the images. During the capture there was a little bit of wind – if you look at the tips of the trees on the bottom, they appear blurry for that reason.
From there, it was all post-processing. I stitched the images using Lightroom’s built-in Photo Merge to Panorama feature. The resulting image had over 25,000 pixels horizontally and the amount of details was pretty impressive. The background was a bit too hazy though, so once the stitching was done, I had to add contrast to some areas of the scene. From there, I took the image to Photoshop and started the process of copy-pasting the moon phases into the shot (each moon phase was cropped earlier). To be able to properly align and arc the moon, I created a custom oval shape, as shown below:
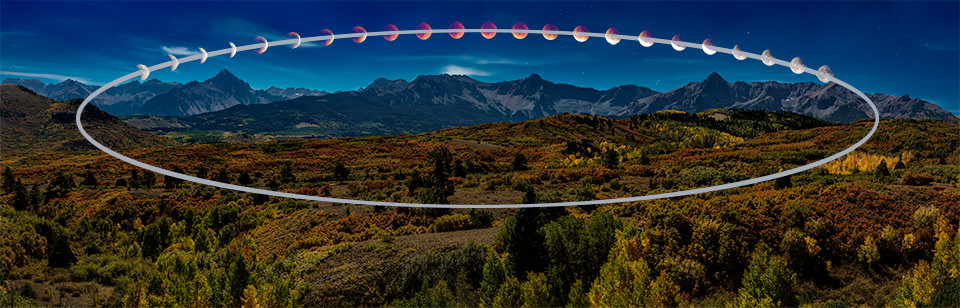
Once my visual guide was there, it was just a matter of moving the moon phases and spacing them out. For this sequence, I ended up using a total of 23 moon images.
صورة مركبة لخسوف القمر الكلي
يمكنك أن ترى أنني كنت أقودك إلى الصورة المعنية، وهي الصورة المركبة أدناه لمراحل القمر التي التقطتها خلال خسوف القمر الكلي لعام 2015:

أي شخص قام بتصوير القمر من قبل، سيعرف أن اللقطة مركبة، مع لصق نسخة القمر في المشهد. كما أشرت أعلاه، فإن التقاط مثل هذا المشهد ليلاً مع التقاط القمر والمقدمة بنفس البعد البؤري سيكون أمرًا صعبًا للغاية. لذا فإن الطريقة الوحيدة للحصول على مثل هذه الصورة هي تصوير القمر بشكل منفصل، ثم تصوير المقدمة ومزج الاثنين معًا. وهذا بالضبط ما فعلته هنا. لقد قمت بتصوير مراحل القمر بمقاس 200 مم باستخدام عدسة Sony FE مقاس 70-200 مم f/4 على كاميرا Sony A7R II. كان تحديد موعد التحول من الجانب المشرق إلى الجانب المظلم والعكس تحديًا بالتأكيد. في البداية، فقط لكي أكون آمنًا، كنت أتنقل ذهابًا وإيابًا. كما ورد في مقالتي حول كيفية تصوير خسوف القمر، فإن الفرق في التعريض بين الجانب المشرق والجانب المظلم يمكن أن يصل إلى 8 توقفات كاملة، وهو أمر جنوني! من المؤكد أنك ستتجاوز حدود نظام الكاميرا الخاص بك عند مثل هذه التعريضات. خلال الفترة الكلية، كنت أضغط على ISO 3200 فقط لأتمكن من الحفاظ على سرعة الغالق سريعة بما يكفي لعدم ظهور ضبابية الحركة. ولو قمت بالتصوير باستخدام عدسة أطول، لكان الأمر أكثر صعوبة.
بعد انتهاء العرض، ذهبت إلى مكان مختلف تمامًا لتصوير المقدمة. نظرًا لأن القمر كان بدرًا، كان تصوير المقدمة تحت ضوء القمر أمرًا سهلاً للغاية. تذكر أن القمر هو مجرد انعكاس للشمس، لذلك تحصل على نفس أشعة الشمس المنعكسة التي تصل إلى المشهد – حتى توازن اللون الأبيض هو نفسه! بمجرد أن اكتشفت التركيز (وهو أمر لم يكن سهلاً، حيث كان الجو مظلمًا جدًا)، قمت بتعيين البعد البؤري على 70 مم على نفس العدسة، وانتقلت إلى الاتجاه الرأسي ثم التقطت 10 لقطات من اليسار إلى اليمين مع بعض التداخل بينهما. كل لقطة، كما هو موضح في دليل التصوير البانورامي الخاص بي. كان التعرض الناتج 30 ثانية عند f/5.6، ISO 800. استغرق التقاط جميع الصور بعض الوقت. أثناء الالتقاط، كان هناك القليل من الرياح – إذا نظرت إلى أطراف الأشجار في الأسفل، فإنها تبدو ضبابية لهذا السبب.
ومن هناك، كان كل شيء في مرحلة ما بعد المعالجة. لقد قمت بخياطة الصور باستخدام ميزة Photo Merge to Panorama المدمجة في Lightroom. تحتوي الصورة الناتجة على أكثر من 25000 بكسل أفقيًا وكانت كمية التفاصيل مثيرة للإعجاب للغاية. كانت الخلفية ضبابية بعض الشيء، لذا بمجرد الانتهاء من الخياطة، كان علي إضافة تباين إلى بعض مناطق المشهد. ومن هناك، أخذت الصورة إلى برنامج Photoshop وبدأت عملية نسخ ولصق مراحل القمر في اللقطة (تم قص كل مرحلة من مراحل القمر مسبقًا). لكي أتمكن من محاذاة القمر وتقوسه بشكل صحيح، قمت بإنشاء شكل بيضاوي مخصص، كما هو موضح أدناه:

بمجرد وصول دليلي البصري إلى هناك، كان الأمر يتعلق فقط بتحريك مراحل القمر وتباعدها. بالنسبة لهذا التسلسل، انتهى بي الأمر باستخدام إجمالي 23 صورة للقمر.
To those who were concerned about the arcing of the moon – yes, I am well aware of the fact that the arc is fake and unrealistic. It was never done to look realistic anyway, so it is just an artistic choice. If this angers or annoys you, I am sorry, but you and I both know that it would be impossible to create a realistic arc in this particular scene. If you look closely, you can clearly see the shadows of the trees, indicating that the moon was at a pretty high position. If I wanted to show a natural arc of the moon, the foreground would have looked minuscule in comparison, which is exactly what I did not want to do. And come on, aligning a total lunar eclipse (the next one is happening in 2033!) with a scene to create a natural arc from the beginning all the way to the end of the lunar phase, with a nice-looking foreground would be near impossible, wouldn’t you agree? Where I was, the moon went up quite a bit, so I don’t know what type of a foreground would even work for such a shot…
قوس القمر
إلى أولئك الذين كانوا قلقين بشأن قوس القمر – نعم، أنا أدرك جيدًا حقيقة أن القوس مزيف وغير واقعي. لم يتم صنعه أبدًا ليبدو واقعيًا على أي حال، لذا فهو مجرد خيار فني. إذا كان هذا يغضبك أو يضايقك، أنا آسف، لكن أنا وأنت نعلم أنه سيكون من المستحيل إنشاء قوس واقعي في هذا المشهد بالذات. إذا نظرت عن كثب، يمكنك رؤية ظلال الأشجار بوضوح، مما يشير إلى أن القمر كان في موقع مرتفع جدًا. إذا أردت إظهار قوس طبيعي للقمر، لكانت المقدمة تبدو صغيرة جدًا بالمقارنة، وهو بالضبط ما لم أرغب في فعله. وهيا، قم بمحاذاة خسوف القمر الكلي (سيحدث الخسوف التالي في عام 2033!) مع مشهد لإنشاء قوس طبيعي من البداية وحتى نهاية المرحلة القمرية، مع مقدمة جميلة المظهر ستكون قريبة مستحيل، ألا توافقين؟ حيث كنت، ارتفع القمر قليلاً، لذلك لا أعرف ما هو نوع المقدمة الذي قد يناسب مثل هذه اللقطة…